
Accept payments in your VTEX store in seconds!
Requirements
All you need to configure the integration is:
- In order to use Wompi as a payment method, you must be registered in one of the plans we offer. If you are not registered yet, create an account on Wompi and a commercial advisor will contact you to assist you in the process and provide you with the necessary credentials for the integration of Wompi in your VTEX store.
Installation
To install Wompi on your store, log in the VTEX platform.
Installation of Wompi - PSE and Wompi - Nequi
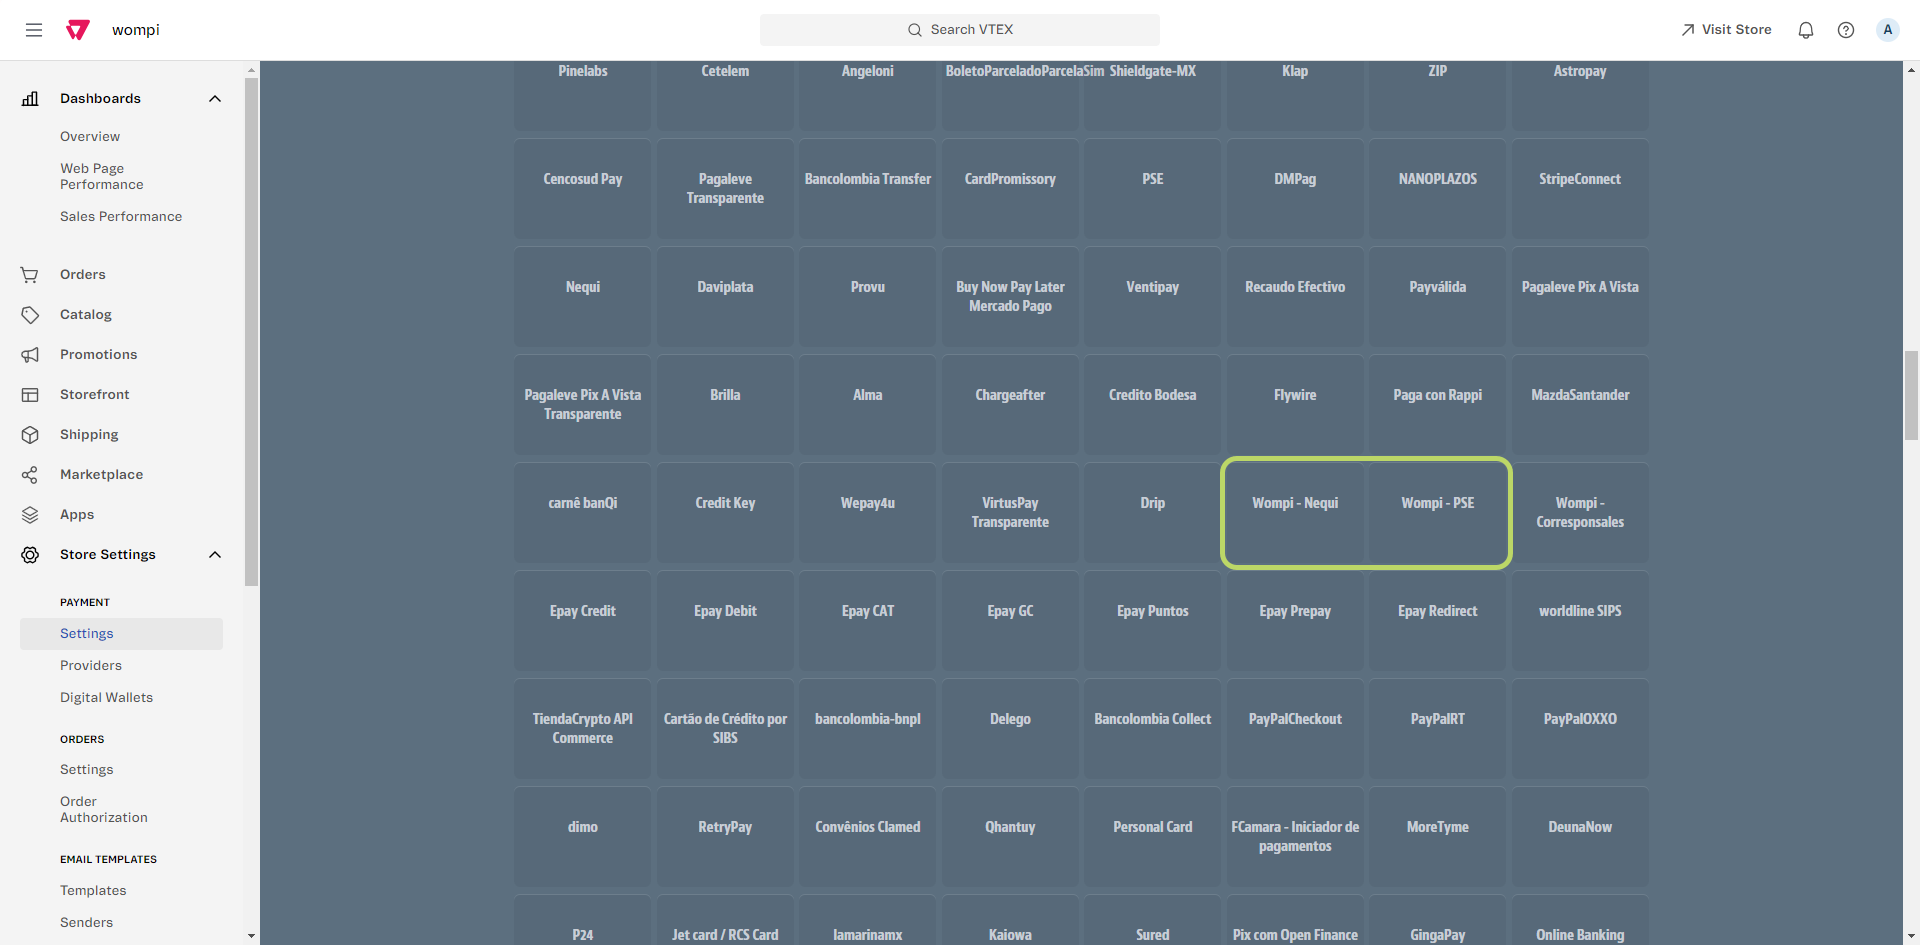
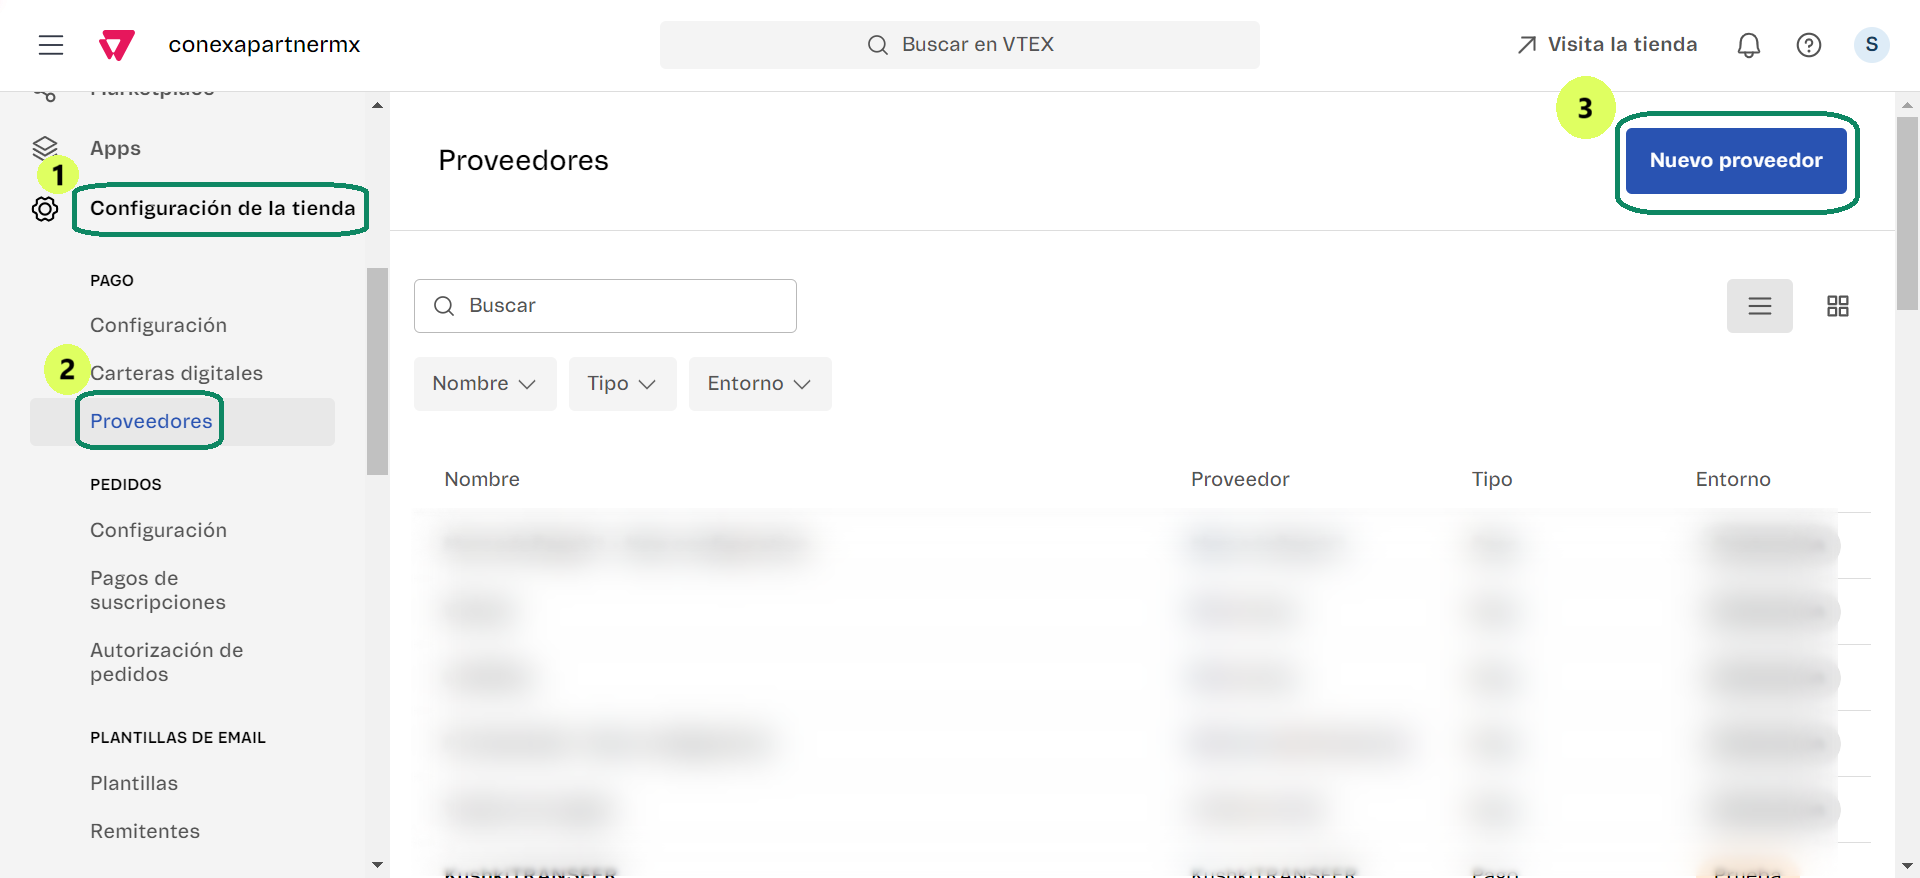
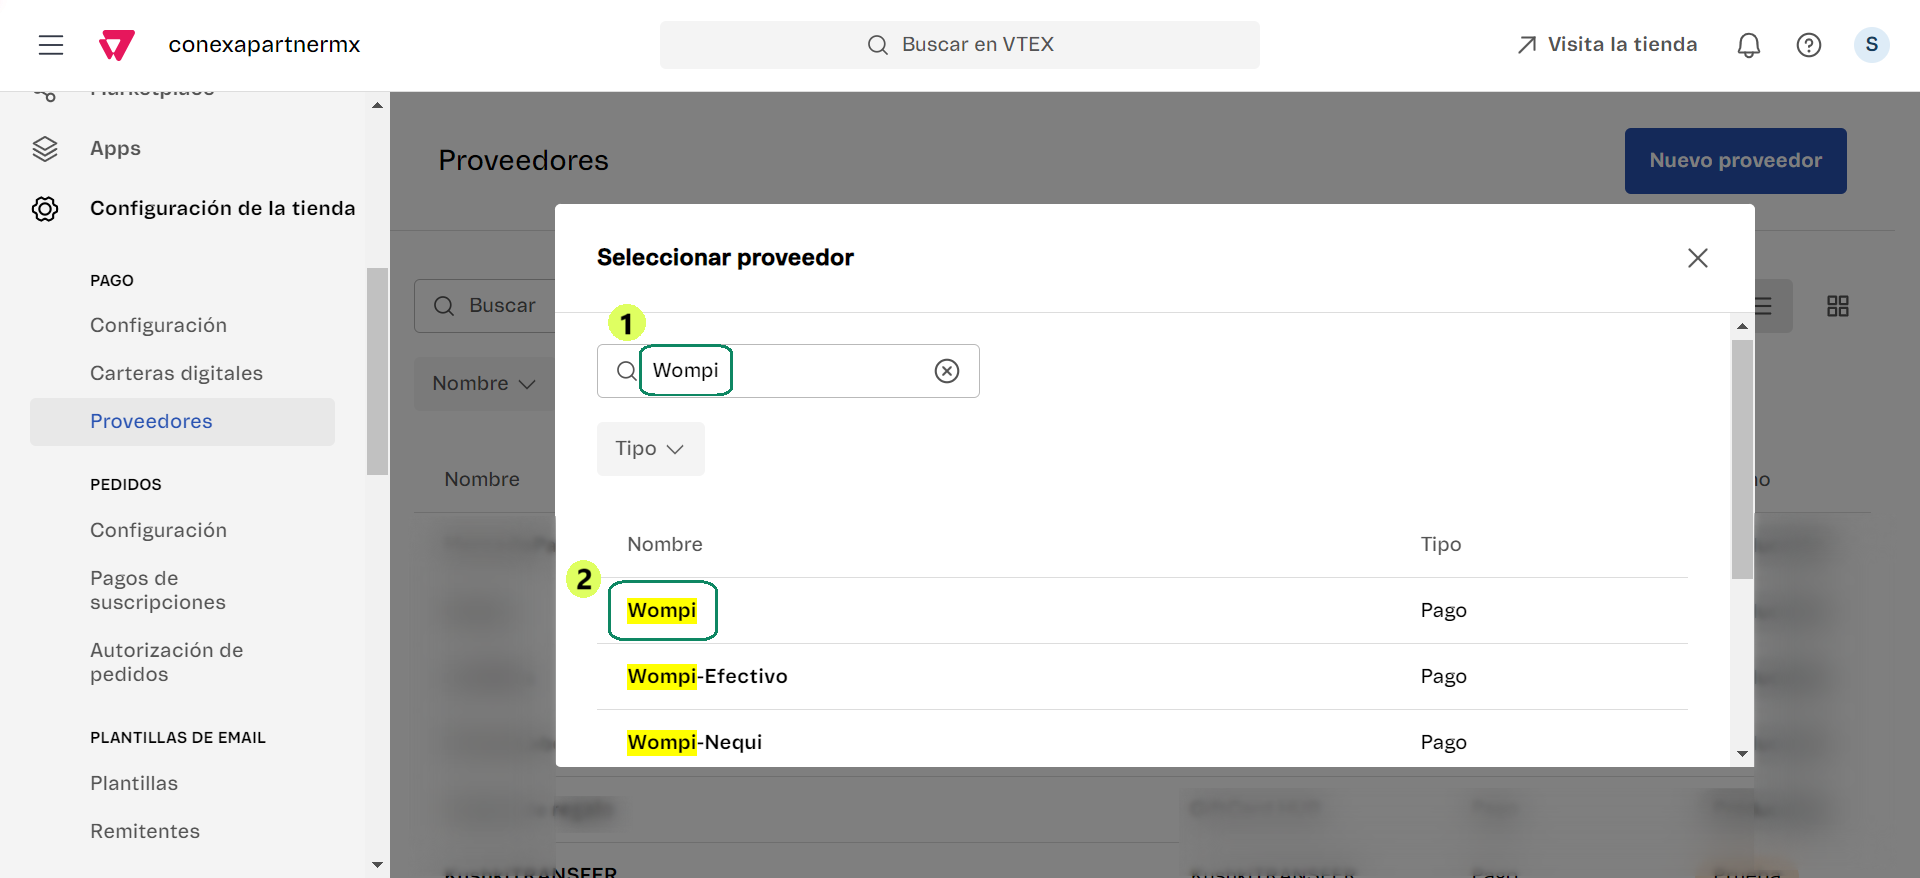
Go to Store Setting -> Payment -> Providers.
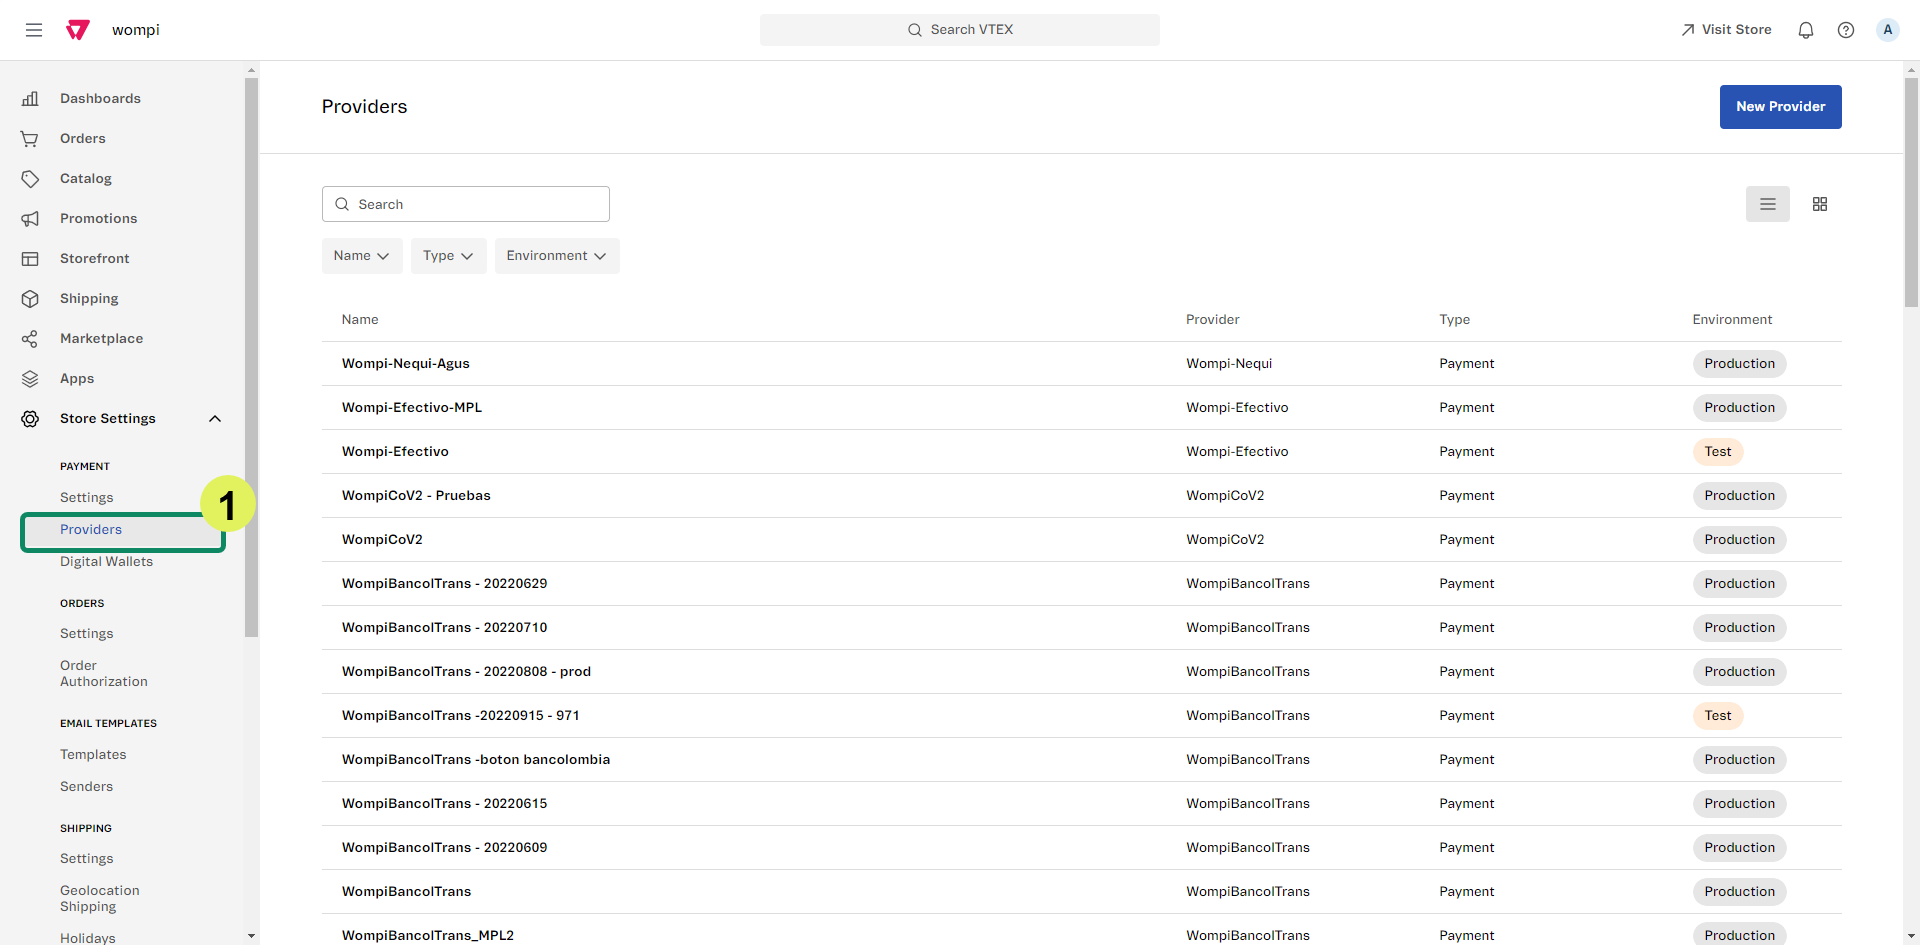
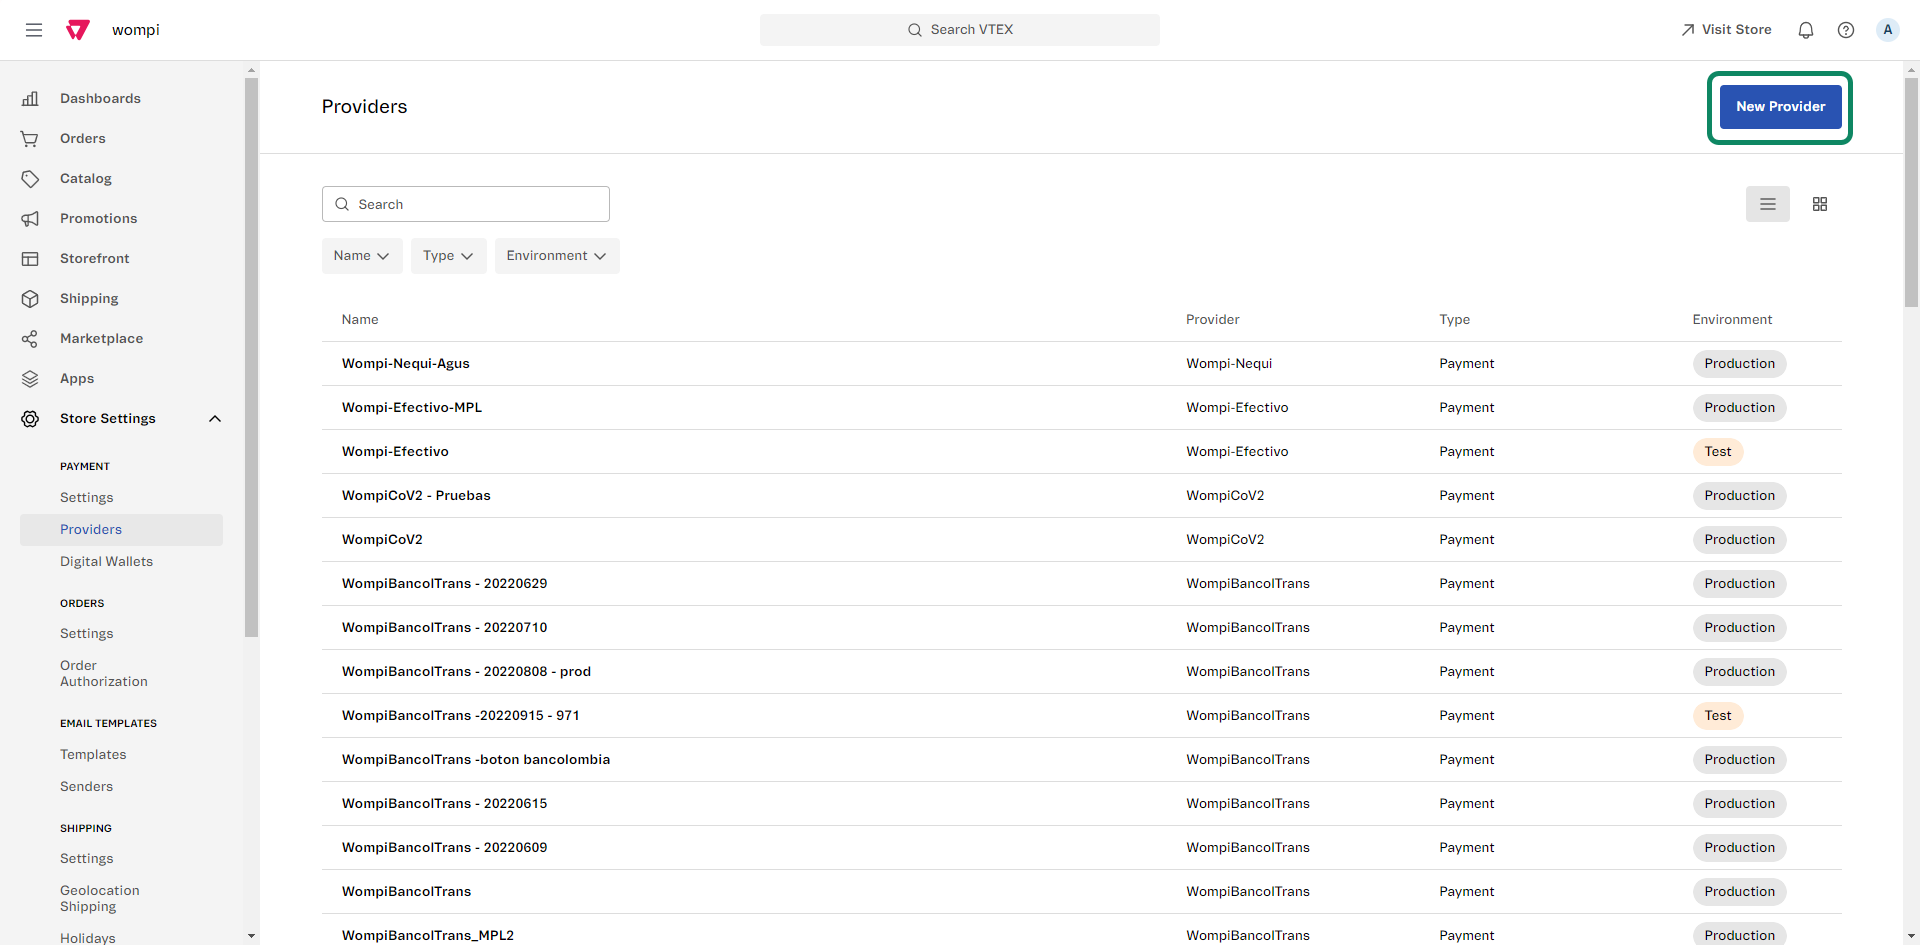
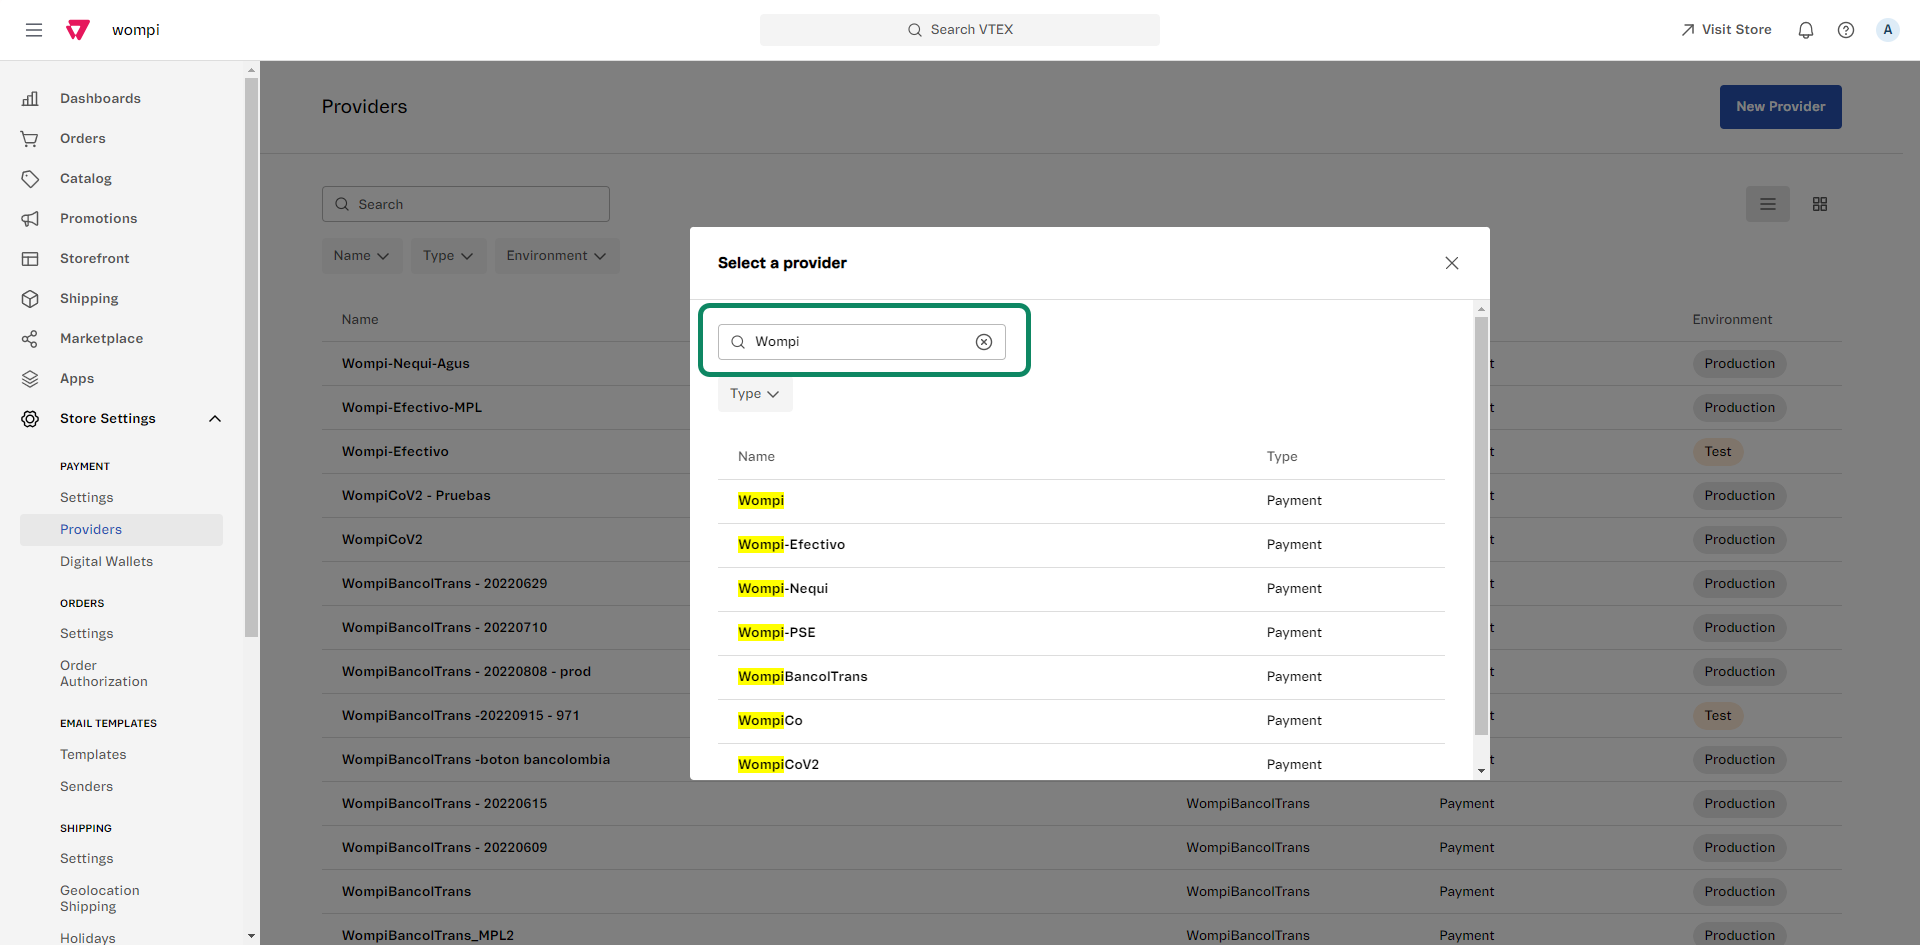
Next, click on the New provider button, search for Wompi in the list and click on the payment option you wish to configure to continue the process.
Note: with Wompi you must configure two (2) affiliations in your VTEX store: Wompi - PSE and Wompi - Nequi, that is, you must repeat the process described below for each one. The two (2) affiliations will have the test mode and production mode to configure in your VTEX store.
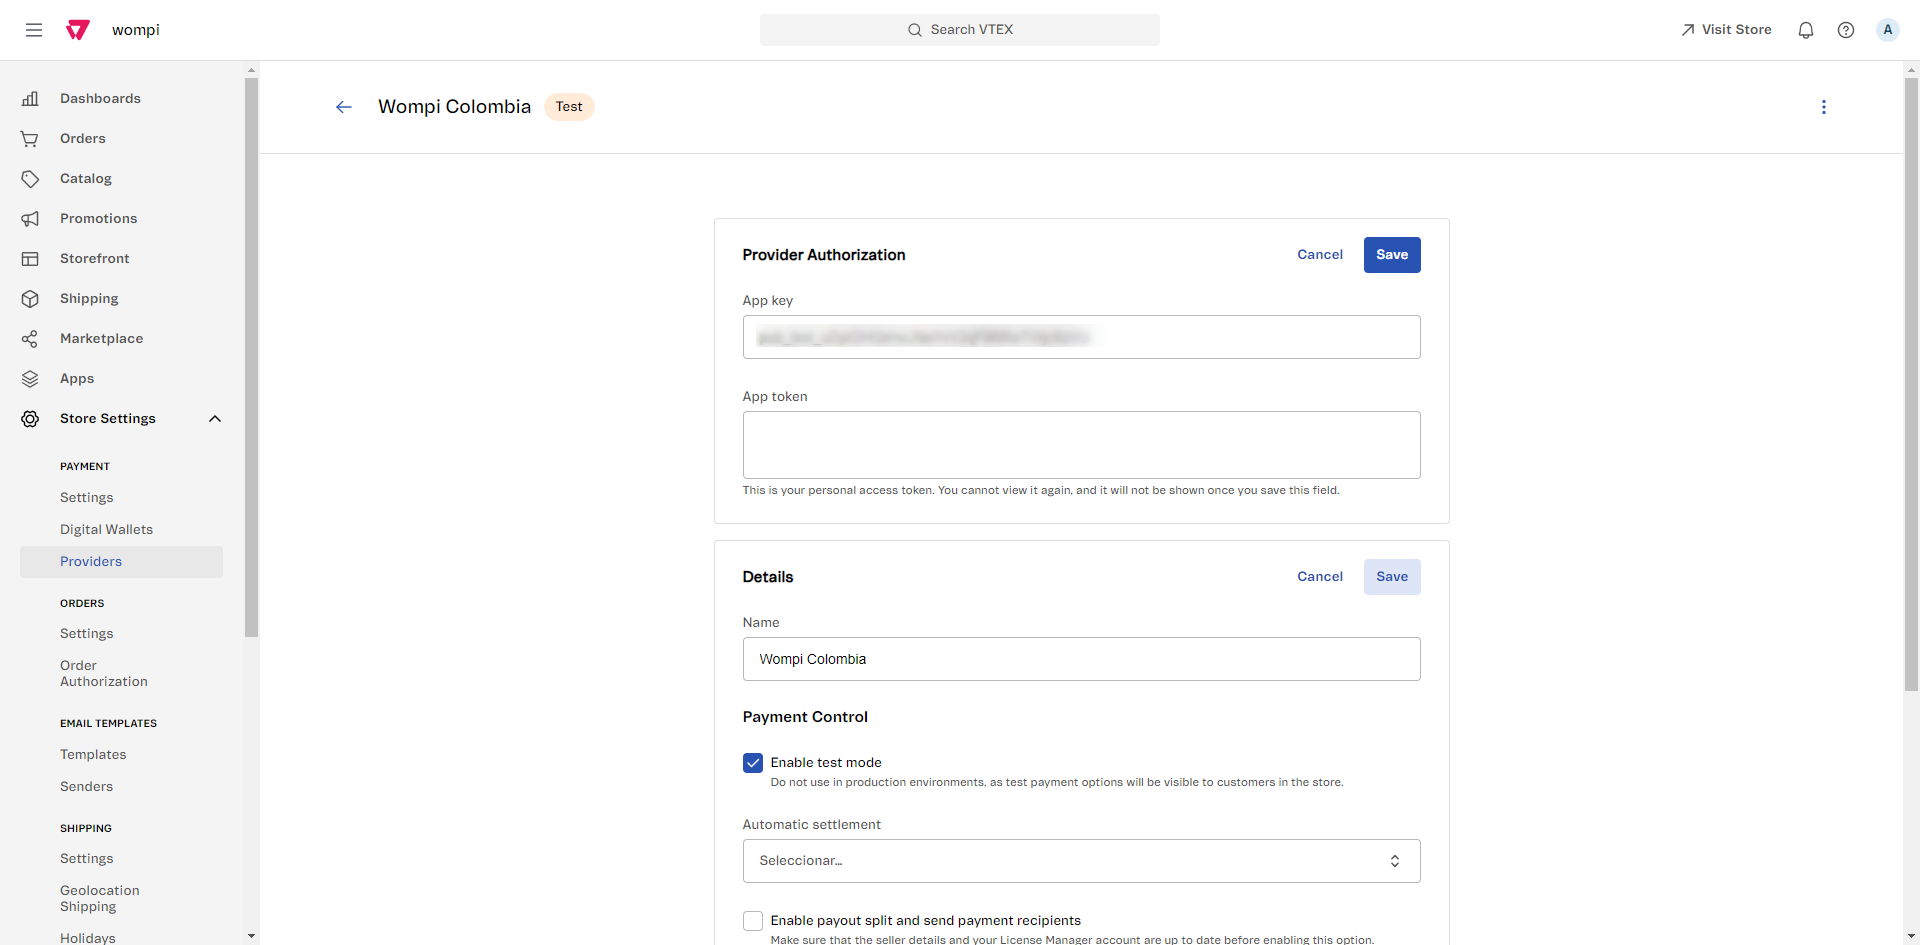
You will then see the following screen where the credentials required for the integration are requested. Remember that, to perform the integration, you must have the Wompi credentials.
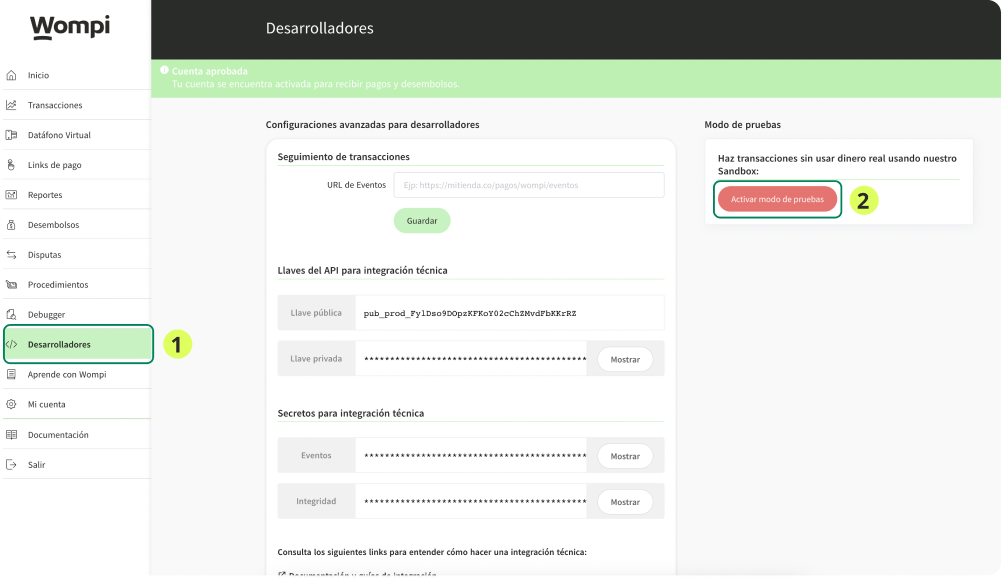
Here's how to find them: First, you must log in to the Wompi commerce dashboard, then go to the Developers section in the menu on the left and take the public and private keys in both the production and test environment. Here we leave you extra support with the step-by-step instructions on how to use the integration keys.
How to integrate Wompi? Integration keys

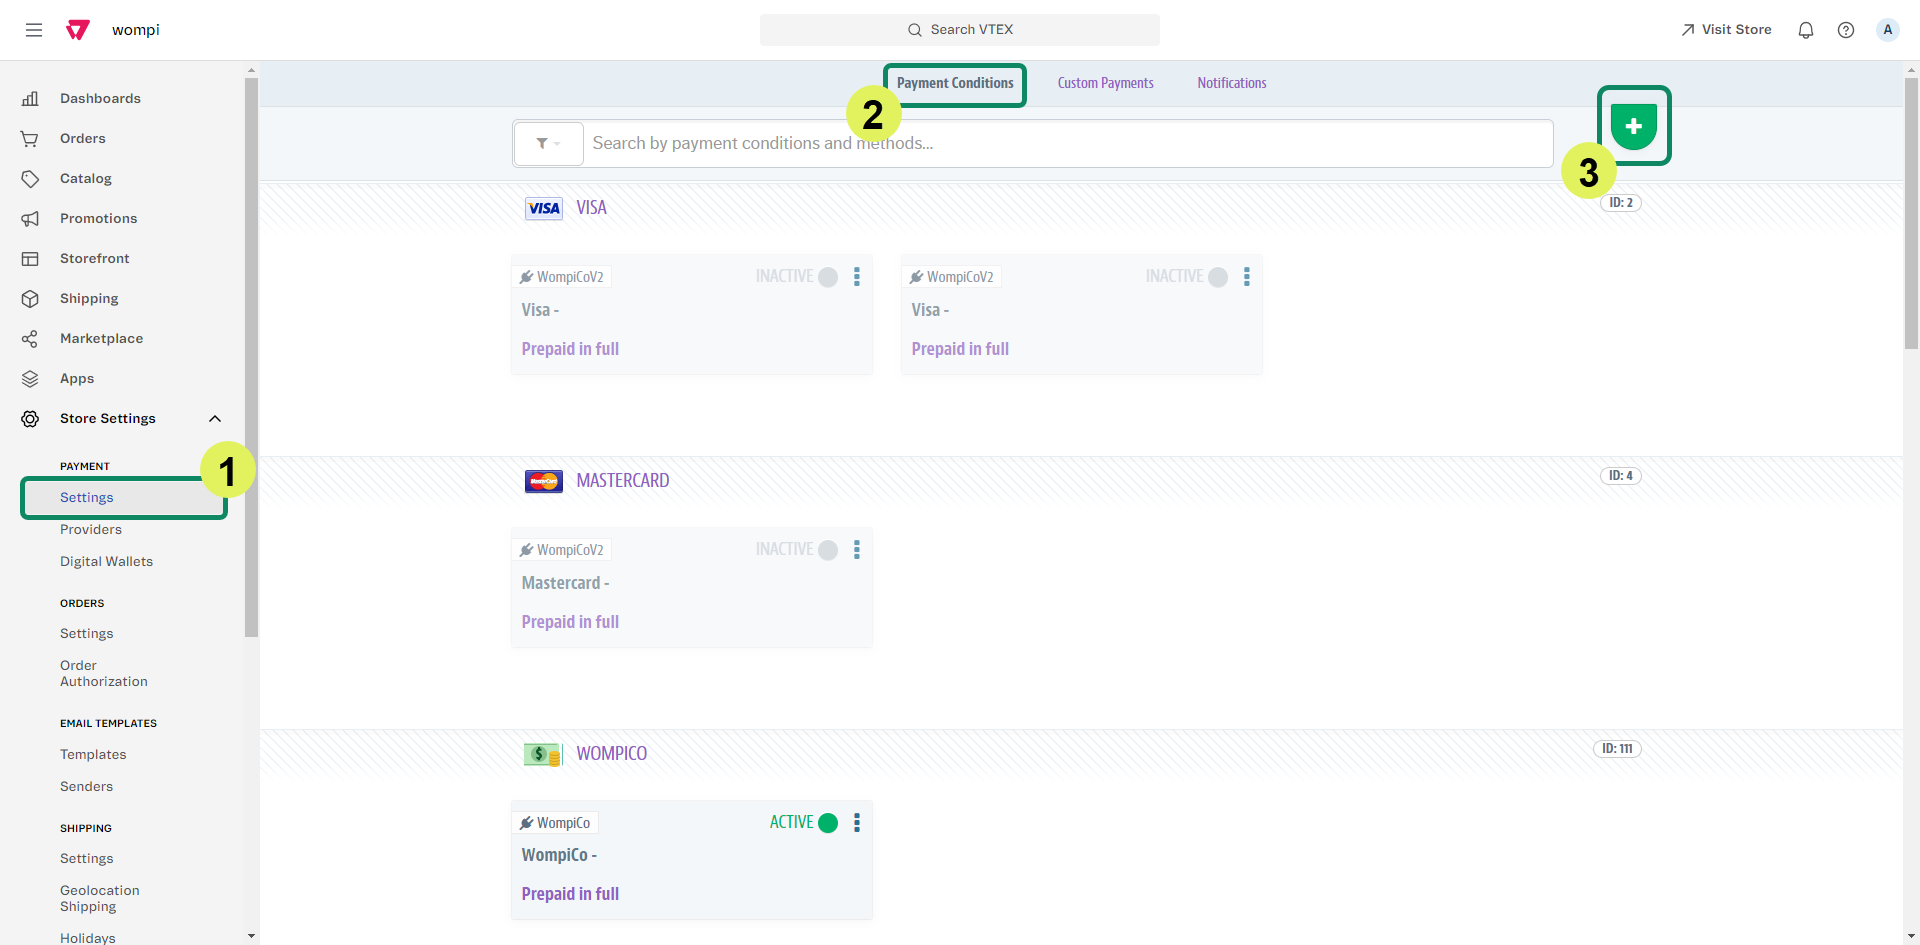
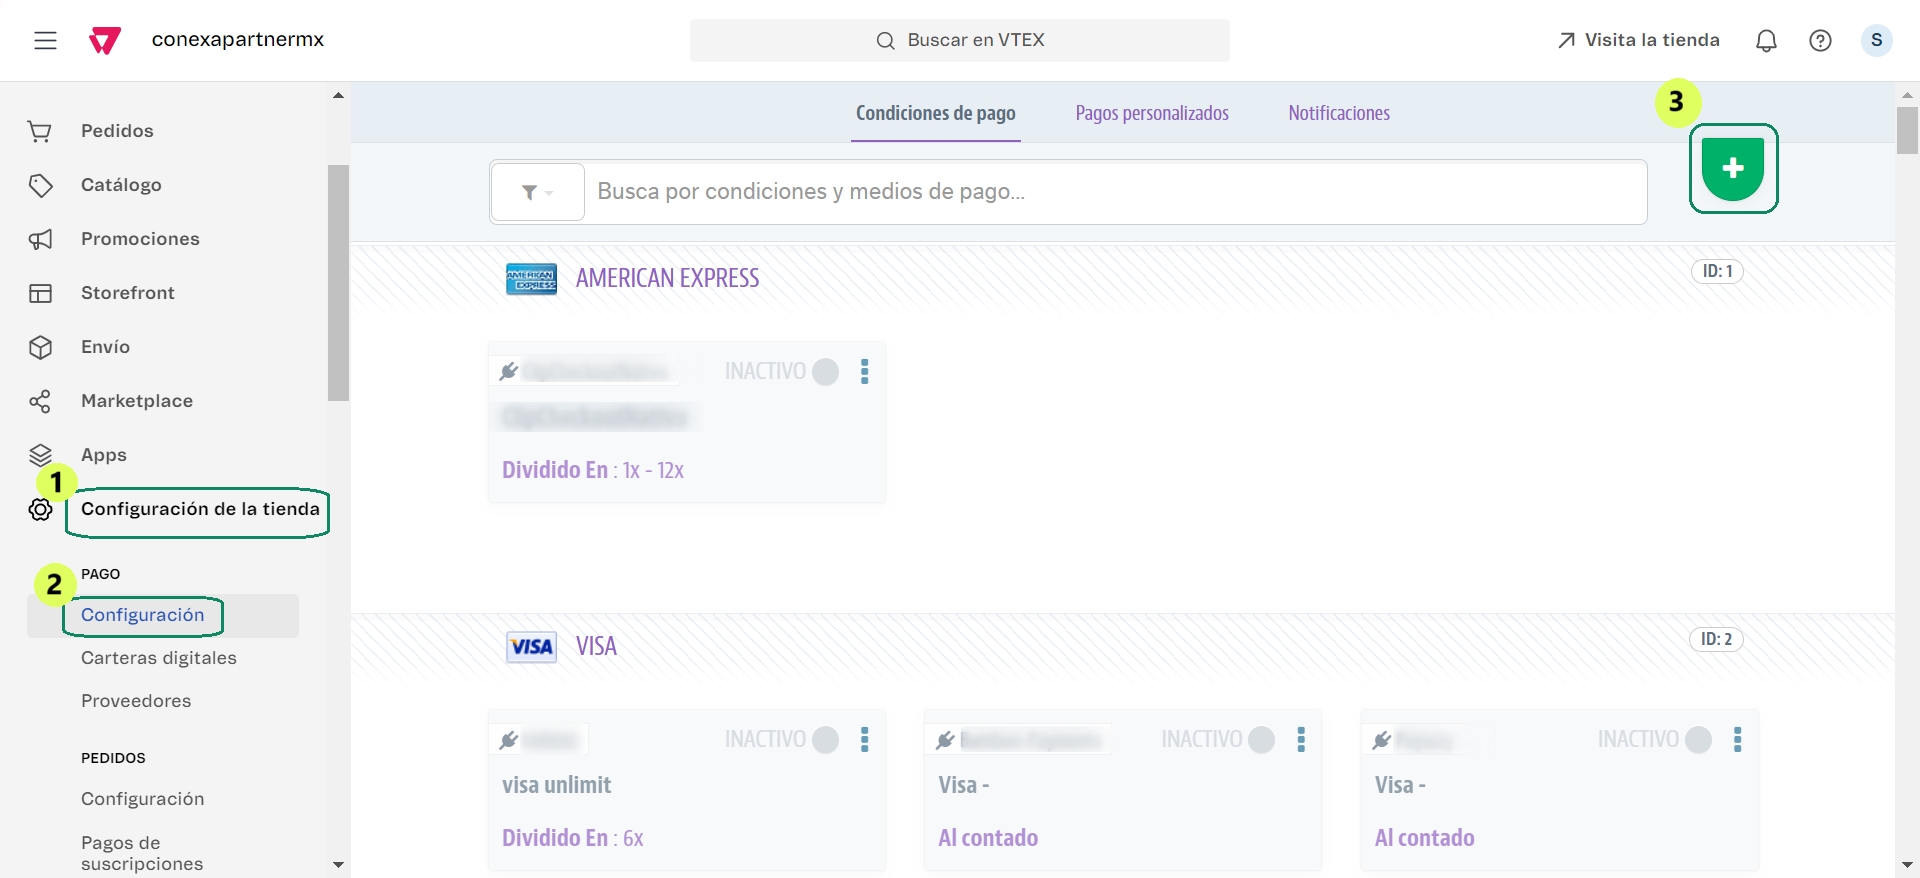
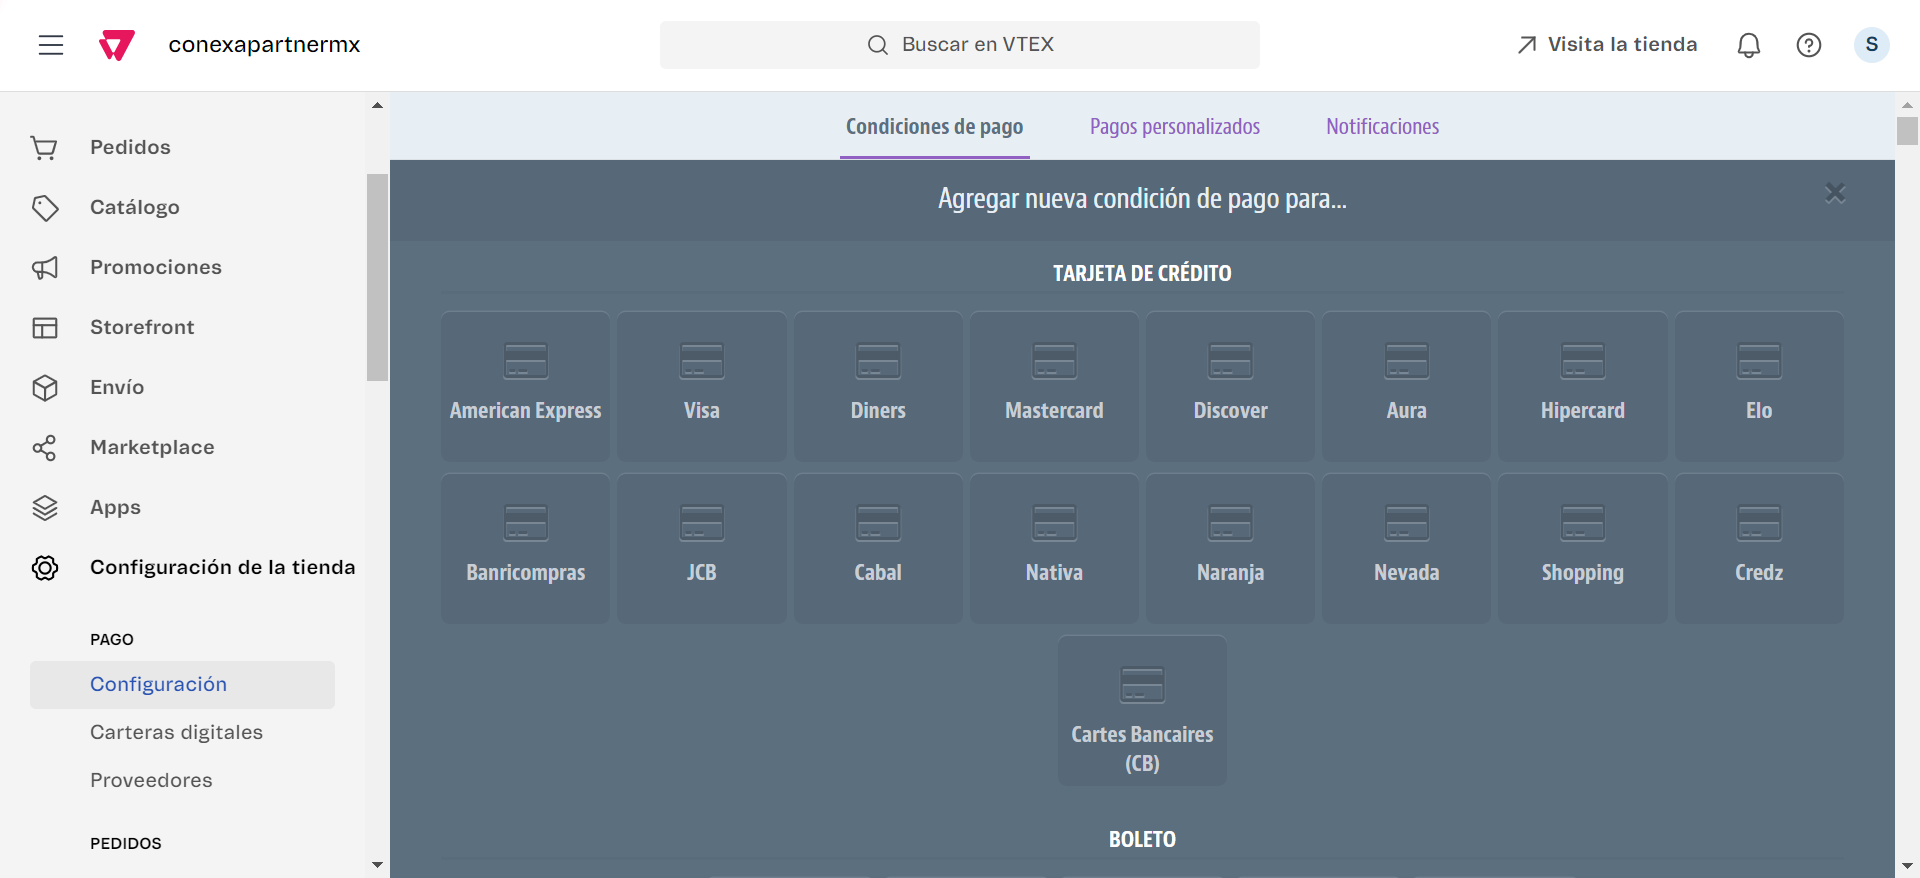
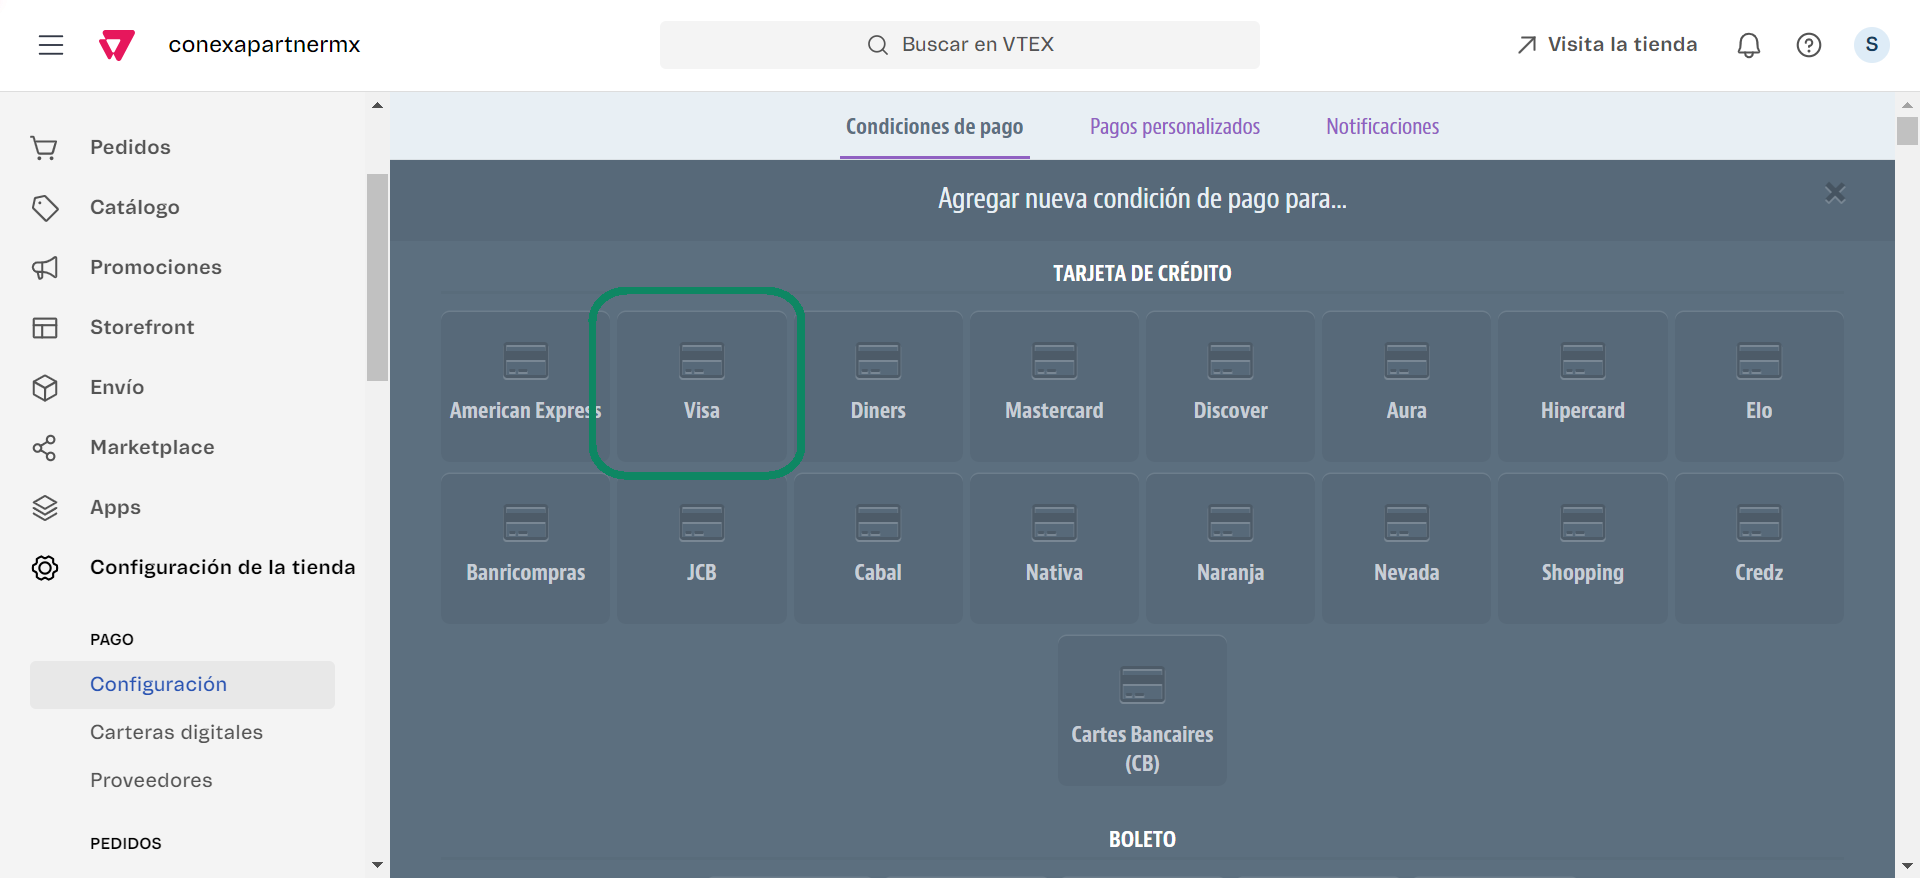
Next, you will need to set up payment terms for Wompi. Go to Store Settings -> Payment -> Settings, locate the Payment Conditions tab and press the + icon. Locate the Wompi option, activate the condition and click the Save button to finish the setup.
Note: in the payment conditions section, for the case of PSE, search for the payment condition called PSE and then select from the drop-down list the specific Wompi - PSE connector that was previously created and configured.
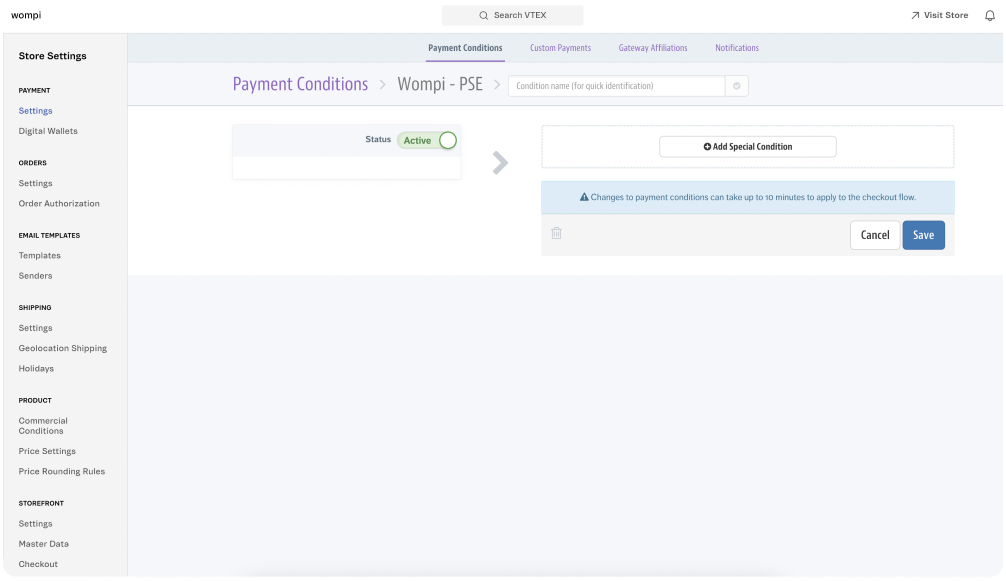
Note: Changes to payment conditions may take up to 10 minutes to be applied at checkout in your VTEX store.
Installation of connector for Bancolombia Button and Cash in Correspondents
- Go to Store Settings -> Payment -> Providers section.
- Next, click on the New provider button, search for Wompi in the list and click on the payment option you wish to configure to continue the process.
- You will then see the following screen where the credentials necessary for the integration are requested. Remember that, to carry out the integration, you must have the Wompi credentials.
Here's how to find them: First, you must log in to the Wompi commerce dashboard, then go to the Developers section in the menu on the left and take the public and private keys in both the production and test environment.
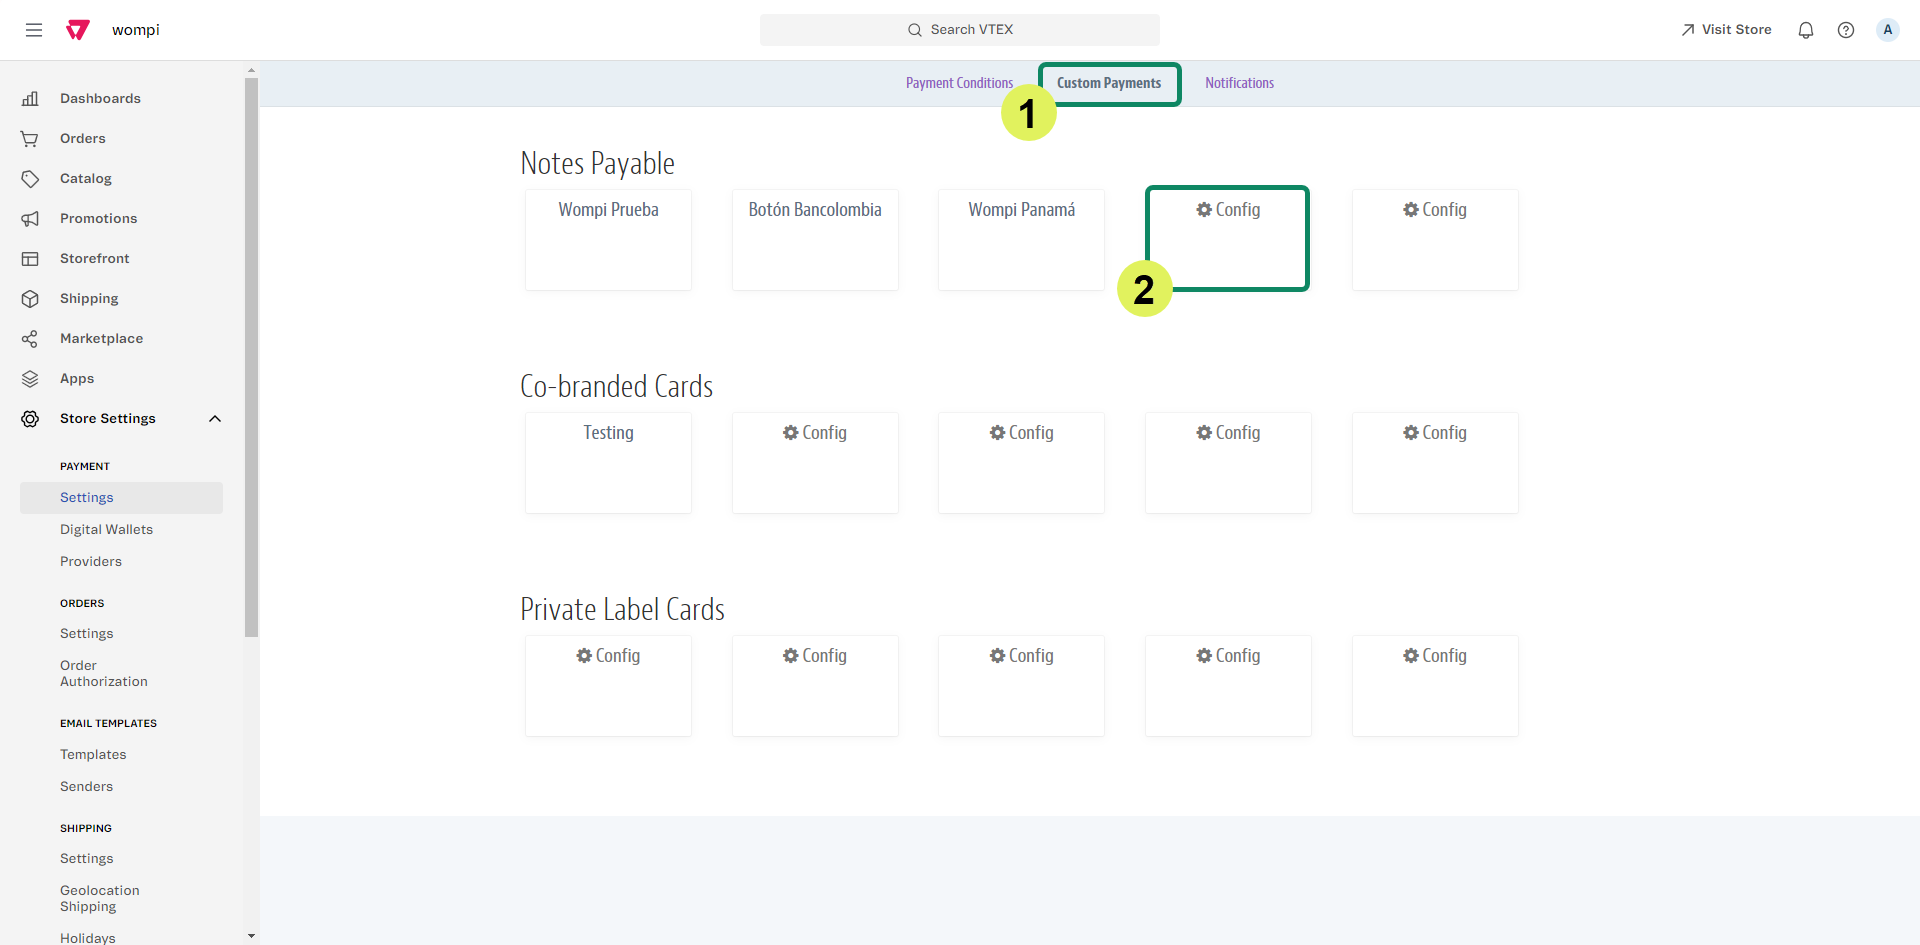
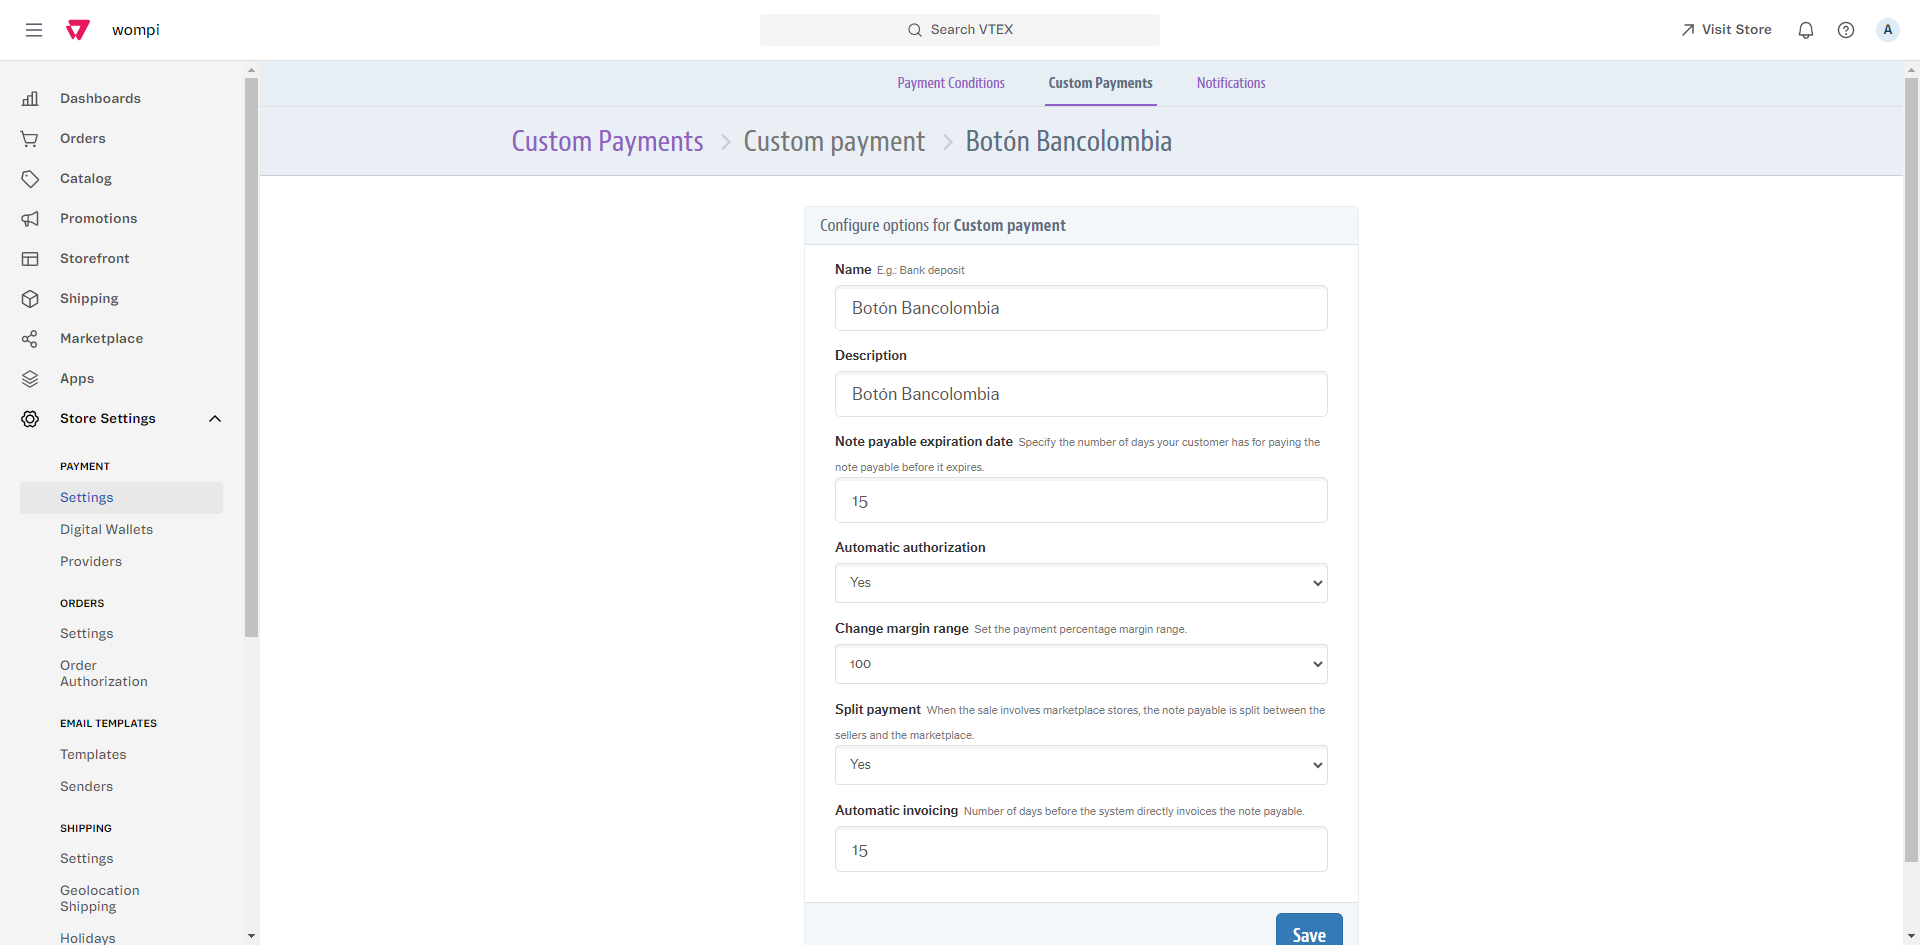
- Next, you will have to go to the Custom Payments tab, click on Configure, name it Botón Bancolombia or Efectivo en Corresponsales and then click on the Save button.
Note: It is important to name your custom payment Botón Bancolombia or Efectivo en Corresponsales. Providing a different name would not guarantee efficient transaction management and the experience would be affected for both users and customers.
- Next, you will need to configure the payment condition for Bancolombia Button. Go to the Payment Conditions tab and press the + icon. Locate and click on the Botón Bancolombia or Efectivo en Corresponsales option that you created as a custom payment, select the Wompi connector that you configured in the previous steps, activate the condition and click on the Save button to finish the configuration.
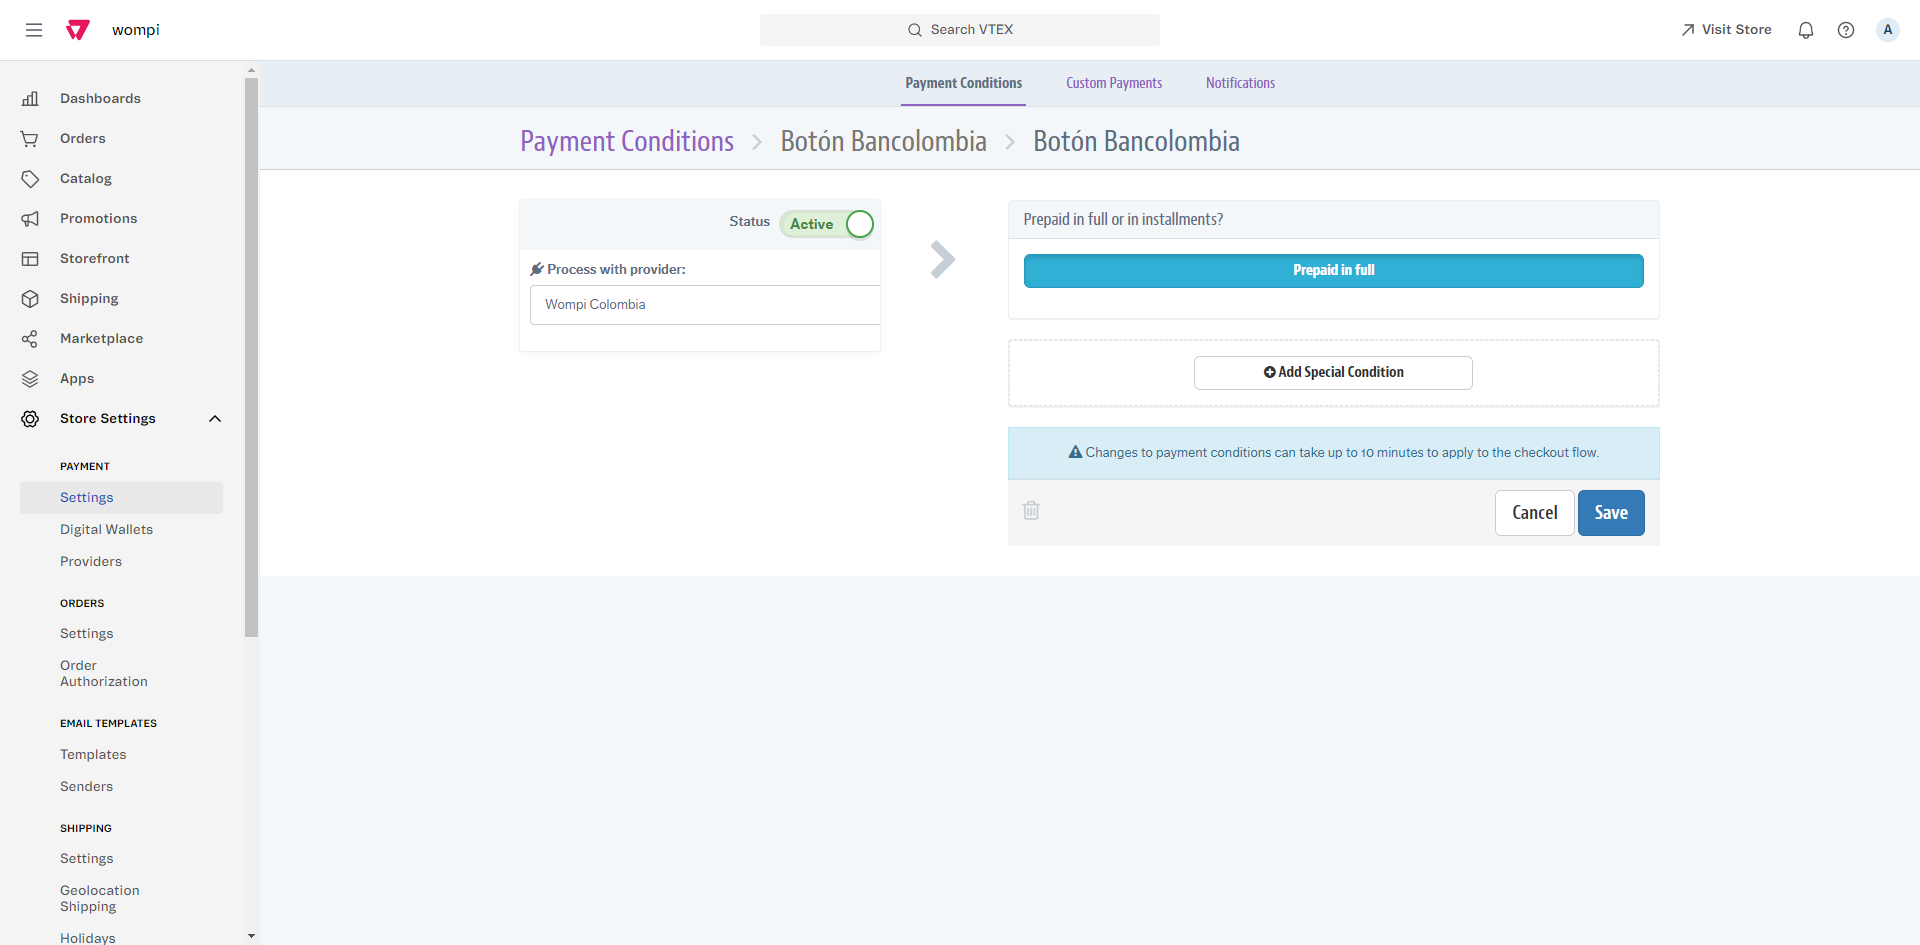
Note: Changes to payment conditions may take up to 10 minutes to be applied at checkout in your VTEX store.
Installation of the Banks for PSE application
The following is a step-by-step guide to install the Banks for PSE application and activate the bank list:
- You must download and install VTEX IO CLI. See more details in the following documentation.
- Locate the Terminal (Windows or other operating system) on your PC and run with administrator permissions by right-clicking on the Terminal icon and selecting Run as administrator.
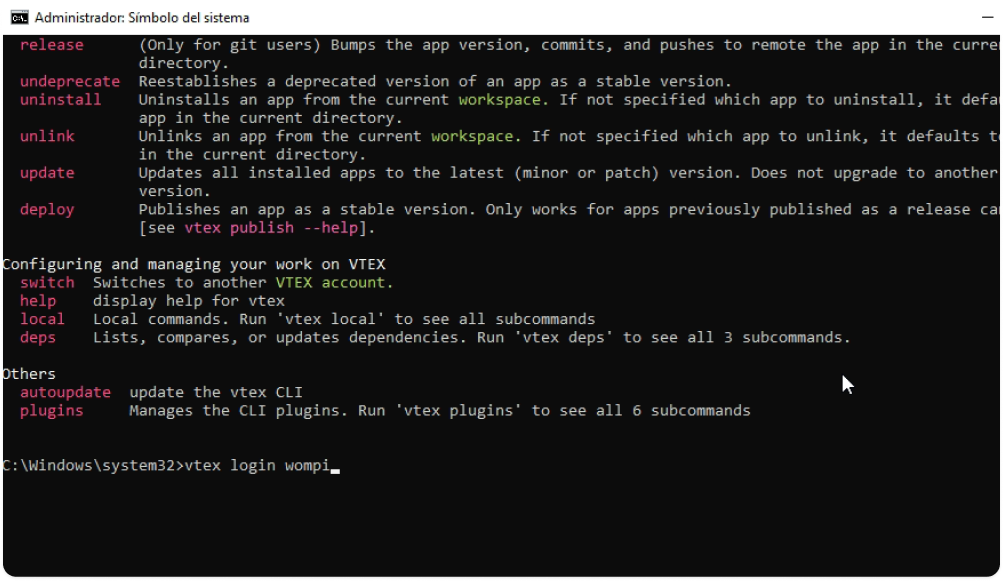
- With the VTEX IO CLI installed, use the command ``vtex login` followed by the VTEX account name to log into your VTEX account. This will open a browser window requesting your credentials.
$ vtex login {Account name VTEX}


- Once you are logged in, you can close the browser window and return to the Terminal, you can use the
vtexwhoamicommand to verify which account and workspace are being used by the Terminal. - Type vtex and press Enter to test the installation of VTEX IO CLI.
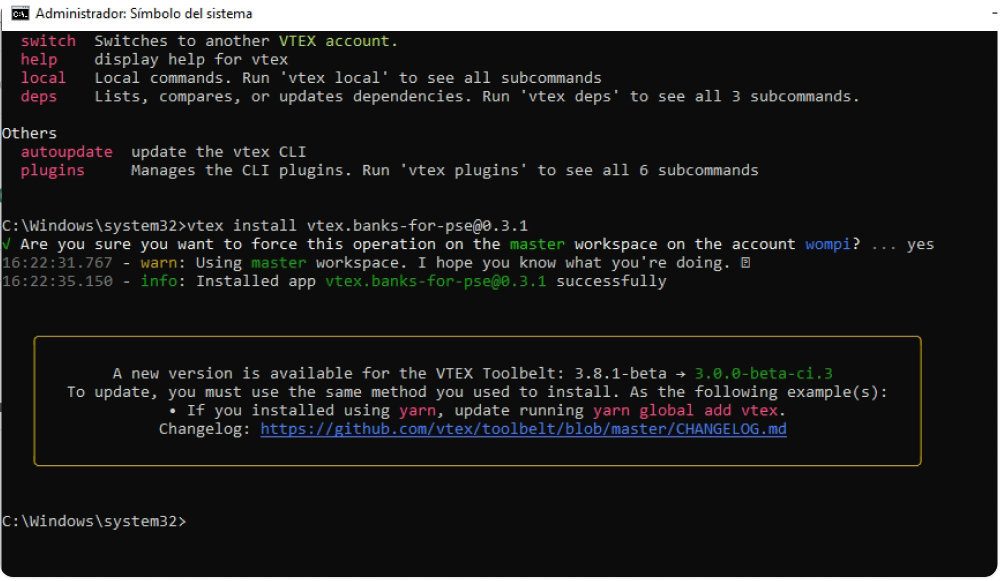
- Proceed to install Banks for PSE by typing the command ``vtex install vtex.banks-for-pse@0.3.1` through the Terminal using the VTEX IO CLI. Commit the changes, type y or Y to confirm the installation. An installation success message will be displayed.

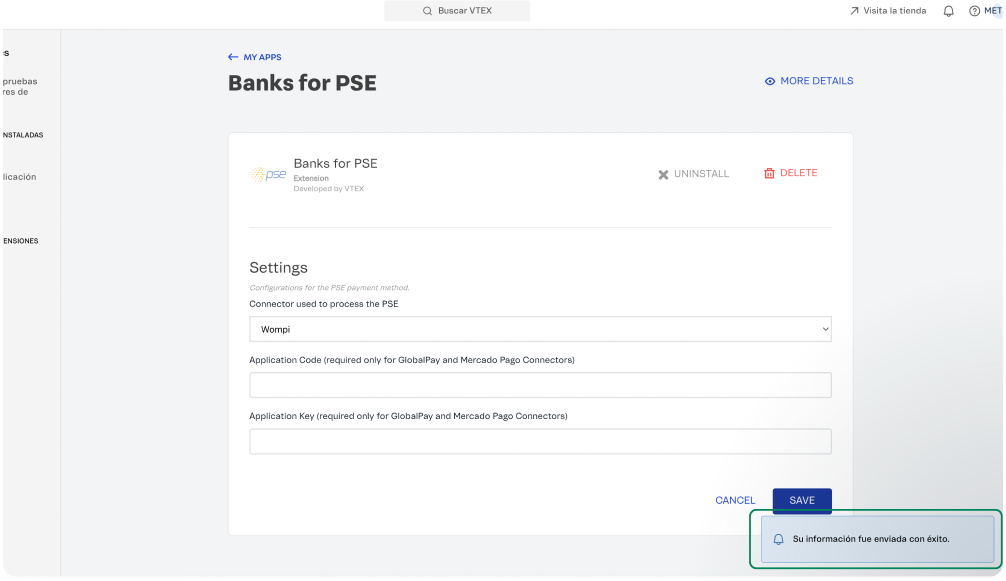
- Go to your VTEX store, see Applications / Application Management, you will see the Banks for PSE application installed. Then click on the Settings option.

- In the Connector used to process the PSE section select Wompi and finally press the SAVE button.

Wompi Installation - Cards
First, you need to configure the payment provider. To do this, go to the section Store Configuration -> Providers -> New Provider.
Search for Wompi in the list and click on that option to continue the process.
Next, you need to:
- Enter your Wompi account credentials.

Here's how to find them: First, log into the Wompi merchants dashboard, then go to the Developers section in the left menu and copy the public keys and private keys for both the production and test environments.
The public key corresponds to the Application Key and the private key corresponds to the Application Token.
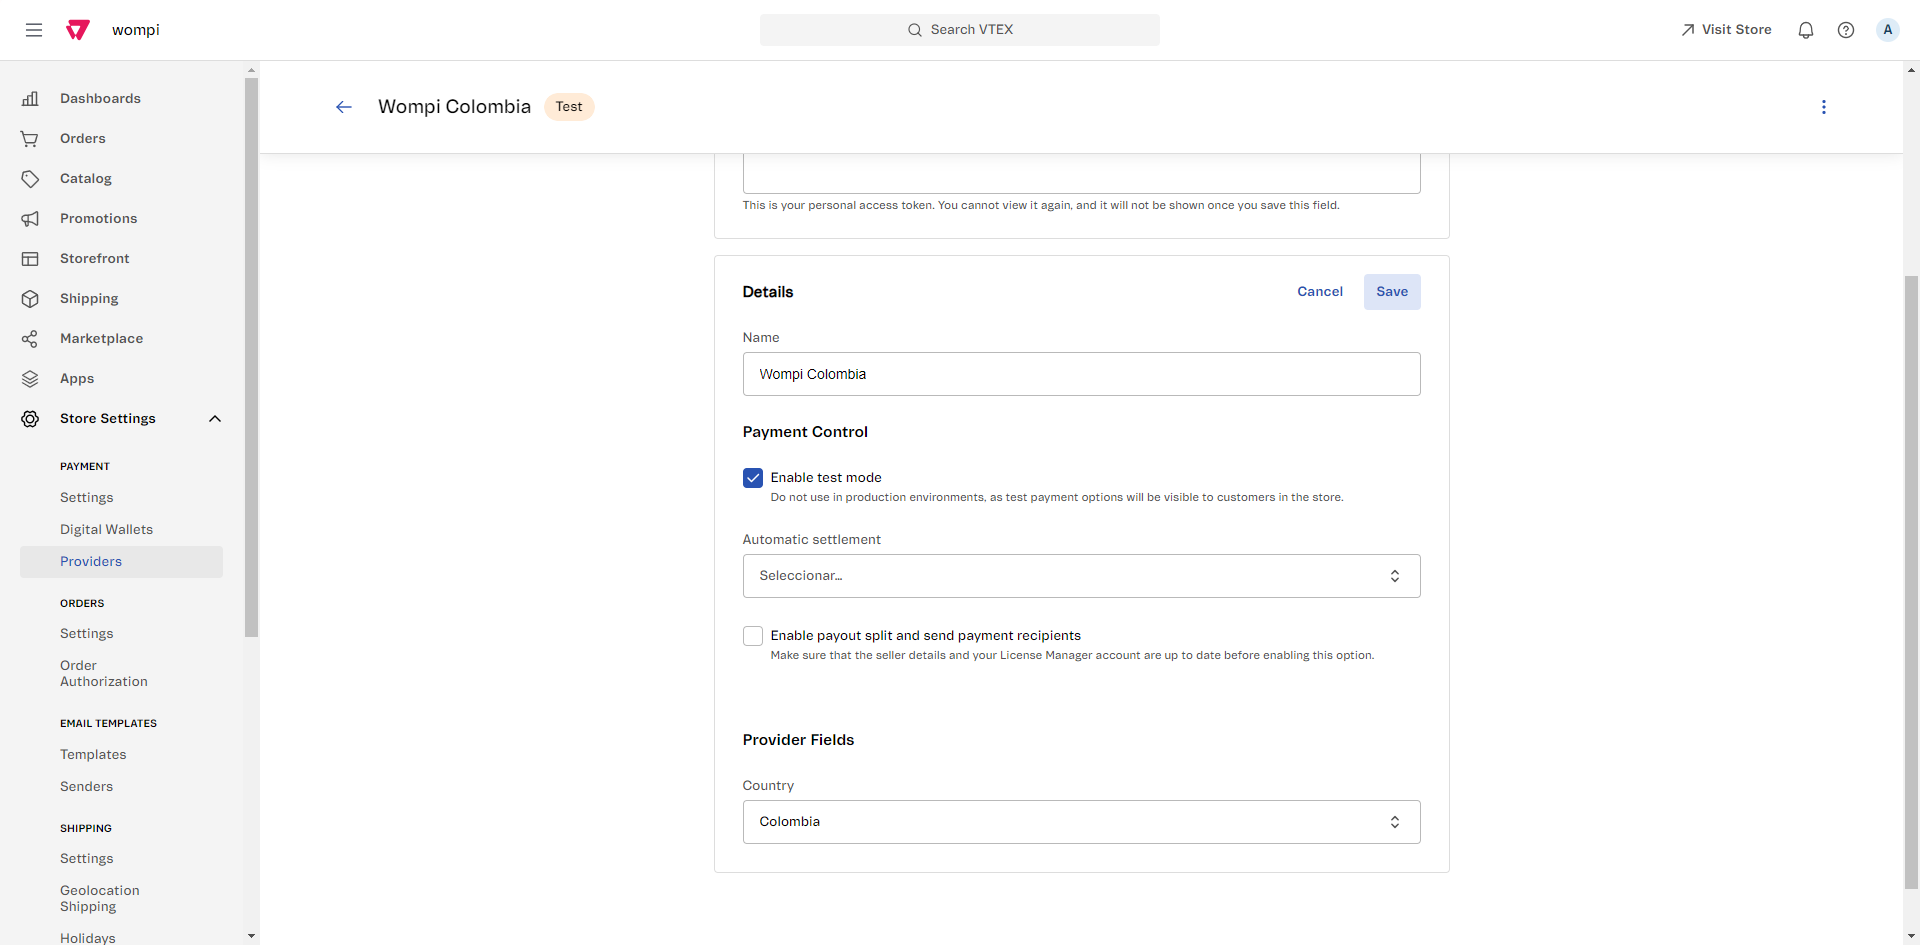
- Customize the provider name if desired, select whether to operate in test mode or not, and select the country where your store operates.
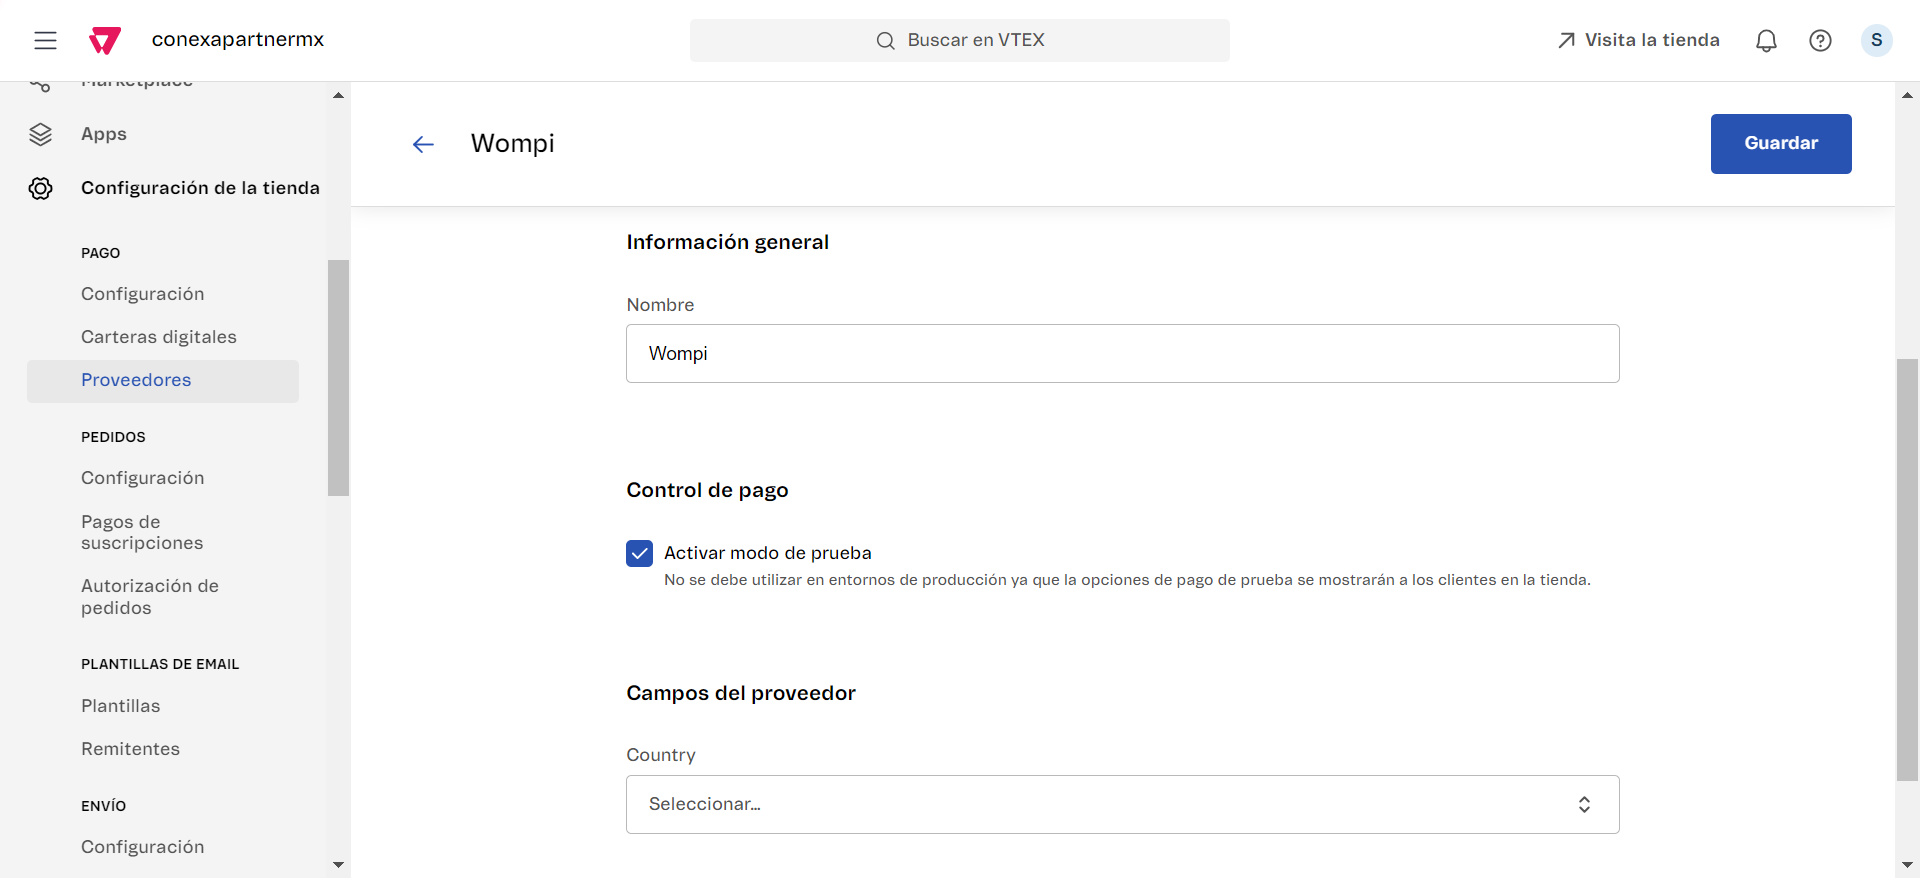
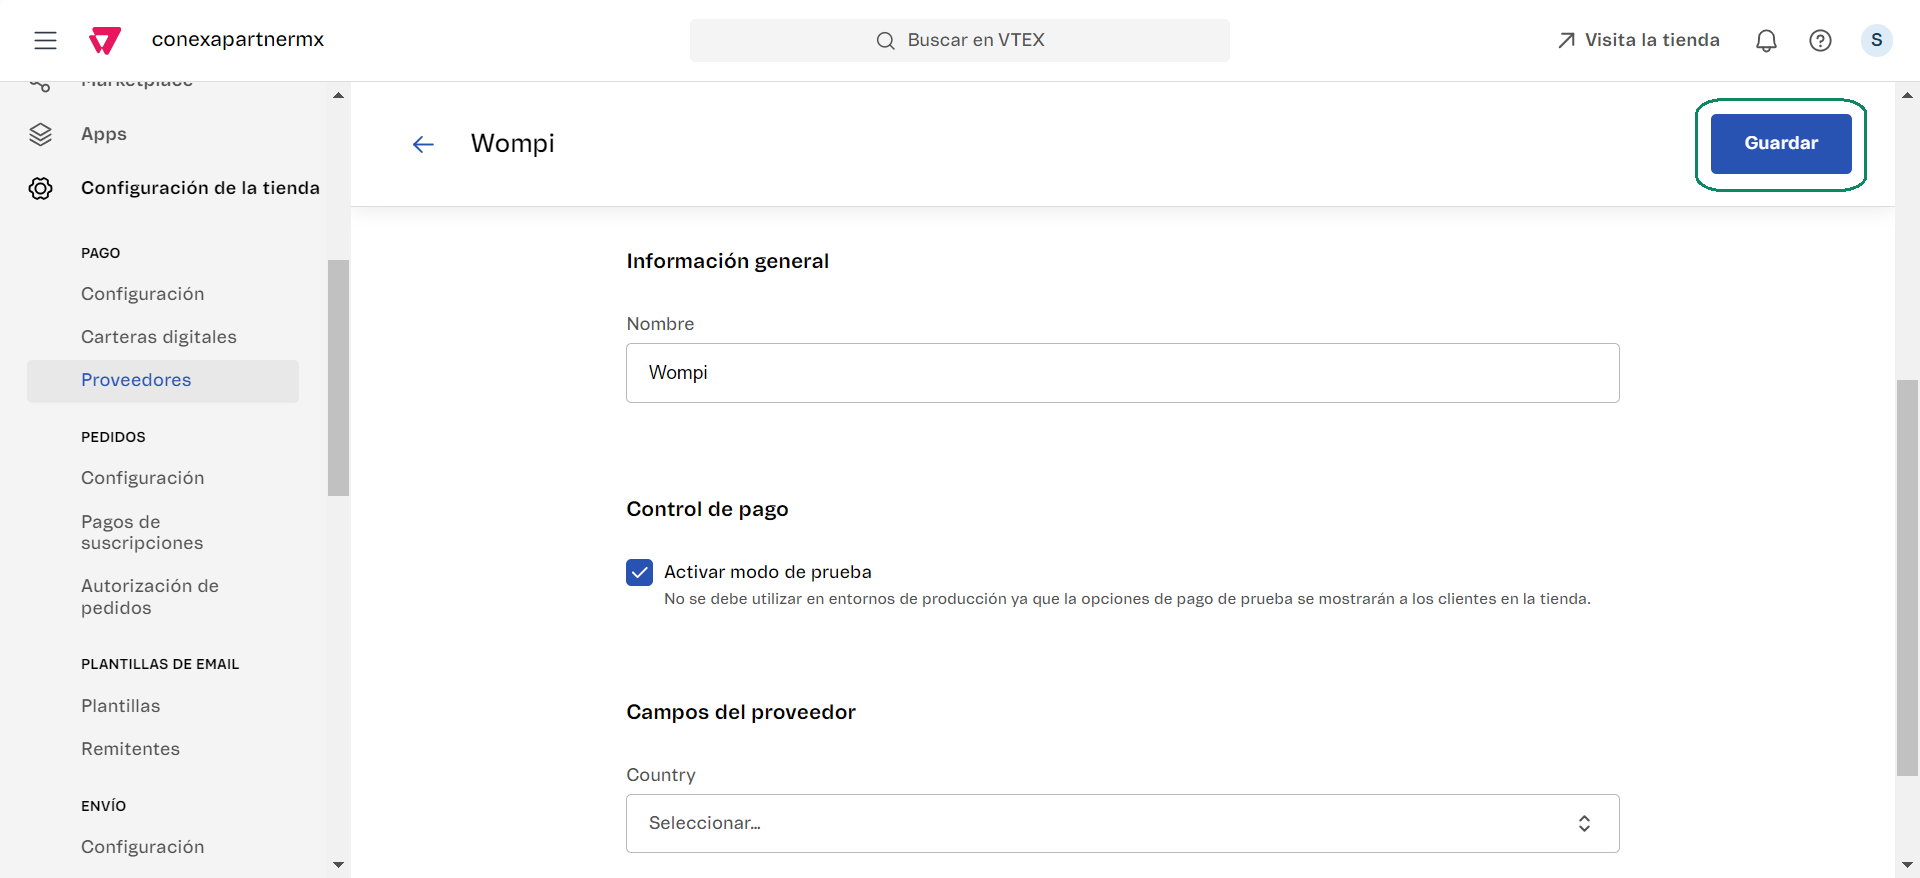
Once you’ve finished, click on the Save button.
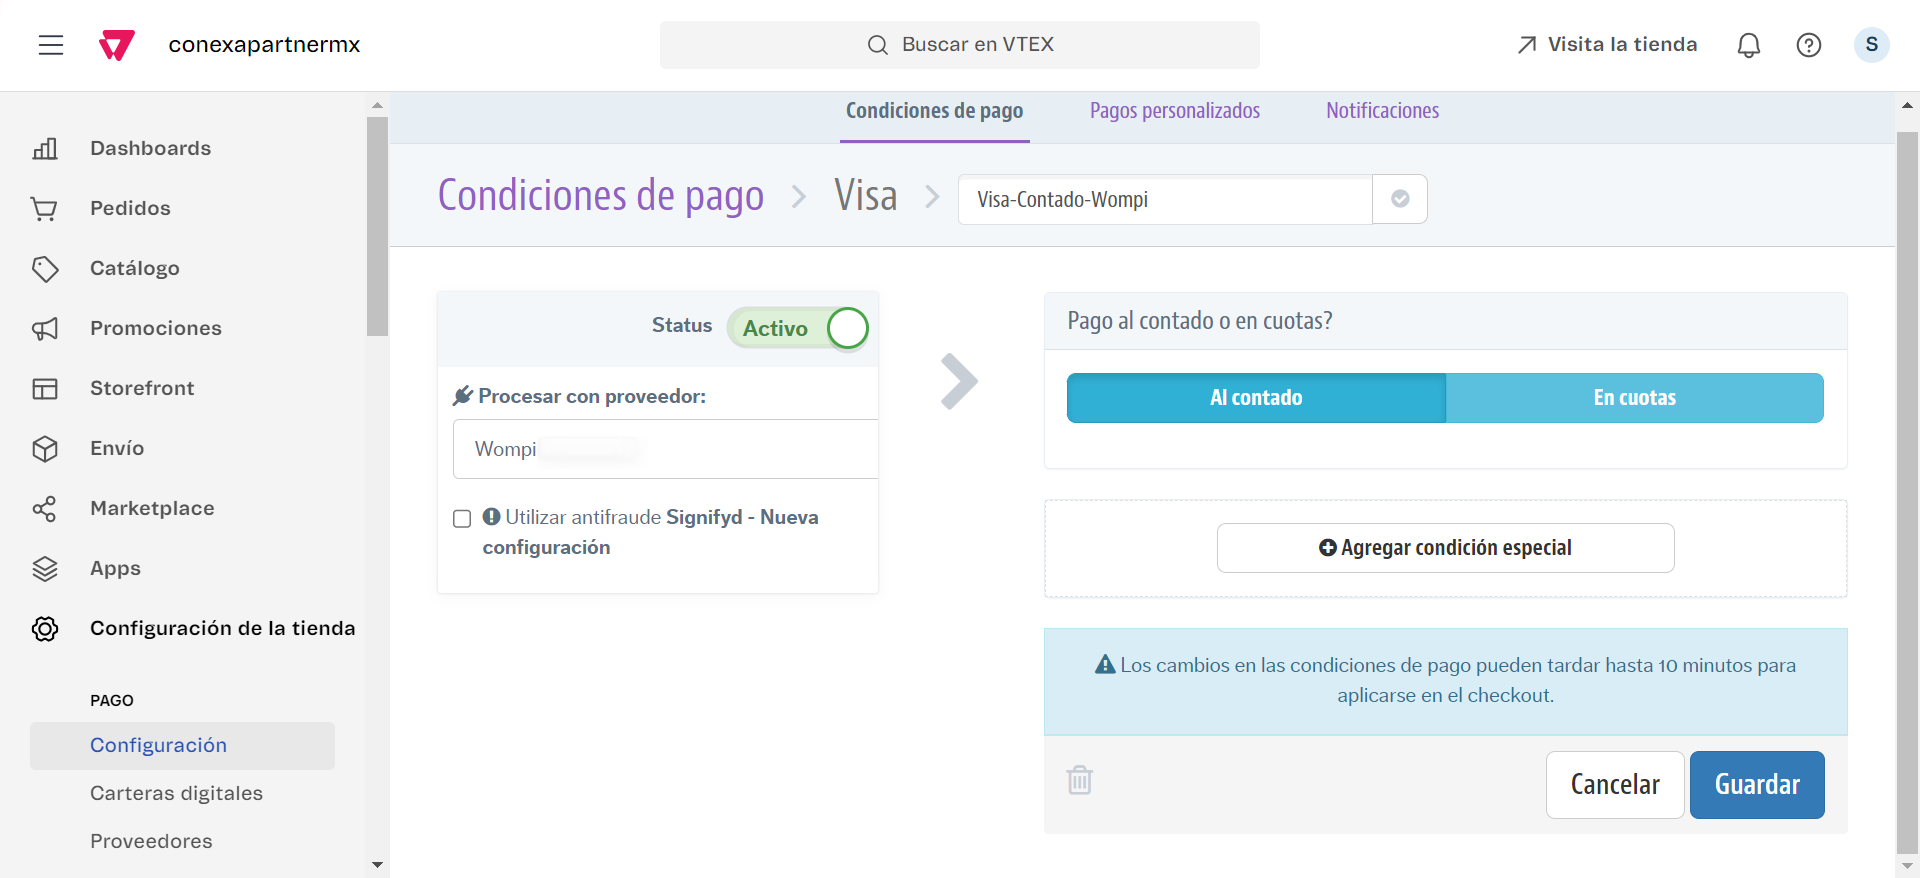
Finally, you will need to configure the payment conditions for Wompi. Go to the Payment Conditions tab and click the + icon.
You can configure installment payments or full payments as follows:
- Installment Payment. Select the brand you wish to offer your customers.
Customize a name if desired, activate the condition, select the provider name you previously configured, choose the Installment option, enter the corresponding data, and finally save the changes.
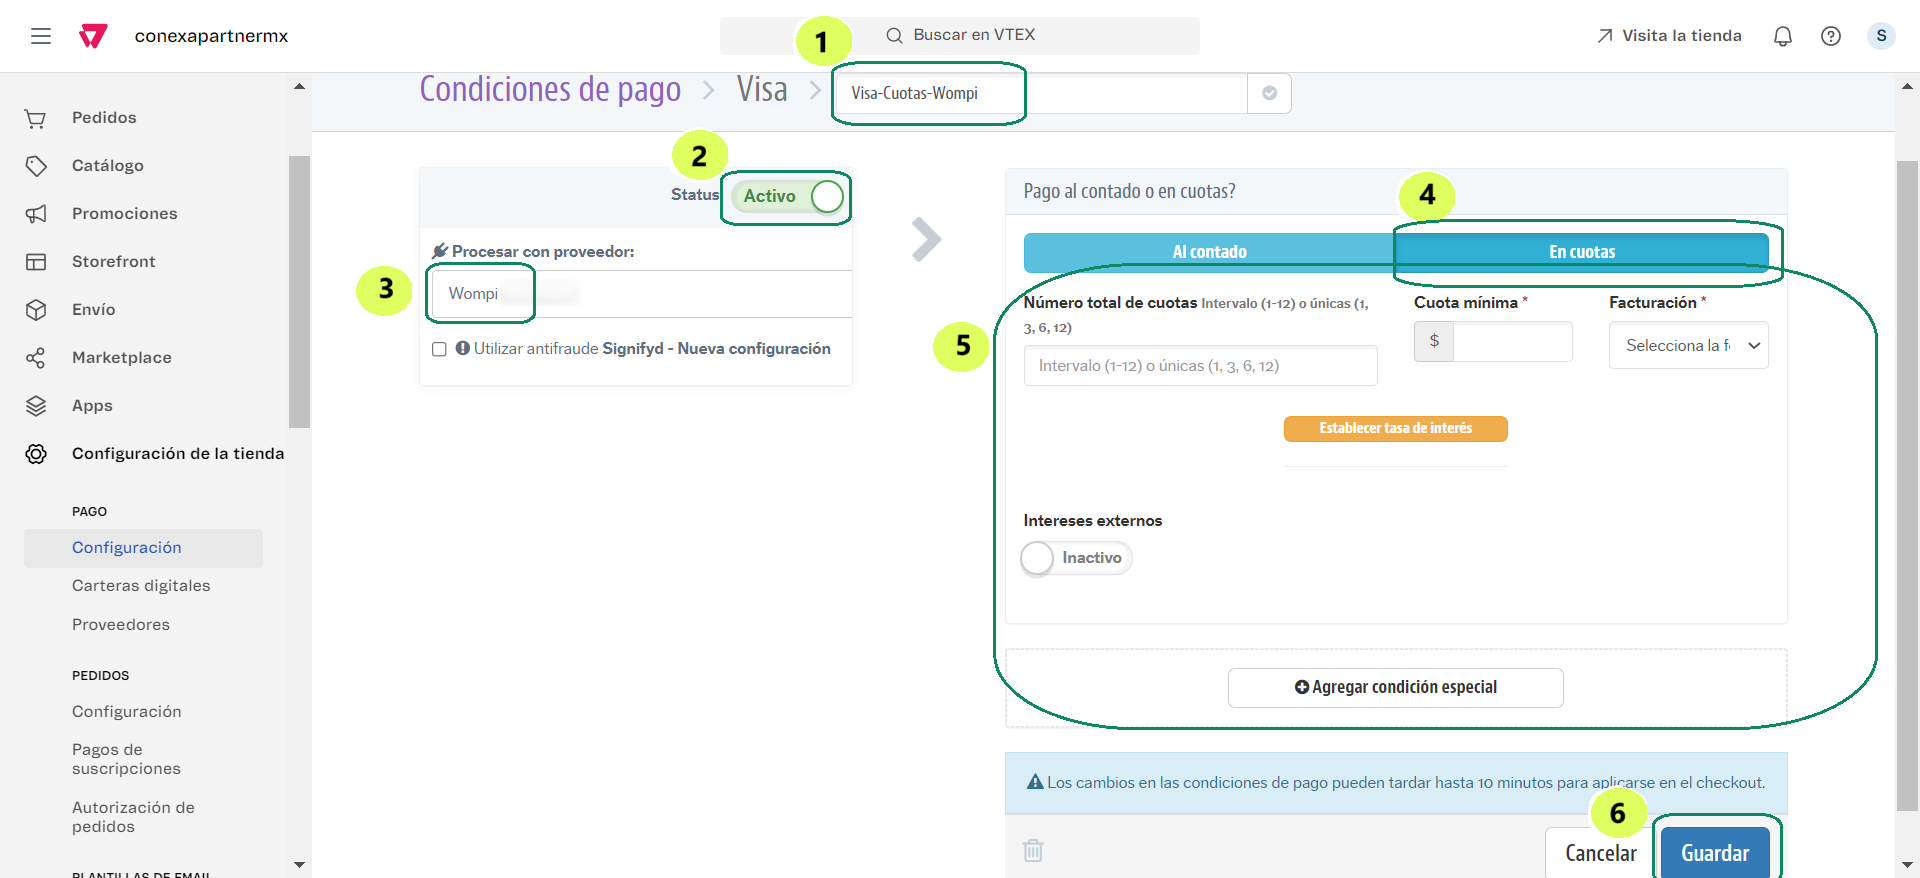
Once this is done, your customers will be able to make installment payments with their card using Wompi through the configured brand.
- Full Payment. Repeat the same process as Installment Payment but instead of selecting the Installment option, select Full Payment.
Configure the following URL
To configure the Events URL and receive the status notifications correctly, we detail the following steps:
- Log in to Wompi with your credentials. Next, go to the Developers section and view the Transaction Tracking section.
- Add the URL https://wompi-vtex-events.conexa.ai/ipn/event in the Event URL field and press the Save button.
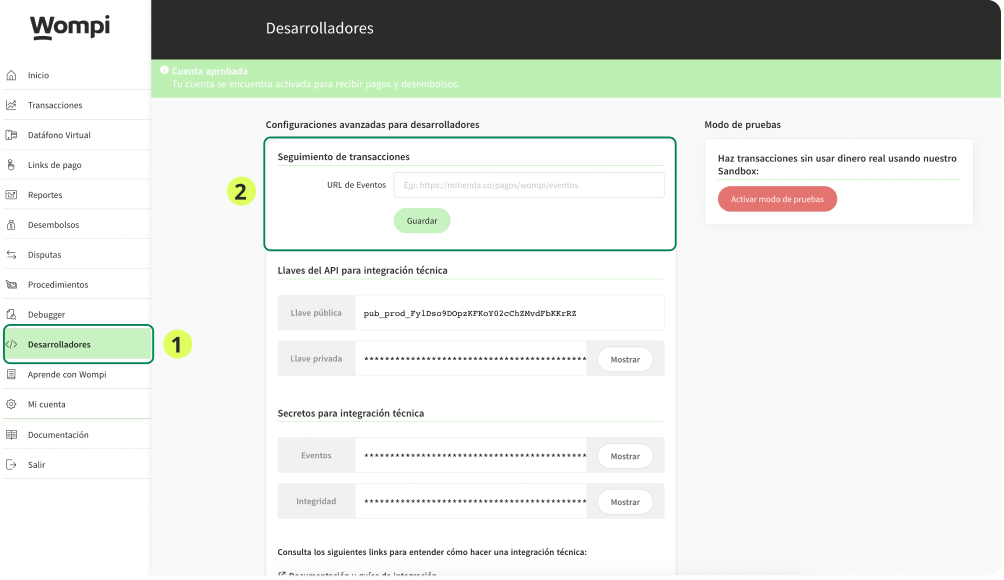
Note: if you activate the test mode, the URL you must configure is the following: https://wompi-vtex-events-stage.conexa.ai/ipn/event.
You are done! The configuration process has been successfully completed.
Tutorials
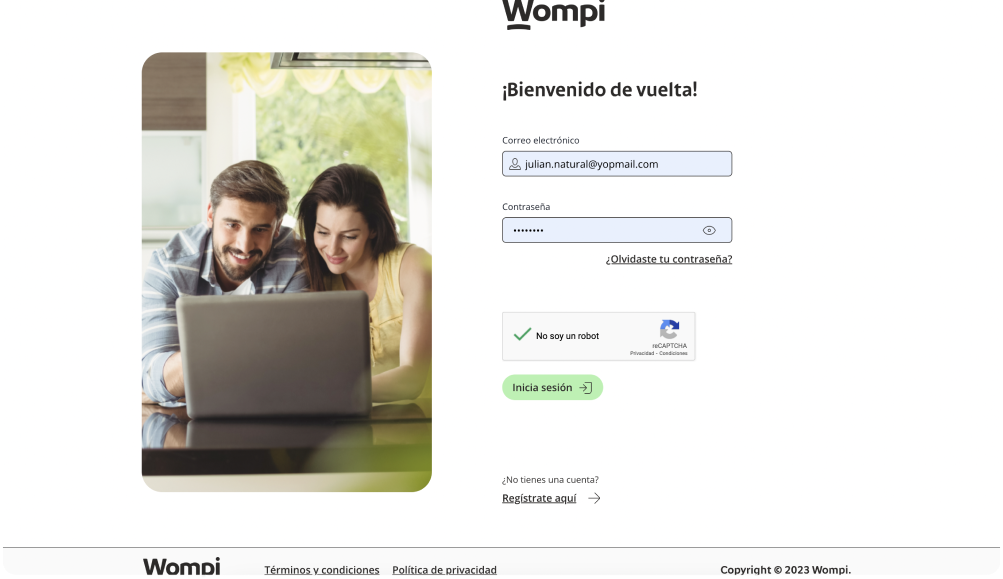
Wompi credentials and your VTEX store
In the following image we explain how to get your Wompi credentials and your VTEX store.
Integration installation
In the following image we explain in detail the installation and configuration process, so you can easily integrate Wompi to your VTEX store.

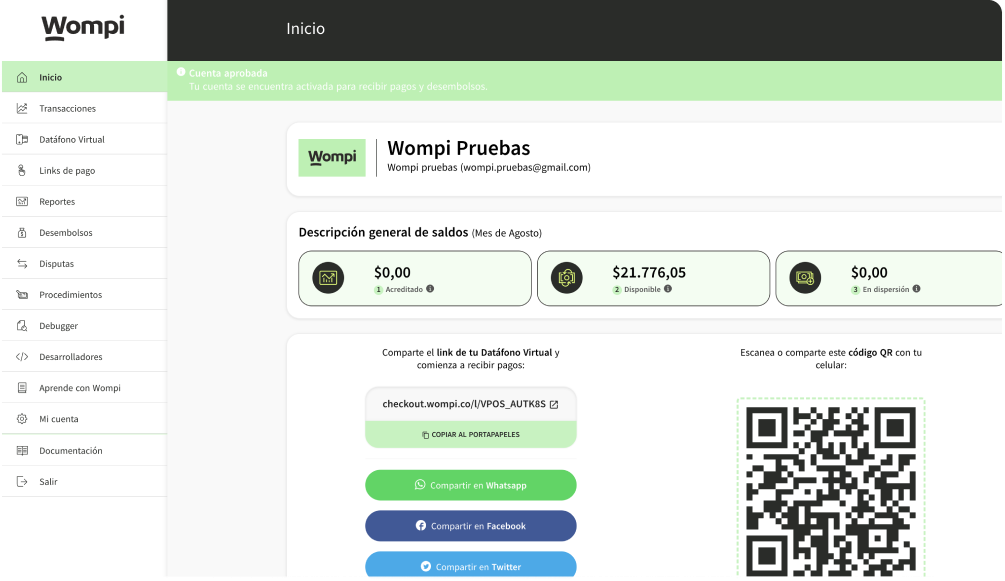
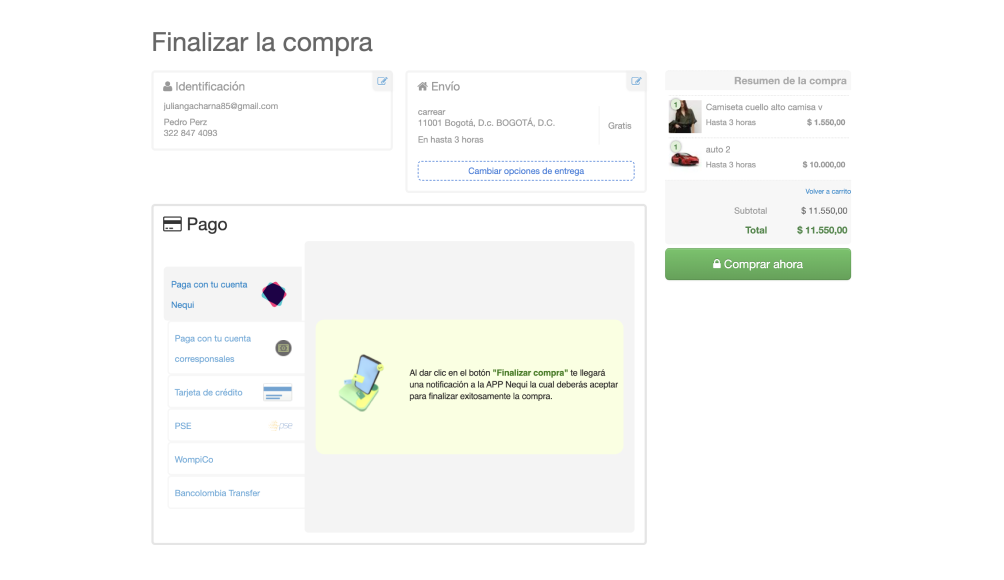
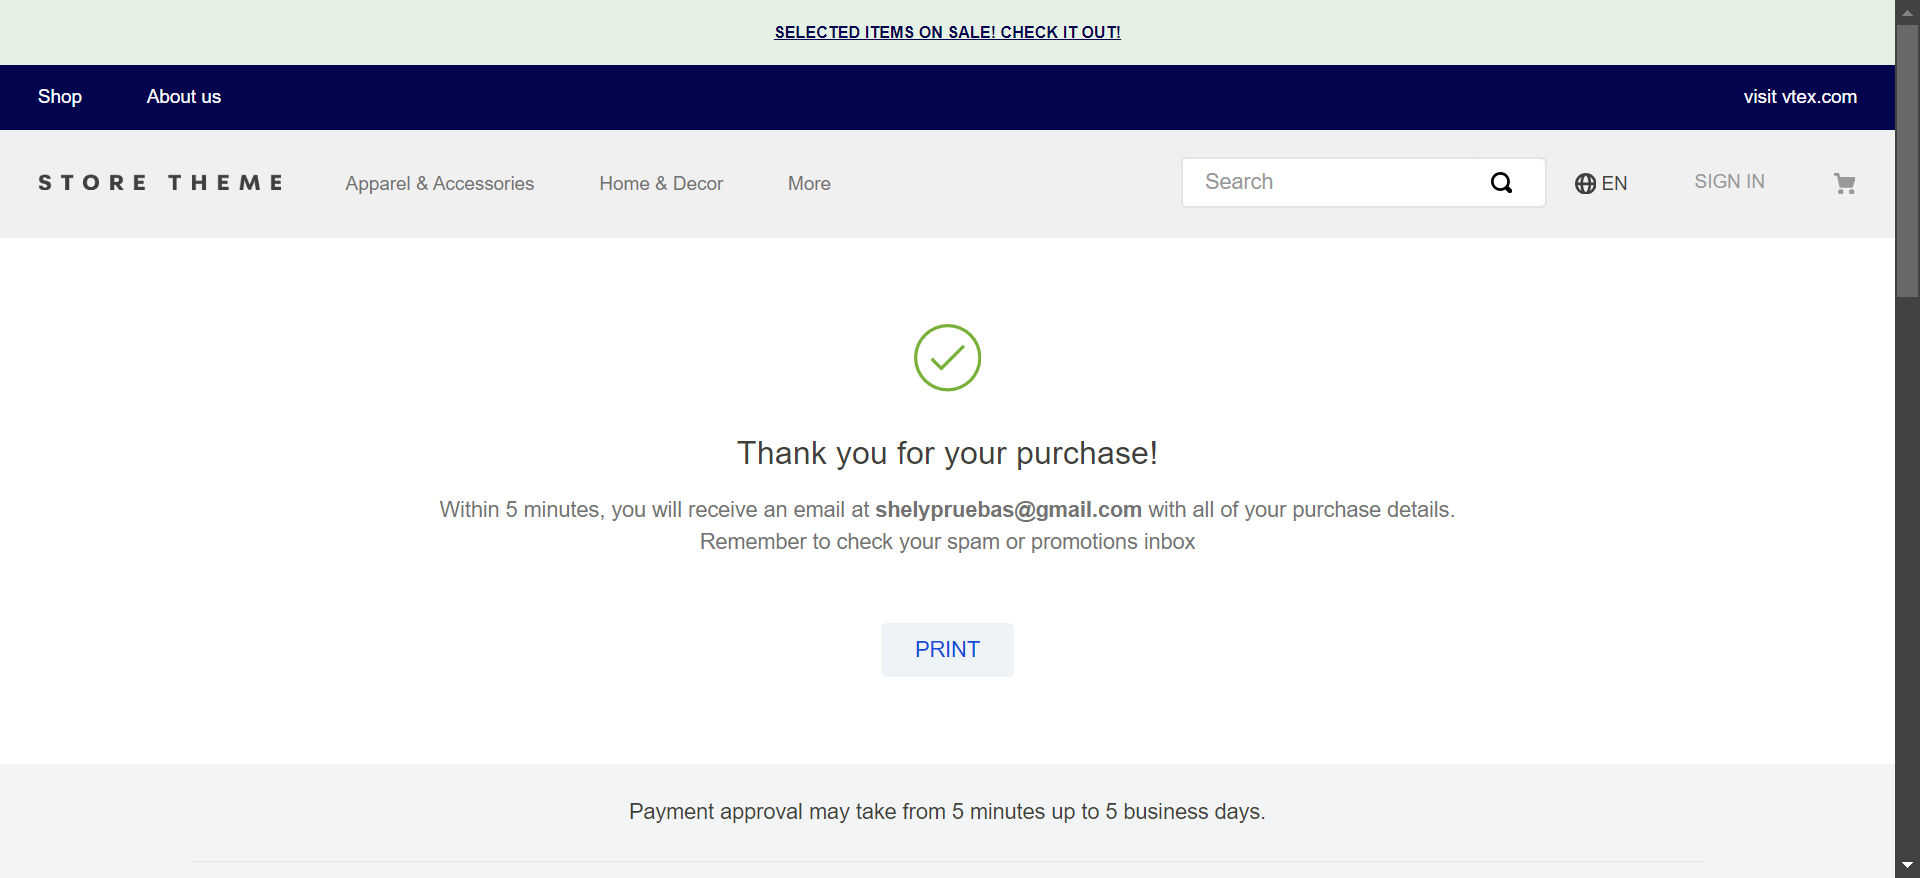
Make a purchase and display in your store VTEX and Wompi.
In the following image we describe how to make a purchase from your store and its visualization in your VTEX store and in the Wompi panel.
Test Mode
To activate Wompi test mode** in **VTEX**, please follow the steps below:
- Log in to Wompi with your credentials.
- Go to the Developers section and press the Enable Test Mode button.
- Use the credentials displayed in the Integration API Keys technical section in your integration.

If you no longer wish to use the test mode press the Disable test mode button and use the productive credentials in your integration.
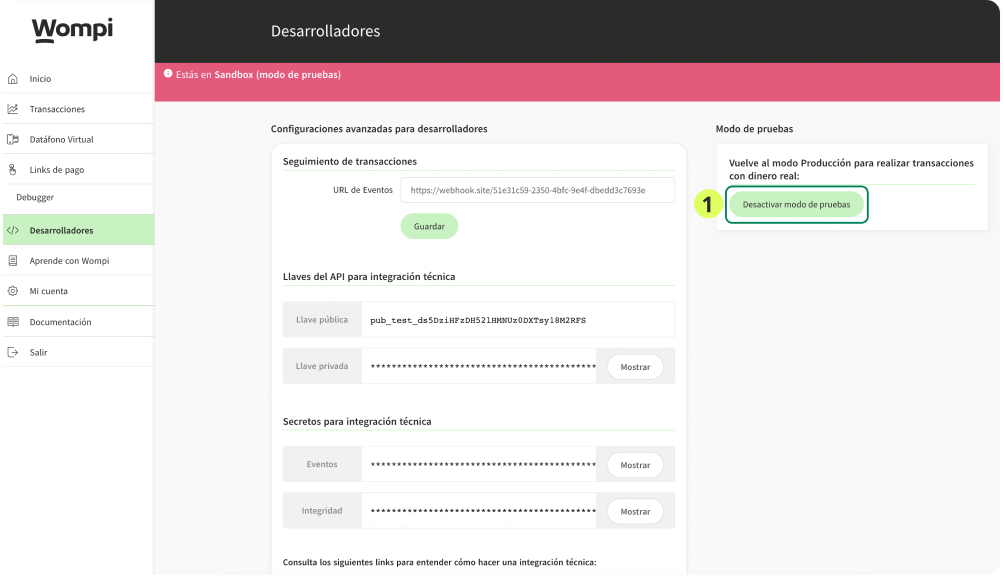
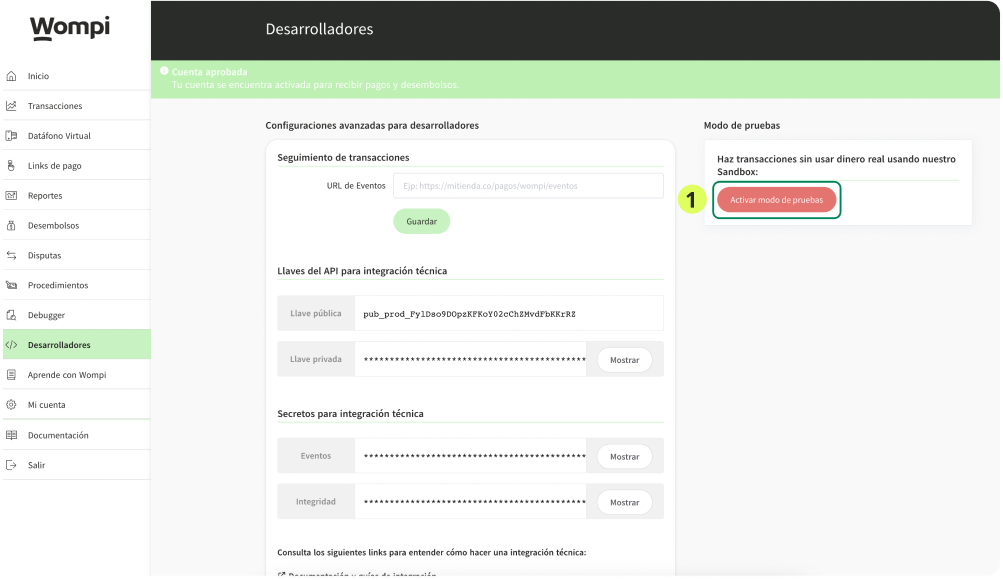
Note: each environment has a pair of related keys, each of these keys has a prod or test prefix, representing the production or sandbox environment respectively, with which you can easily identify which environment it corresponds to.
Customers flow
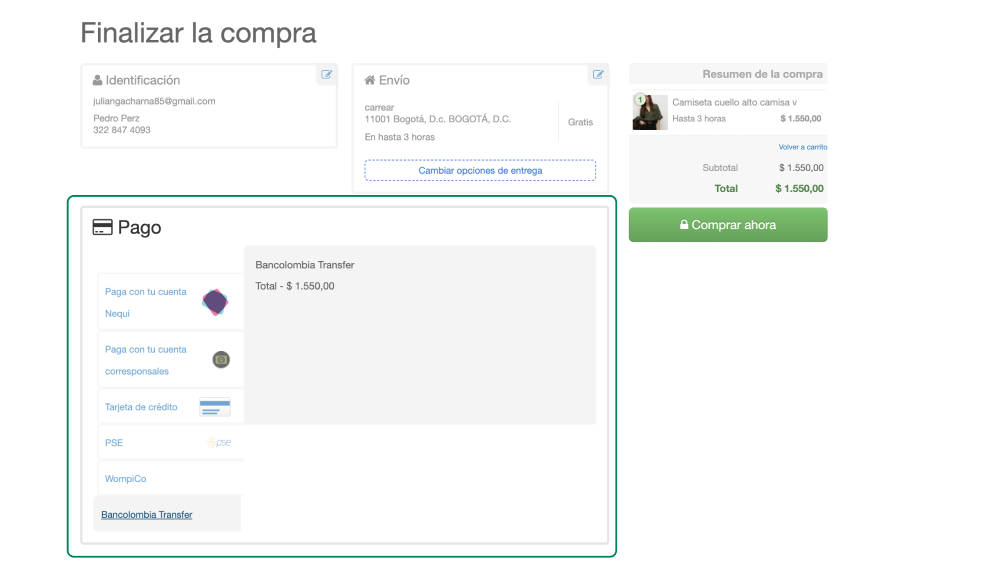
To make a payment, once the product is selected and added to the cart, your customers will see the option of Wompi as a payment method available.
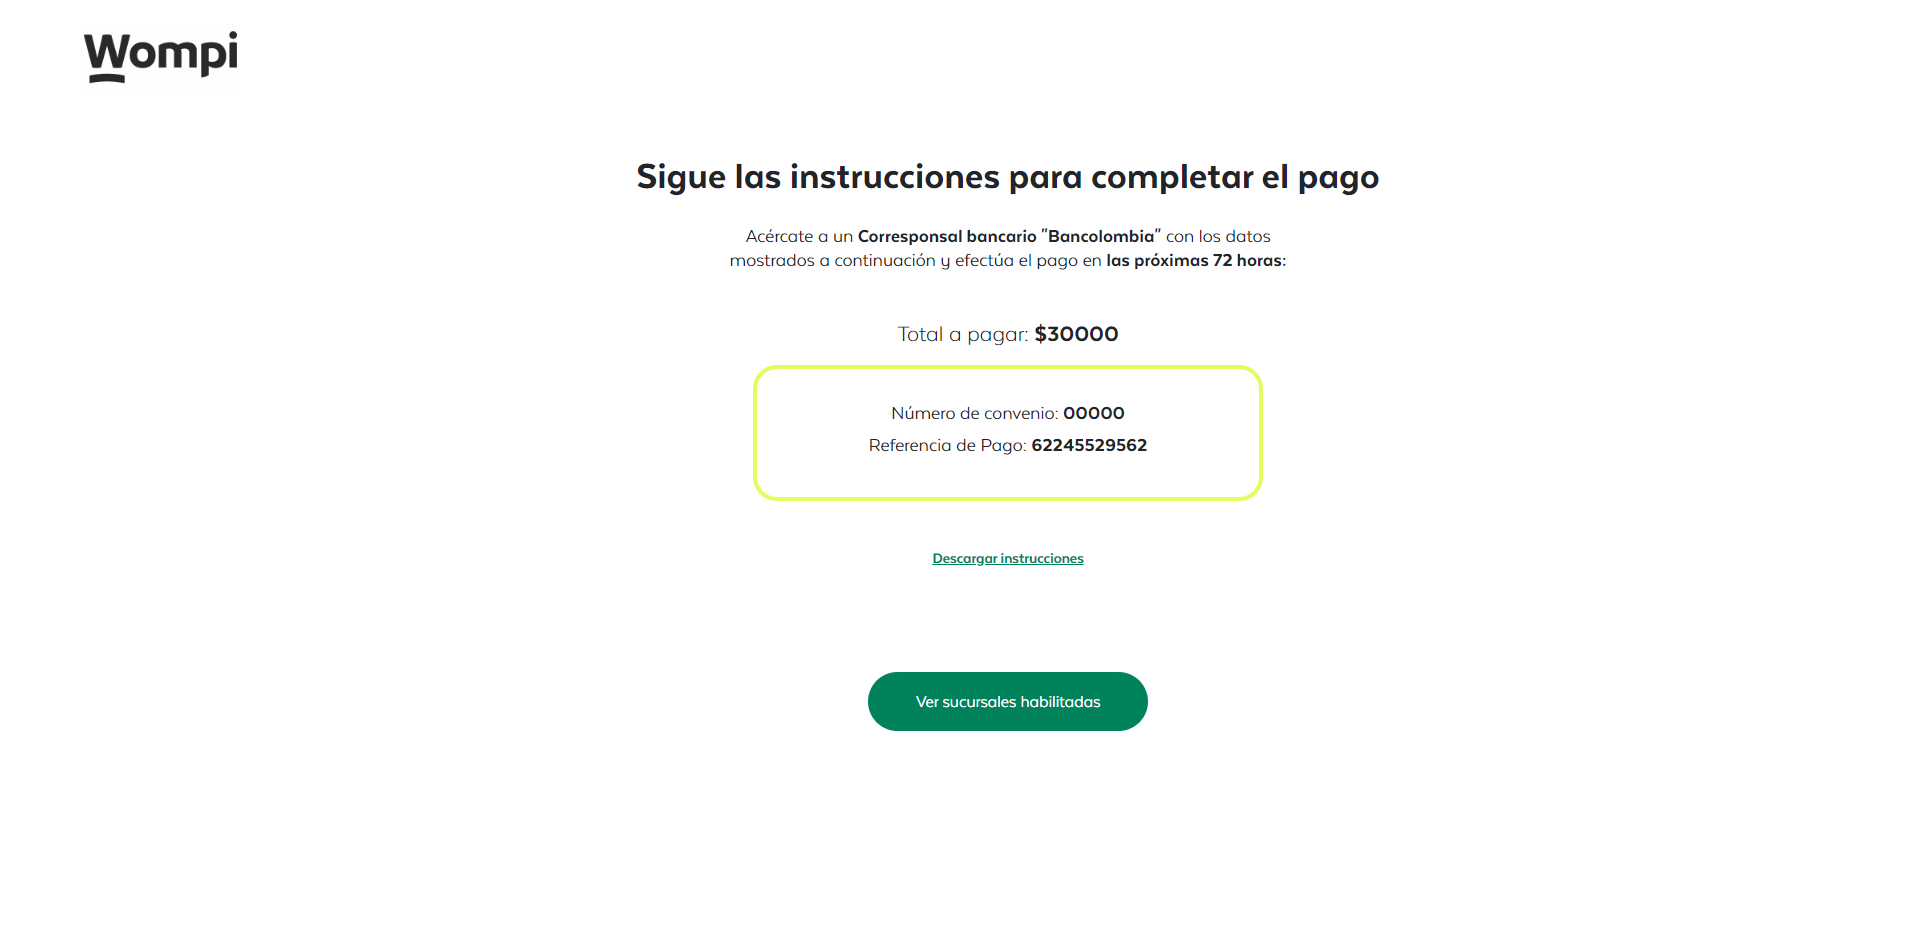
Wompi - Correspondents
Bank Correspondents is an offline payment method, that is to say, it is made in person.
The buyer selects the payment method in the checkout of your VTEX store and presses the Buy Now button.
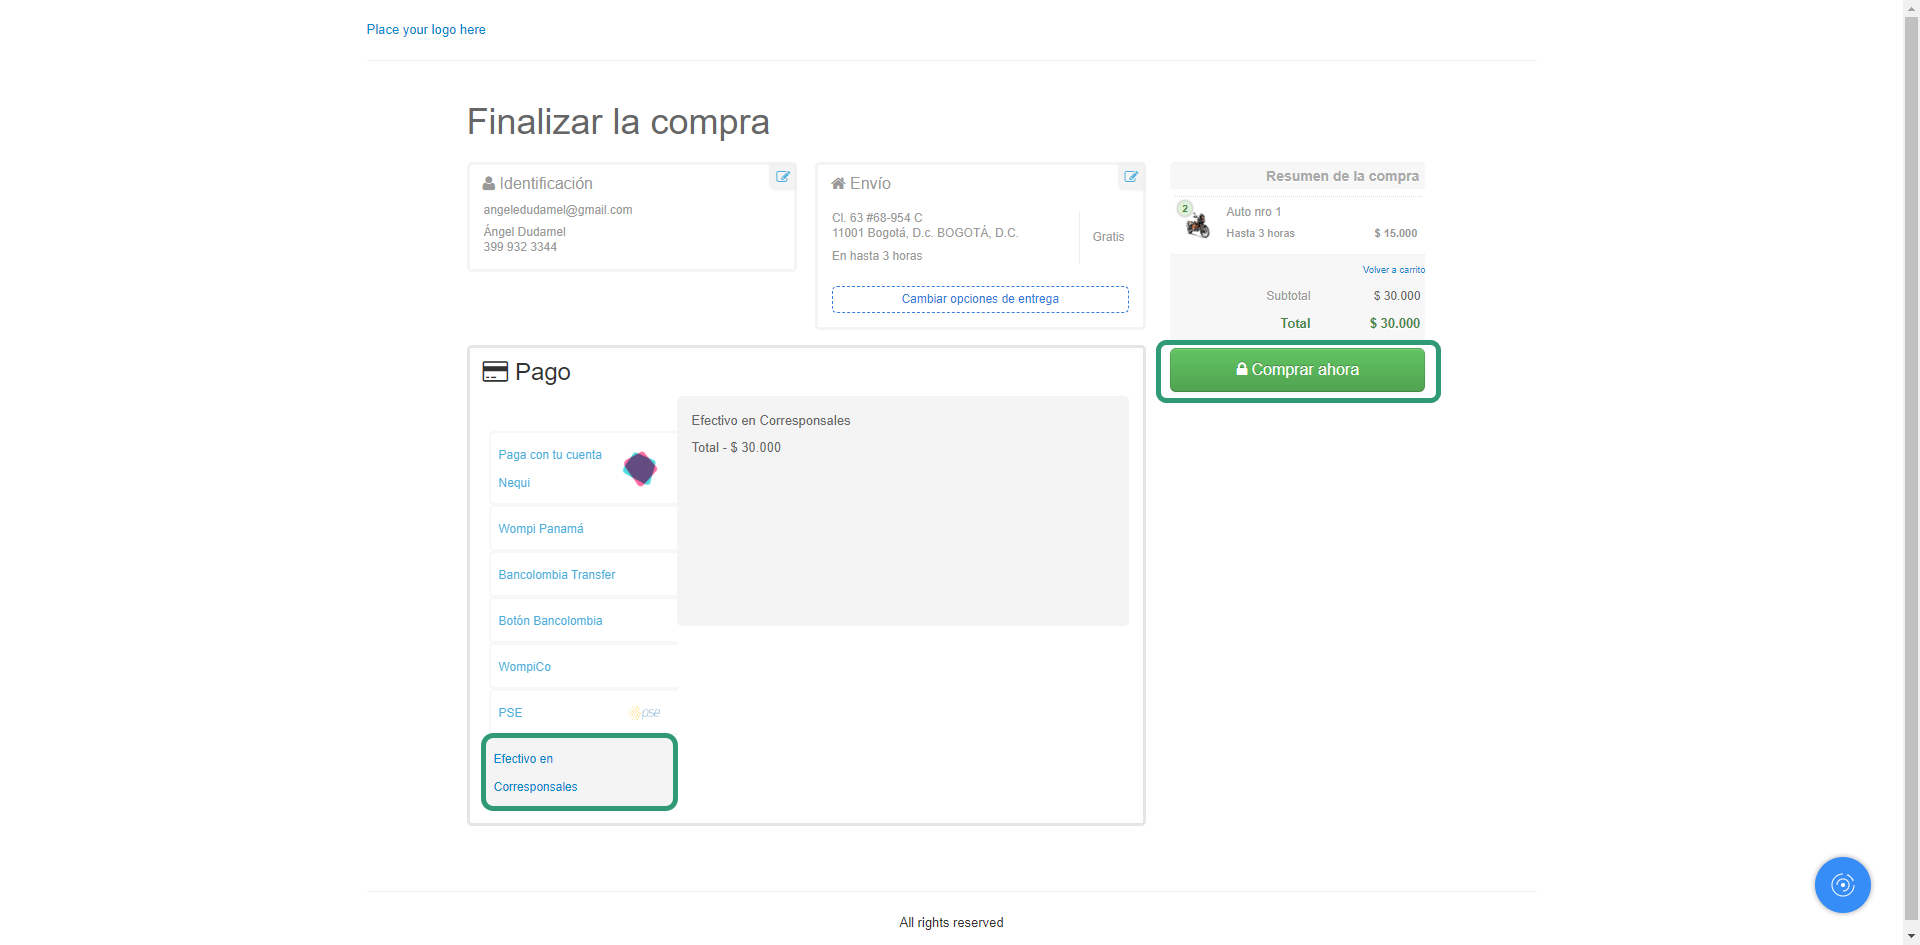
You must then approve the terms and conditions and press the Continue with payment button.
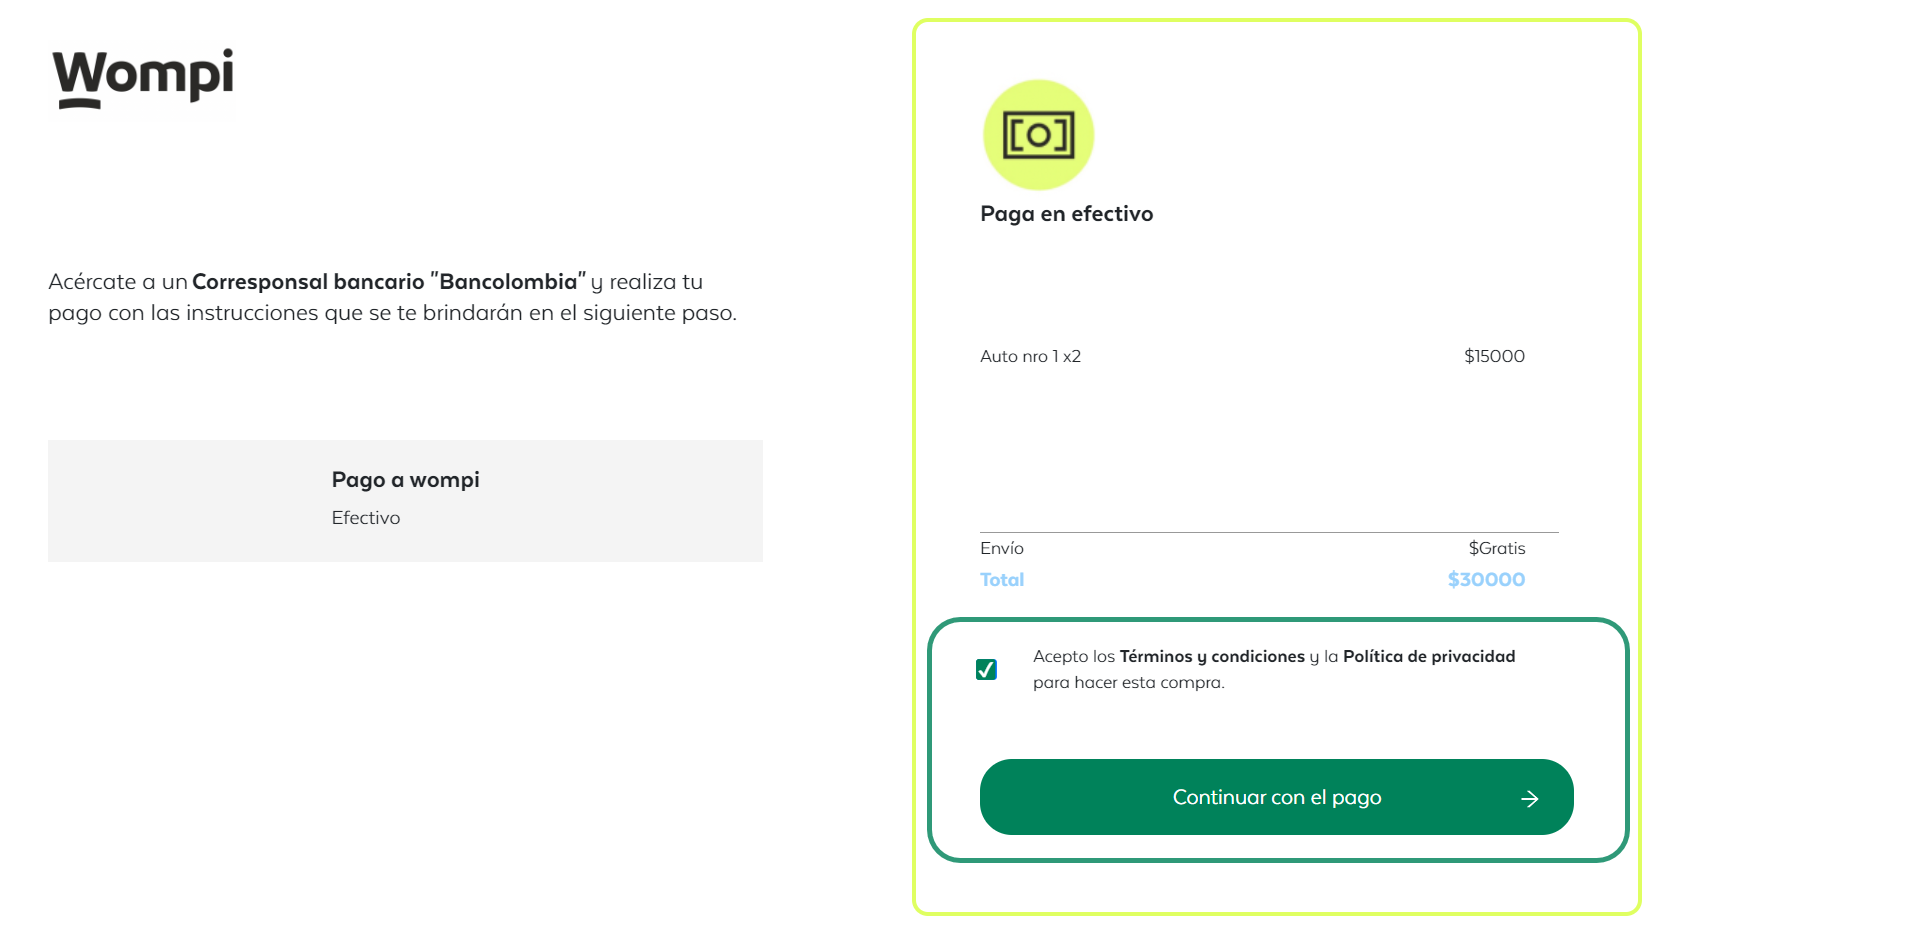
A unique code will be displayed. The buyer should go to a Correspondent Bank and using the reference code will allow him to finalize the transaction. The status of the transaction should be updated.
Wompi - PSE
PSE is the banking network in Colombia that will allow the buyer to make a money transfer choosing any bank of preference.
The buyer selects the PSE payment method and the bank of his choice at the checkout of your VTEX store.
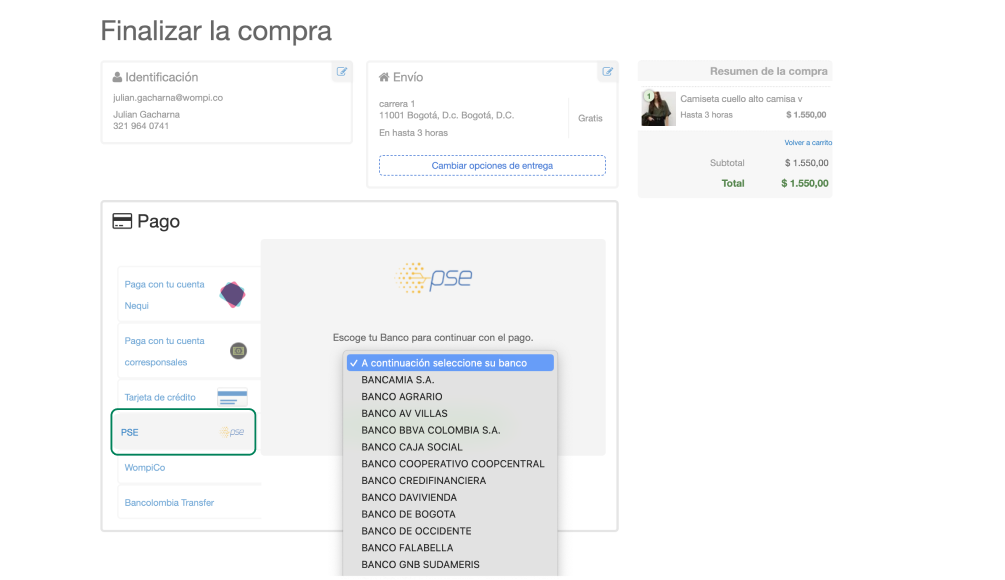
Next, press the Continue and make payment button and you will be redirected to the PSE page.
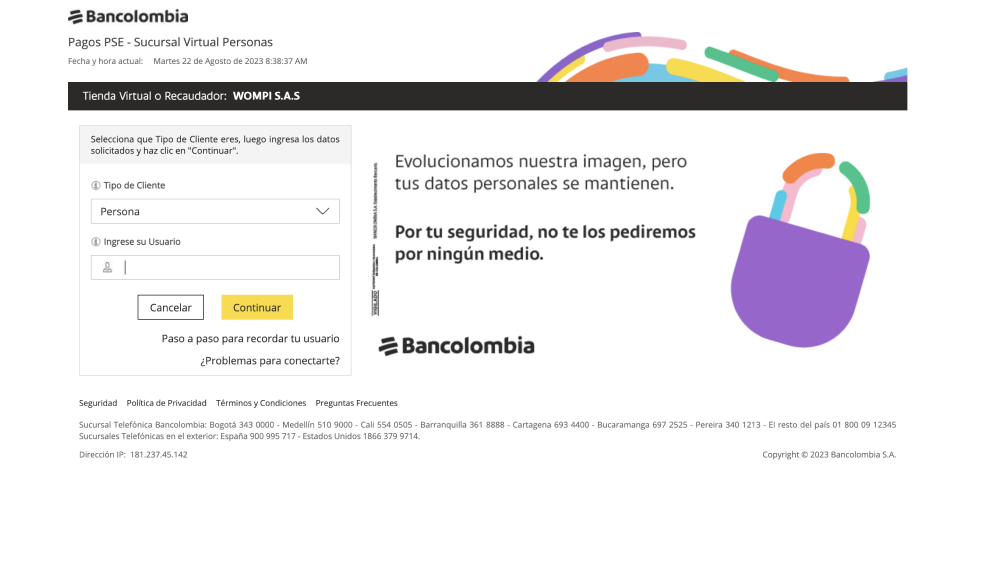
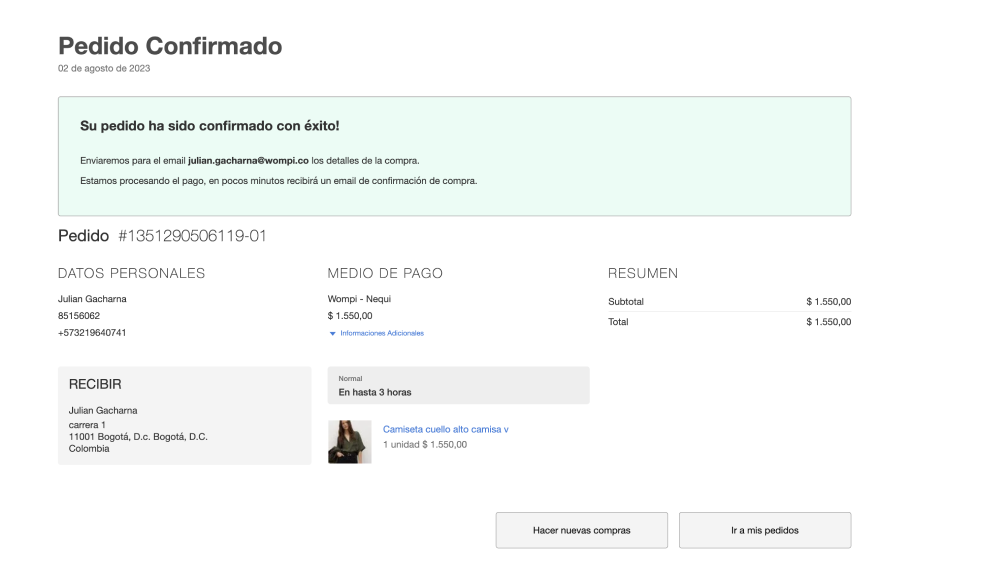
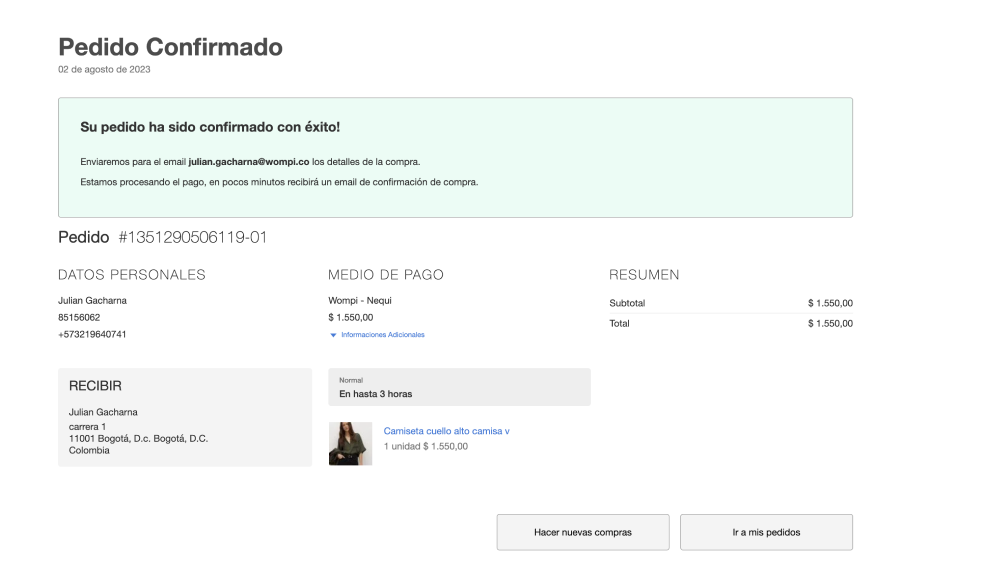
Once the operation is completed, you will be returned to the checkout of your VTEX store with the order confirmation.
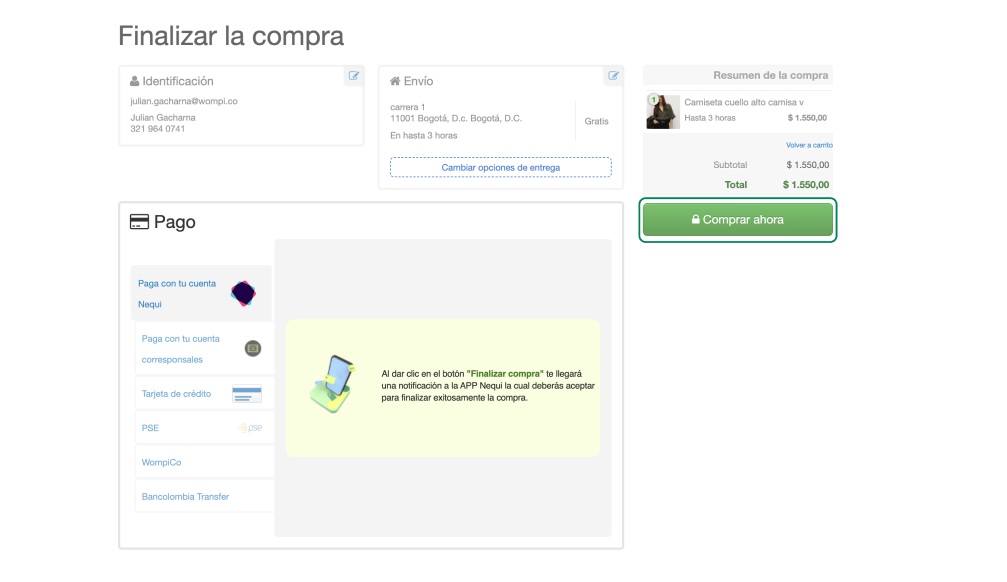
Wompi - Nequi
Nequi is a bank wallet. The buyer must identify himself with the phone number of his Nequi account and select the payment method at checkout.

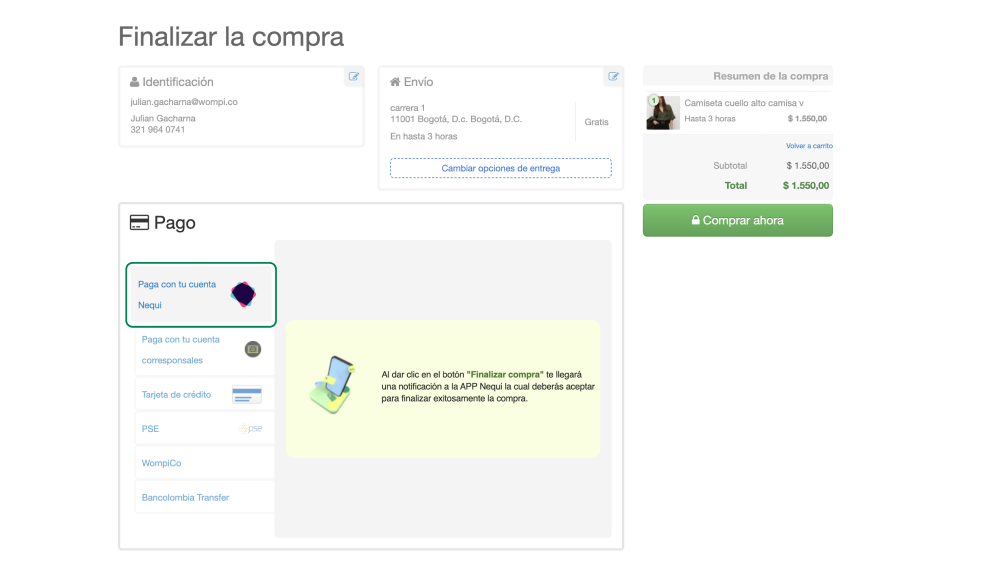
Next, they must press the Buy Now button. The buyer will receive a notification to confirm the transaction, and once confirmed, the purchase will be completed.
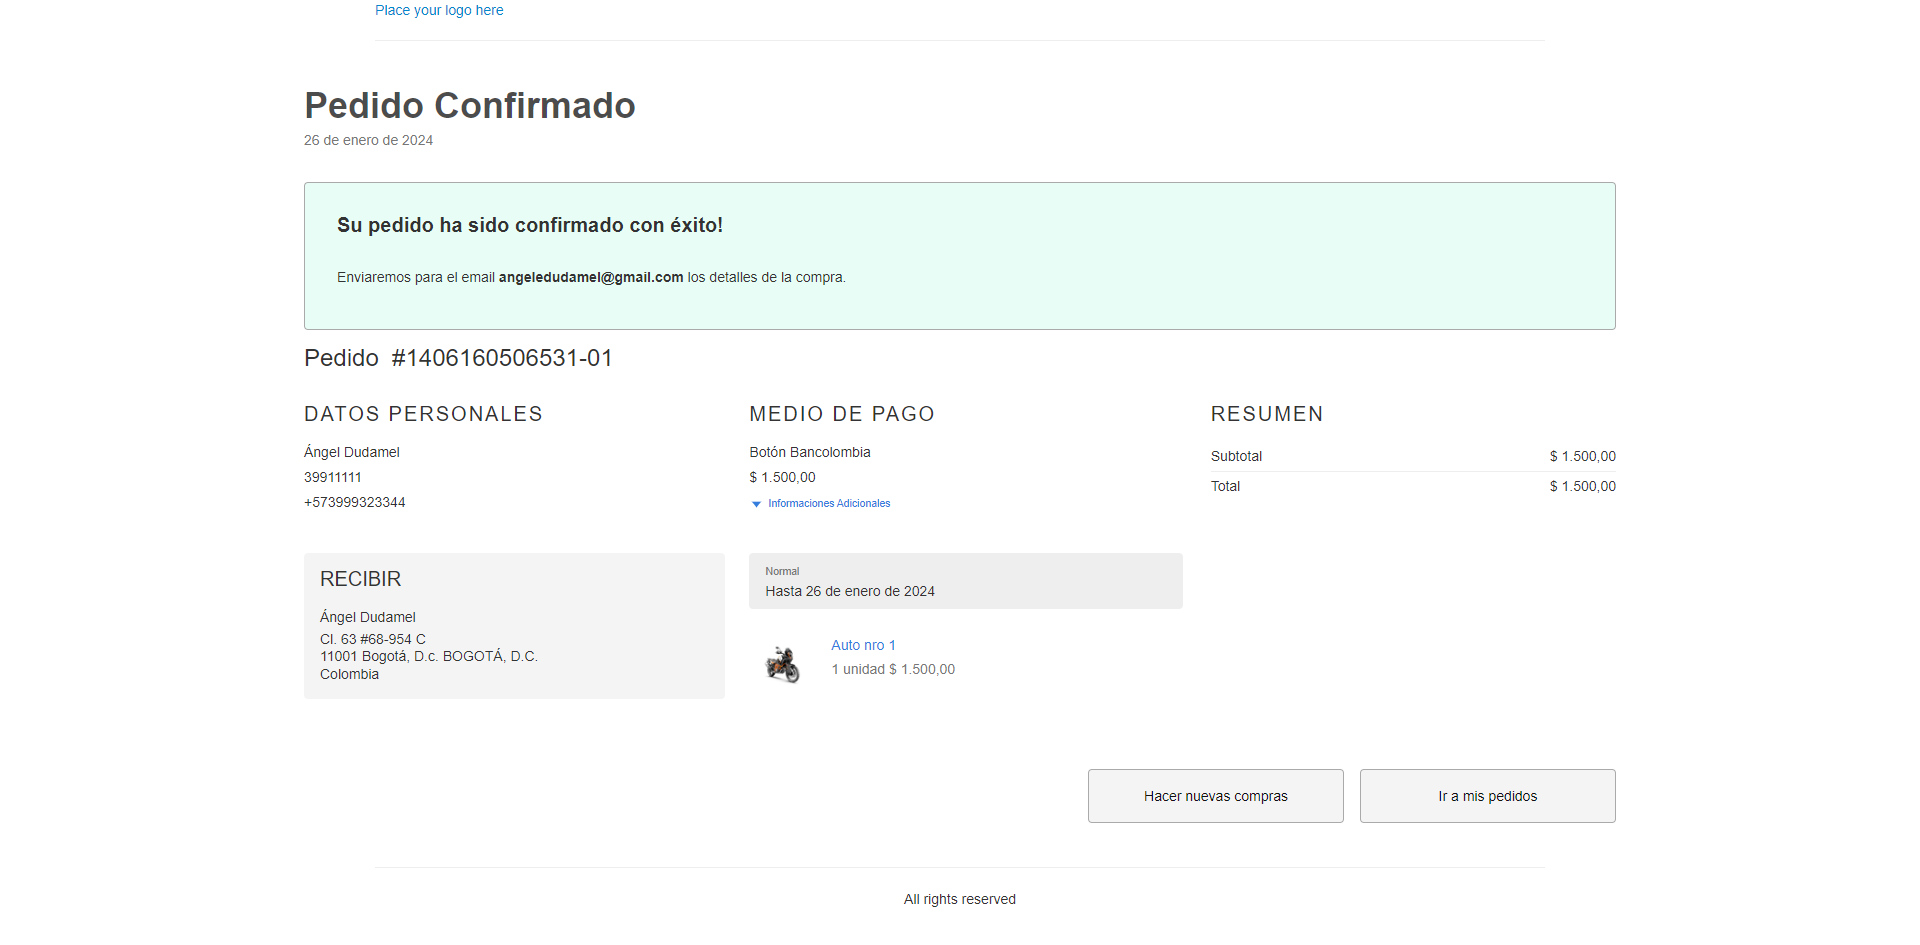
Bancolombia Button
The buyer selects the payment method Bancolombia Button at the checkout of your VTEX store.
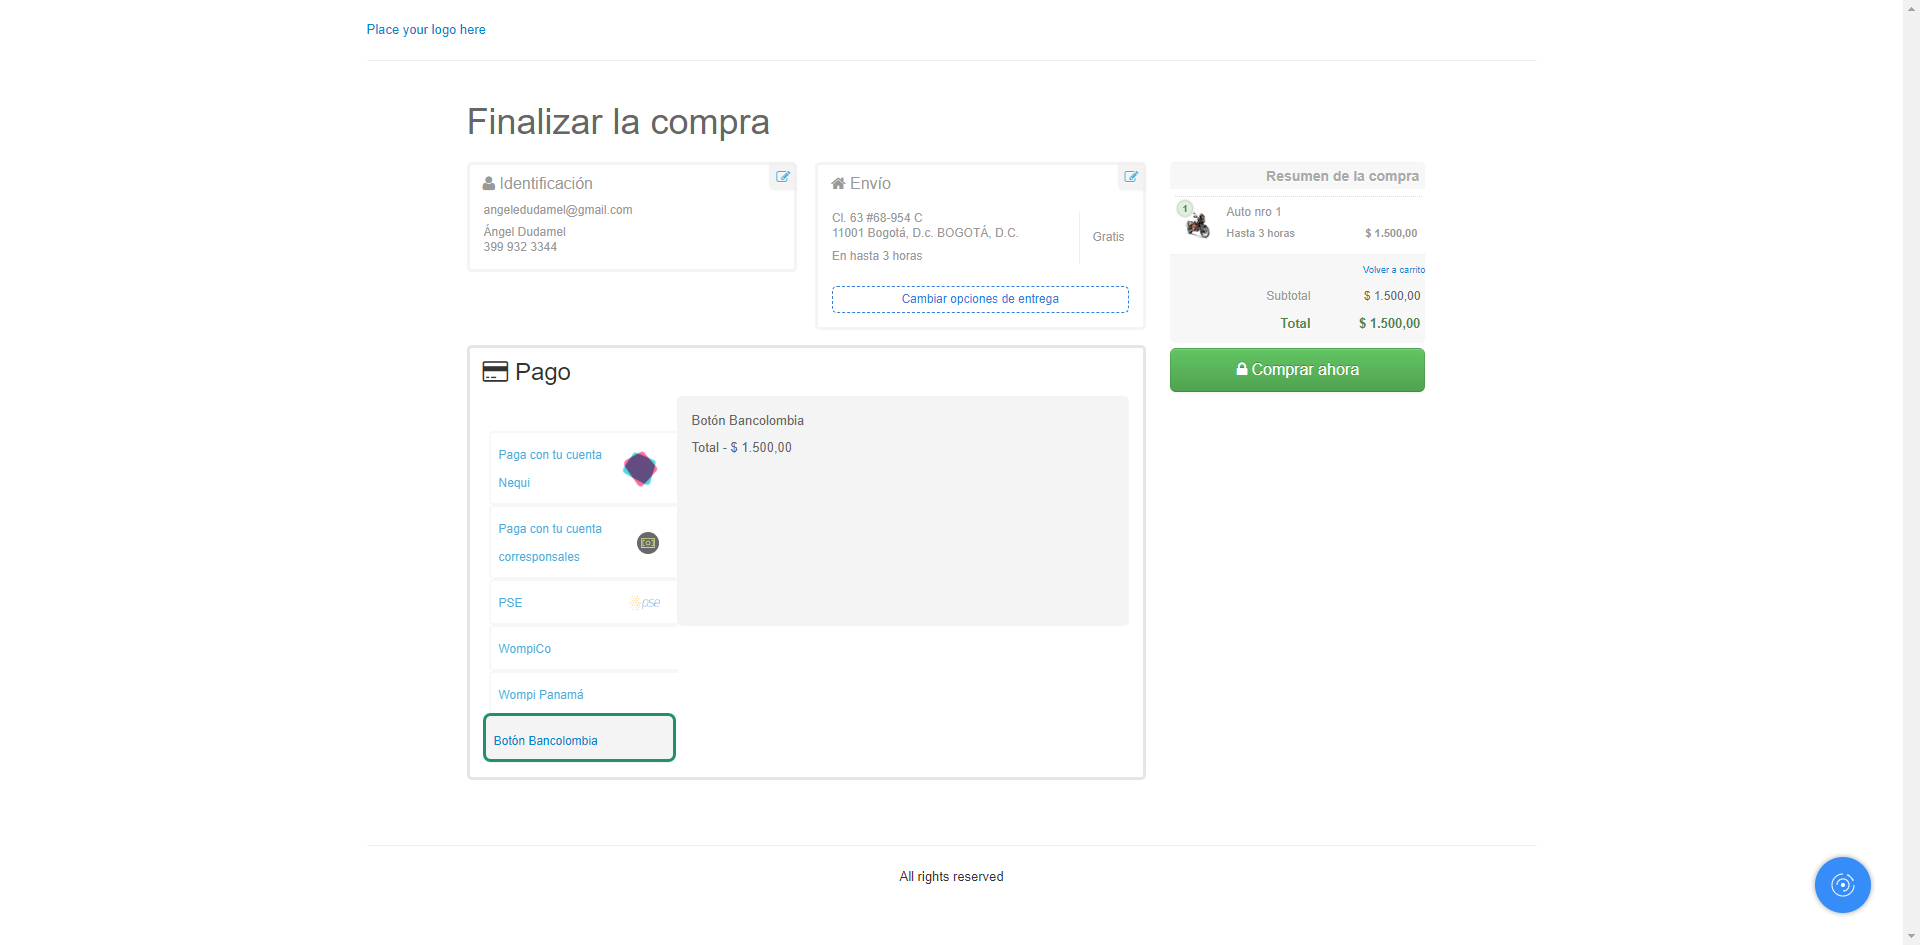
Press the Buy Now button and you will be redirected to the bank experience to continue with the transaction.
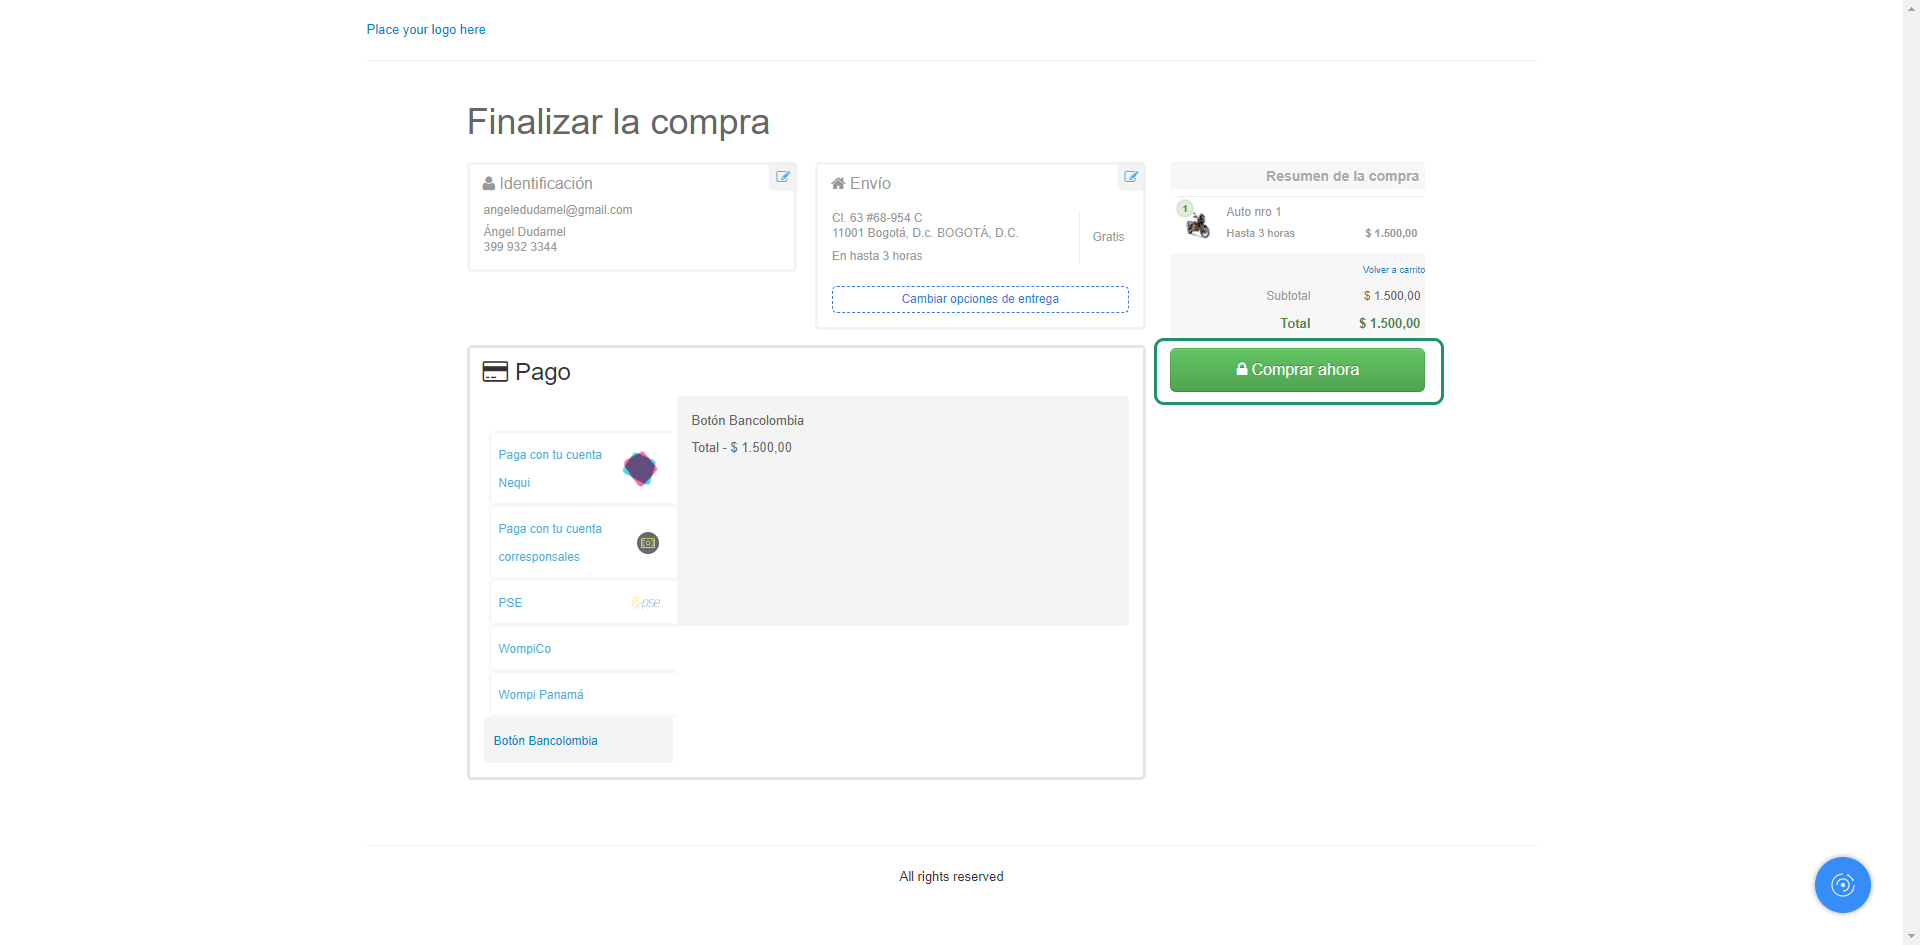
Once the operation is completed, you will return to the checkout of your VTEX store with the order confirmation.
Wompi - Cards
The buyer selects Credit Card or Debit Card as the payment method.
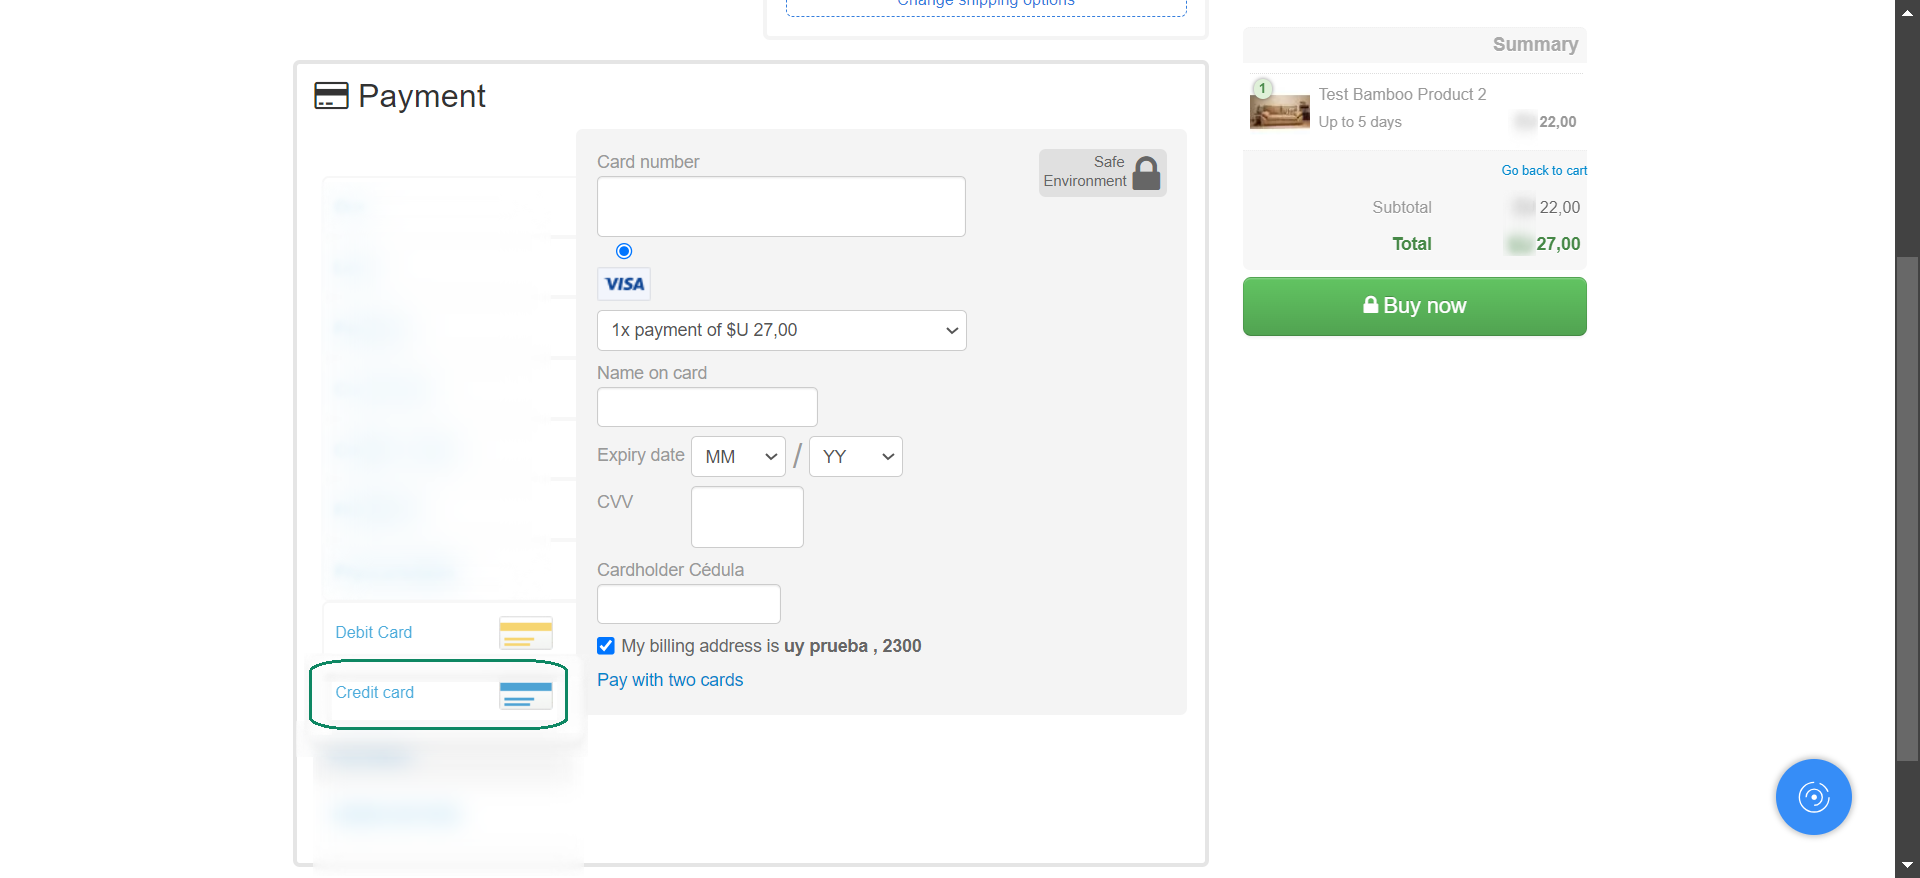
Then, they must enter the card details, the number of installments if applicable, and complete the purchase.
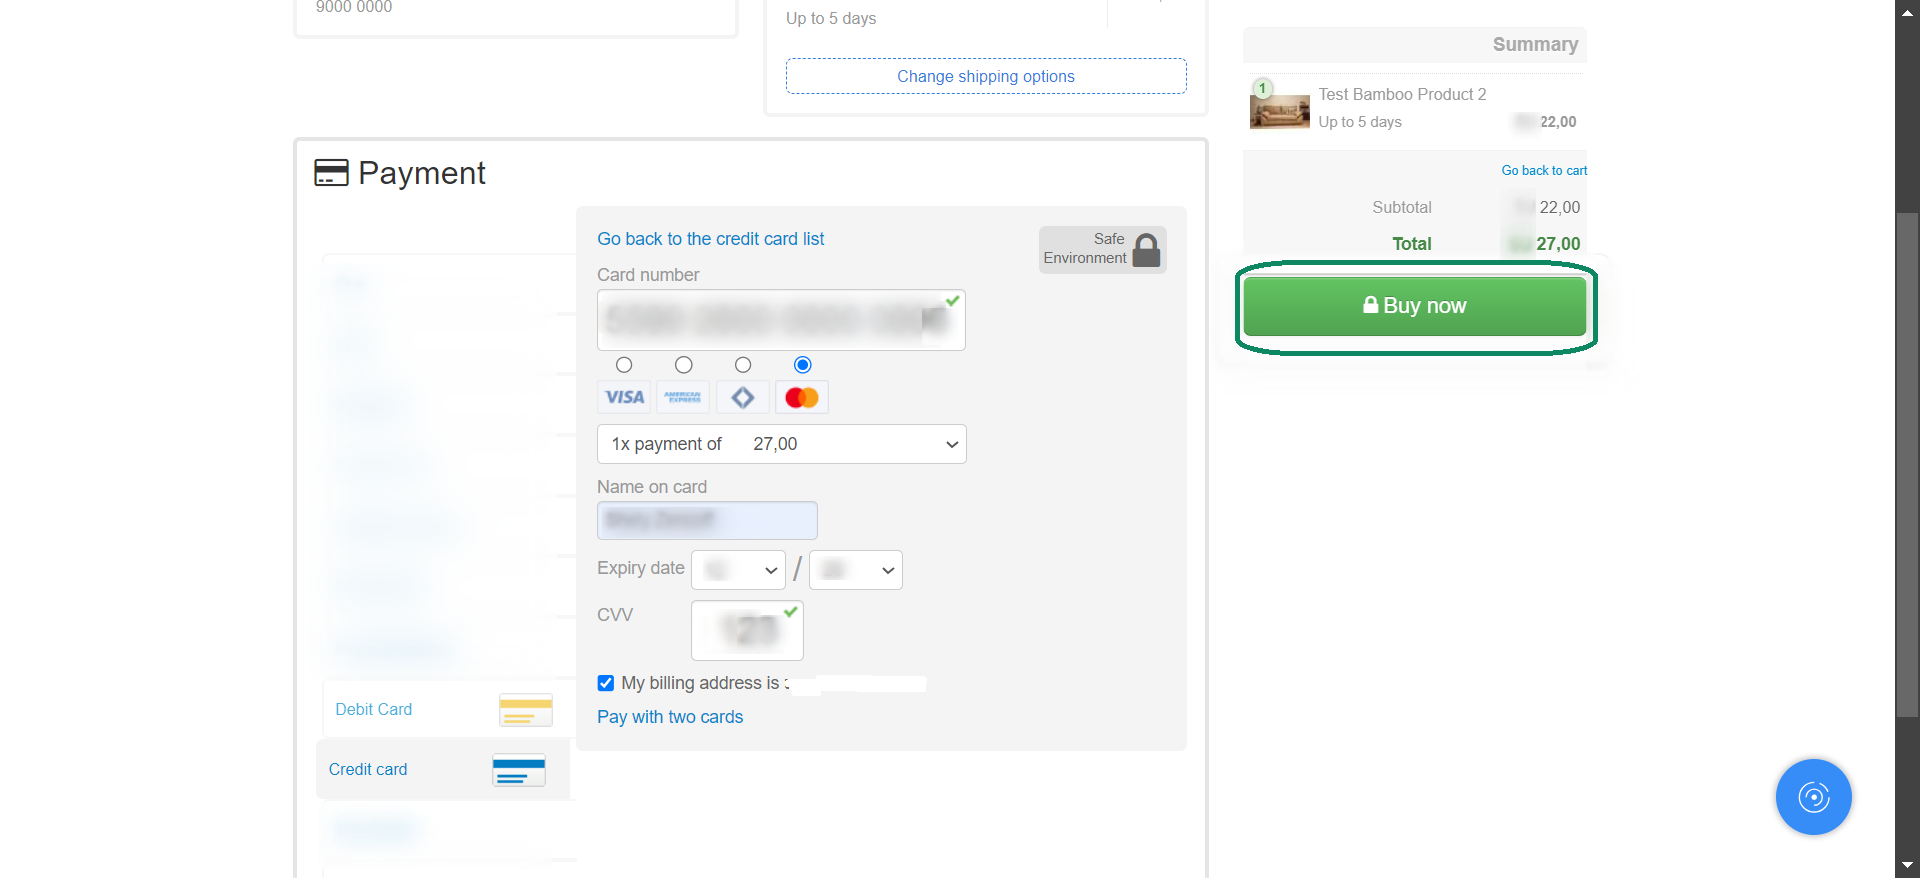
Once the transaction is completed, they are returned to your VTEX store checkout with the order confirmation.
Administrator flow
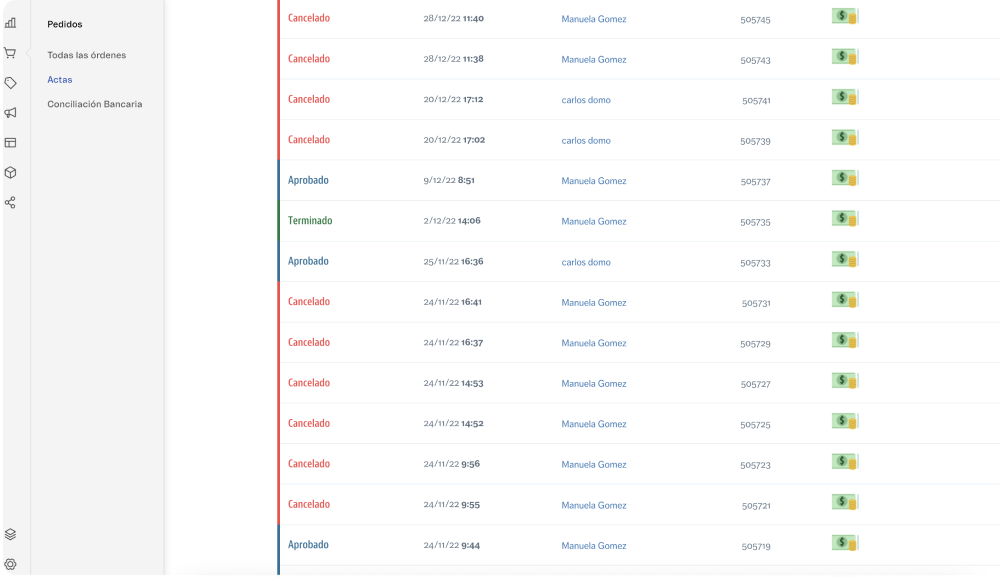
As the administrator of your store, you will be able to view a list of your transactions with the payment method used.
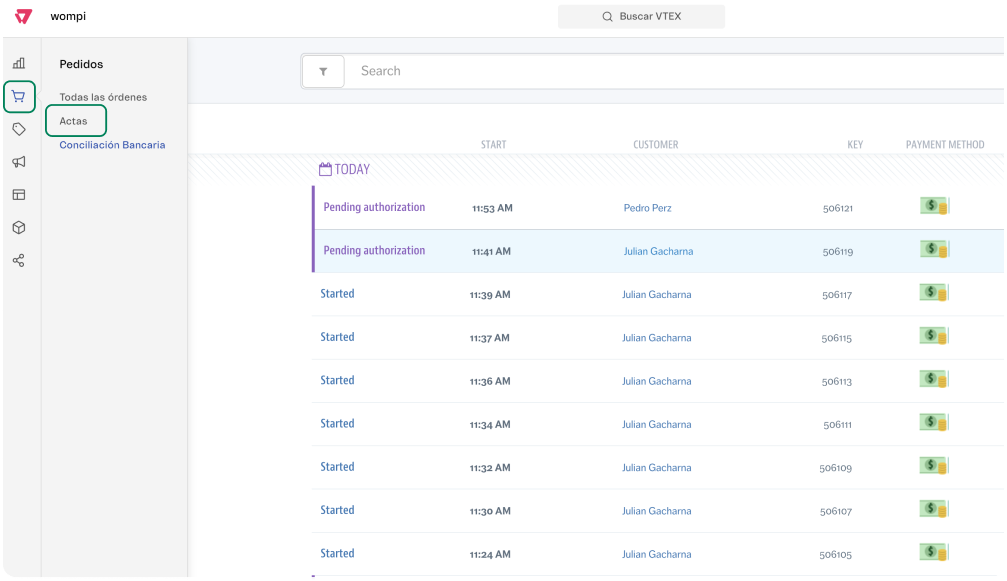
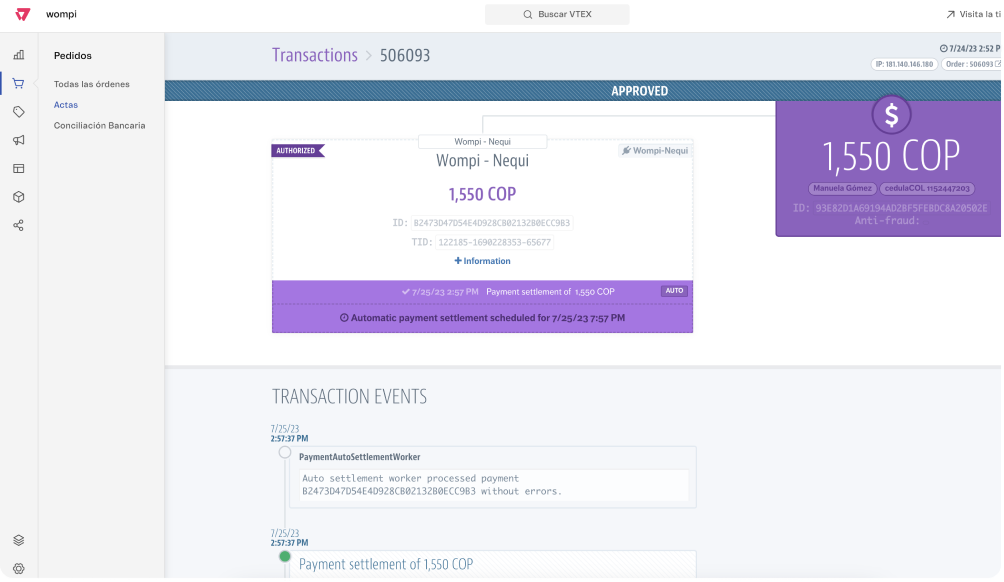
In the same way, from the order list you can check the details of your orders: you will see if the payment was made through Wompi and the corresponding transaction id.


Also, as a commerce from the Wompi dashboard, you will be able to visualize the payment made.

FAQ
1. Why is the payment method not displayed in my store?
The credentials used in the configuration process are not correct. We recommend that you make sure that the credentials configured are correct and that all the steps mentioned in this documentation have been performed. If the problem persists, contact support.
2. How can I view more information about my transactions?
From your VTEX store and/or Wompi panel, you can obtain more details about your transactions.
3. Is the status of the payment made updated in my store?
Once the buyer pays for the order, you should see the approved payment in your store.
4. Where can I get more information about gateway membership registration?
Visit Register gateway affiliations from Tutorials and Solutions of the VTEX platform.
5. Where can I get more information to set up payment terms?
Visit Configure payment terms from Tutorials and Solutions of the VTEX platform.
6. Can I stop offering the payment method?
Yes, whenever you want you can disable the payment method, simply go to the TRANSACTIONS -> Payments -> Settings section, click on the Payment conditions tab and disable the payment condition for Wompi. Then, from the same screen you can enable the condition if you want to use it again in your VTEX store.
