Secure Payment Sources with 3D Secure (Sandbox)
Introduction
In this guide, you'll learn how to create and use secure payment sources with 3D Secure in Wompi's Sandbox environment.
What is 3D Secure? It's a security protocol that adds an additional authentication layer for online transactions, helping prevent fraud and protect both merchants and buyers.
Protecting your business and your money is one of our priorities. Check out our security recommendations to strengthen your integration.
Activating the 3D Secure Protocol
To enable 3D Secure in your integration, you must request it through our support channel:
Steps to Request Activation:
- Access the Wompi Support Center
- Go to the "Contact Us" module
- Complete the form with the following information:
- Request Type: Integration
- Subject: Copy and paste:
3D Secure Activation for Payment Sources - production - Description: Include any additional relevant details for your request
How Does 3D Secure Work in a Payment Source?
The flow of a payment source with 3D Secure follows these steps. We'll use a service subscription as an example:
-
Payment Initiation — Your customer selects products/services and proceeds to checkout on your platform.
-
Redirect to Authentication — After entering card details, the customer is automatically redirected to the issuing bank's authentication page.
-
Cardholder Authentication — The bank requests the customer to enter a password, OTP code, fingerprint, or other verification method.
-
Payment Source Authorization — Once successfully authenticated, the bank generates a successful authentication message and sends it to the acquirer.
-
Source Availability — The acquirer receives the authentication confirmation and authorizes the payment source as secure.
-
Transaction Processing — The system verifies there are sufficient funds and that the transaction complies with anti-fraud rules.
-
Confirmation — A confirmation is displayed to the customer indicating the transaction completed successfully.
-
Recurring Billing — If the payment source is for a subscription, the system will make automatic charges at defined intervals using the created secure payment source.

Implementation Flow Diagram
The following diagram shows the complete technical flow for implementing payment sources with 3D Secure from the frontend:

This diagram illustrates:
- The complete process from obtaining the acceptance token to creating the payment source
- Card tokenization before creating the payment source
- The polling strategy to query the payment source status
- Challenge handling when required by the issuing bank
- The different possible final statuses: AVAILABLE (successful), DECLINED, or ERROR
Important Considerations
-
3RI Protection: When you create a secure payment source with 3DS and use its ID in automatic transactions, these will be protected under the 3RI protocol.
-
Supported Networks for 3DS: The protocol is available for Mastercard and Visa.
-
Supported Networks for 3RI: The 3RI protocol for automatic transactions is available on Mastercard.
→ More information: Automatic Transactions with 3RI -
Availability by Model: 3DS availability may vary depending on your business model (Gateway or Aggregator). Contact us to confirm your specific case.
-
Payment Sources Without 3DS: If you need to create payment sources without this protocol, see: Payment Sources & Tokenization
-
3DS for Non-Recurring Transactions: If you need to implement 3DS in individual (non-recurring) transactions, visit: Transactions with 3D Secure (Sandbox) v2
Additional Resources
API Implementation
Below we explain how to implement 3D Secure on your platform step by step.
Prerequisites
Before you begin, make sure you have:
1. Authentication Keys
- You'll need your public key to include it as a
Bearer tokenin request headers. - Learn how to obtain them: Authentication Keys
2. Test Cards
Use these cards according to the scenario you want to simulate:
| Scenario | Card Number | Additional Data |
|---|---|---|
| Authentication with Challenge | 2303 7799 5100 0446 | Any future date, CVV, and name |
| Authentication Error | 2303 7799 5100 0354 | Any future date, CVV, and name |
| Supported Version Error | 2303 7799 5100 0347 | Any future date, CVV, and name |
3. Environment URLs
- Check the Sandbox Environment URLs
Implementation Flow
Step 1: Obtain an Acceptance Token
Get a pre-signed acceptance token to be able to create the payment source.
Step 2: Tokenize the Card
Tokenize the payment method (credit or debit card) before creating the payment source.
Step 3: Create the Payment Source with 3D Secure
Make a POST request to the following endpoint:
POST https://sandbox.wompi.co/v1/payment_sources
Required Headers
Authorization: Bearer pub_test_your_public_key
Content-Type: application/json
Body Parameters
| Parameter | Type | Description | Required |
|---|---|---|---|
type | String | Payment source type. Use CARD for cards. | ✅ Yes |
token | String | Card token obtained in Step 2. | ✅ Yes |
customer_email | String | Customer's email address. | ✅ Yes |
acceptance_token | String | Acceptance token from Step 1. | ✅ Yes |
Request Example
{
  "type": "CARD",
  "token": "tok_test_1234567890abcdef",
  "customer_email": "pepe@example.com",
  "acceptance_token": "acceptance_test_1234567890abcdef"
}
Step 4: Interpret the Initial Response
Since the card requires 3D Secure authentication, the initial status will be PENDING until the process is completed.
Response Example
{
  "data": {
    "id": 123456,
    "public_data": {
      "bin": "230377",
      "last_four": "0446",
      "exp_month": "08",
      "exp_year": "30",
      "card_holder": "Pepe Perez",
      "validity_ends_at": "2031-08-29T14:35:02.547+00:00",
      "type": "CARD"
    },
    "token": "tok_test_1234567890abcdef",
    "type": "CARD",
    "status": "PENDING",
    "customer_email": "pepe@example.com"
  },
  "meta": {}
}
The PENDING status indicates that the 3D Secure authentication process is in progress. You must proceed to the next step to complete it.
Step 5: Query the Authentication Status (Polling)
Make periodic queries to the payment source query endpoint to obtain authentication data:
GET https://sandbox.wompi.co/v1/payment_sources/{payment_source_id}
Replace {payment_source_id} with the ID obtained in Step 4.
Required Headers
Authorization: Bearer pub_test_your_public_key
Response with Authentication Data
When the 3DS process activates, you'll find a three_ds_auth object inside the extra field:
{
  "data": {
    "id": 123456,
    "status": "PENDING",
    "extra": {
      "three_ds_auth": {
        "current_step": "CHALLENGE",
        "current_step_status": "PENDING",
        "three_ds_method_data": "<!DOCTYPE html><html>...</html>"
      }
    }
  }
}
three_ds_auth Fields
| Field | Description | Possible Values |
|---|---|---|
current_step | Current step of the 3DS flow | CHALLENGE, BROWSER_INFO, etc. |
current_step_status | Status of the current step | PENDING, COMPLETED, ERROR |
three_ds_method_data | HTML form for the challenge (only if applicable) | String with HTML |
Step 6: Render the Challenge (If Required)
If the three_ds_method_data field is present, you must:
- Extract the HTML contained in this field
- Render it inside an iframe on your page
- Allow the user to complete the authentication challenge
Visual Example of the Challenge
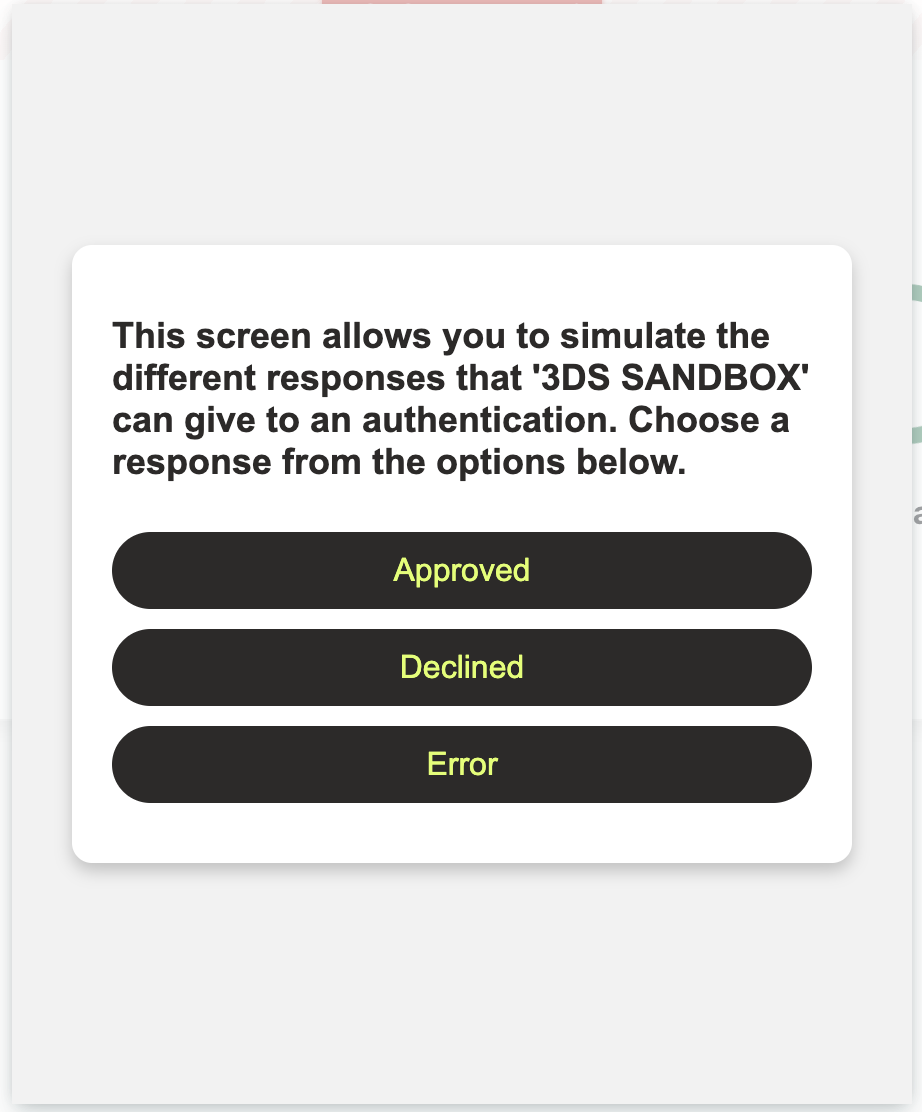
In the Sandbox environment, the challenge is a simulation. The user can choose between three options: APPROVED, DECLINED, or ERROR. The selected option will determine the final status of the payment source.
In production, the challenge content is defined by the issuing bank and will vary depending on the financial institution.
Step 7: Verify the Final Status
Continue making periodic queries until the status changes from PENDING to one of these final statuses:
| Status | Meaning |
|---|---|
AVAILABLE | ✅ Successful authentication. The payment source is ready to use. |
DECLINED | ❌ Authentication failed. The payment source cannot be used. |
ERROR | ⚠️ An error occurred during the authentication process. The payment source cannot be used. |
Successful Response Example
{
  "data": {
    "id": 123456,
    "public_data": {
      "bin": "230377",
      "last_four": "0446",
      "exp_month": "08",
      "exp_year": "30",
      "card_holder": "Pepe Perez",
      "validity_ends_at": "2031-08-29T14:35:02.547+00:00",
      "type": "CARD"
    },
    "token": "tok_test_1234567890abcdef",
    "type": "CARD",
    "status": "AVAILABLE",
    "customer_email": "pepe@example.com",
    "extra": {
      "three_ds_auth": {
        "current_step": "CHALLENGE",
        "current_step_status": "COMPLETED"
      }
    }
  },
  "meta": {}
}
Common Scenarios and How to Handle Them
During 3D Secure implementation, some situations may arise that you should know about to provide the best experience for your users.
Scenario 1: User Abandons the Authentication Flow
It's common for some users to close the window or navigate to another page during the CHALLENGE step without completing authentication.
What happens?
Wompi has a time limit to complete the 3DS authentication flow. If this time expires, the payment source will end up in DECLINED or ERROR status.
How to handle it:
- Display a friendly message indicating the verification process was incomplete
- Offer the option to retry by creating a new payment source
- Consider implementing visual reminders during the process to reduce abandonment
Scenario 2: Card Not Compatible with 3DS
Some cards may not be compatible with the 3DS protocol. This validation is performed automatically before the Browser Info step.
What happens?
The payment source will immediately be in DECLINED status and the flow will end.
How to handle it:
- Clearly inform the user that their card doesn't support this payment modality
- Offer alternatives such as the payment sources without 3DS flow
- Suggest using another payment method if available on your platform
When you create a secure payment source with 3DS and use its ID in automatic transactions, these will be protected under the 3RI protocol. See considerations at: Automatic Transactions with 3RI
Next Steps
Once you've completed the Sandbox implementation and verified everything works correctly:
- Request activation in production following the steps in the "Activating the 3D Secure Protocol" section
- Update your credentials to use production keys
- Perform thorough testing in production before final launch
Have questions? Contact us through our Support Center.
