Payment Sources & Tokenization
With Wompi you can charge your customers more than once by using by using payment sources. For example, you can build subscription services for a magazine, charge for an on-demand service like a delivery or whichever payment experience your users need to pay more than once, but giving you the credit card details only once.
The payment sources feature can be used with Cards or Nequi accounts, which requires the customer to only input the Card or Nequi information once, so that it can be used to charge them afterwards without requiring their presence or manual intervention again.
You only need to follow the step by step instructions which are detailed next:
Step by step
- Step 1 — Ask users for the payment method information.
- Step 2 — Create a payment source.
- Step 3 — Create a transaction using the payment source.
Step 1: Ask for the payment method information
The first of these 3 steps to charge using a payment source, requires the secure storage of a credit card or Nequi account information. For that, you will use our API in a way to save information in a safe and secure way.
The process of saving and representing card information in a secure way is called: tokenization. This means that you should send the payment method information to the Wompi API only once, to obtain a token which you will use to create a payment source as outlined in Step 2 of this guide.
Take into account the API environment
Remember that in Wompi there is a Sandbox environment for test transactions and a Production environment for real payments. For more details read our guide on environments and sources clicking here.
Cards
For cards (credit and debit with CVV) the endpoint that you should use is /v1/tokens/cards, sending a POST with the following JSON body:
{
  "number": "4242424242424242", // Card number (string, with no spaces or special chars)
  "exp_month": "06", // Expiration month (2-digit string)
  "exp_year": "29", // Año de expiración (2-digit string)
  "cvc": "123", // Security code (3 or 4 digit string)
  "card_holder": "Pedro Pérez" // Cardholder name (string, 5 chars minimum length)
}
As a result of this request, you'll get the following response:
{
  "status": "CREATED",
  "data": {
    "id": "tok_prod_15_44c5638281if67l04eA63f705bfA5bde",
    "created_at": "2020-09-07T19:09:31.585+00:00",
    "brand": "VISA",
    "name": "VISA-4242",
    "last_four": "4242",
    "bin": "538696",
    "exp_year": "06",
    "exp_month": "29",
    "card_holder": "Pedro Pérez",
    "expires_at": "2021-09-05T19:09:30.000Z"
  }
}
If the status key has the "CREATED" value, this means the cards has been correctly tokenized. You can now use its token value ("tok_prod_15_44c5638281if67l04eA63f705bfA5bde"), in the id key to create a payment source.
Nequi accounts
For payments with Nequi, the endpoint that you should use is /v1/tokens/nequi sending a POST with the public key as an authorizer with the following JSON body:
{
  "phone_number": "3017654321"
}
In the following response, the id key contains the new Nequi Token ("nequi_prod_RQkUiuv3lEnDLiSao2Cz0iQLdFlyQOI5"), which you can use to create a payment source. However, the customer still needs to accept the subscription on his cellphone, so that the status changes from "PENDING" to "APPROVED".
{
  "data": {
    "id": "nequi_prod_RQkUiuv3lEnDLiSao2Cz0iQLdFlyQOI5",
    "status": "PENDING",
    "phone_number": "3107654321",
    "name": "Company Name"
  }
}
To check the state of the subscription, you can use the GET /v1/tokens/nequi/:nequi_token endpoint with the aforementioned Nequi Token:
GET /v1/tokens/nequi/nequi_prod_RQkUiuv3lEnDLiSao2Cz0iQLdFlyQOI5
Once you get an APPROVED string in the "status" property, it will be possible to properly create the payment source.
{
  "data": {
    "id": "nequi_prod_RQkUiuv3lEnDLiSao2Cz0iQLdFlyQOI5",
    "status": "APPROVED",
    "phone_number": "3107654321",
    "name": "Company Name"
  }
}
DaviPlata Accounts
Before using this payment method in the production environment, you need to request its activation from the commercial team.
Requirements
- Business' public key.
- Test data.
Explanation of API usage
- To initiate the tokenization process for a Daviplata account, the endpoint you should use is:
POST /v1/tokens/daviplata
With the public key as the Bearer token for authentication, using the following JSON body:
{
  "type_document": "CC",
  "number_document": "1122233",
  "product_number": "3991111111"
}
Note: You should keep in mind that the behavior will depend on the value you enter in the product_number field, as specified in the test data since it is a Sandbox environment.
As a result of this request, you will receive the following response:
{
  "data": {
    "id": "daviplata_devtest_KYbozzUqNlHVQ3Rxgi1skM3991111111",
    "status": "PENDING",
    "url_services": {
      "token": "token_de_autenticacion",
      "code_otp_send": "https://test.com",
      "code_otp_validate": "https://test.com"
    }
  },
  "meta": {}
}
- id: It corresponds to the token associated with the Daviplata account.
- status: Current status of the token.
- token: It is the key that will allow us to use the following service (code_otp_send); this token is for one-time use only.
- code_otp_send: API URL that will send the OTP code to the payer.
- code_otp_validate: API URL that will validate the OTP code entered by the payer.
- Send the OTP code to the payer:
Requirements
- Token: You can find it in the result of the previous request:
data -> url_services -> token. - URL: You can find it in the result of the previous request:
data -> url_services -> code_otp_send.
You need to make a POST request to the URL and send the Token as the Bearer Token, example:
POST https://test.com
As a result of this request, you will receive the following response:
{
  "status": 200,
  "code": "OK",
  "message": "Solicitud ejecutada correctamente.",
  "data": {
    "subscription": {
      "PK": "daviplata_devtest_KYbozzUqNlHVQ3Rxgi1skM3991111111",
      "status": "PENDING",
      "statusMessage": "",
      "steps": {
        "PurchaseIntention": [
          {
            "resultStatus": {
              "message": "Transacción aprobada",
              "transactionDate": "2024-07-31T21:52:04.146+00:00",
              "transactionId": "KlfxX9Ir-rDlY-KVzI-oOzwQyGaYRmC",
              "status": 0
            },
            "infoOtp": {
              "idSesionOTP": "20270866",
              "expirationDateOTP": "2024-07-31T21:52:04.146+00:00",
              "expirationTimeOTP": 3
            }
          }
        ]
      }
    },
    "authorization": {
      "access_token": "pub_devtest_lfGsG2o7X6OL8fOSVcaP2r20sMGpMgT9"
    },
    "attempts": {
      "currentSendCode": 1,
      "limitSendCode": 2,
      "currentValidateCode": 0,
      "limitValidateCode": 2
    }
  }
}
We will focus on the information in data -> subscription:
- PK: Corresponds to the token associated with the Daviplata account.
- status: Current status of the token.
- statusMessage: If not empty, provides the reason for the failure.
- steps -> PurchaseIntention: An array that, in each of its iterations in descending order, indicates the number of times the OTP code has been sent to the customer.
- steps -> PurchaseIntention -> resultStatus: Information about the response to the OTP code sending request.
- steps -> PurchaseIntention -> infoOtp -> idSesionOTP: This ID is for one-time use and expires when the payer incorrectly enters the OTP code (it is suggested to request another OTP code).
- steps -> PurchaseIntention -> infoOtp -> expirationDateOTP: The time until the OTP code is valid.
- steps -> PurchaseIntention -> infoOtp -> expirationTimeOTP: The minutes of validity for the OTP code.
In addition to this:
- authorization -> access_token: Token that can be used to consume
code_otp_sendorcode_otp_validate; it is a one-time use token. - attemps -> currentSendCode: Number of times the OTP code has been sent to the payer.
- attemps -> limitSendCode: Maximum number of times allowed to send the OTP code to the payer.
- attemps -> currentValidateCode: Number of times the payer has entered and validated the OTP code.
- attemps -> limitValidateCode: Maximum number of times allowed to validate the OTP code.
- Validate the OTP code entered by the payer:
Requirements
- Token: You can find it in the result of the previous request:
data -> authorization -> access_token. - URL: You can find it in the result of the first step request:
data -> url_services -> code_otp_validate. - OTP Code: Received by the payer as a text message. In Sandbox, use the test data.
You need to make a POST request to the URL, using the token as the Bearer Token, example:
POST https://test.com
And send in the request body:
{
  "code": "574829"
}
As a result of this request, you will receive the following response:
{
  "status": 200,
  "code": "OK",
  "message": "Solicitud ejecutada correctamente.",
  "data": {
    "subscription": {
      "PK": "daviplata_devtest_KYbozzUqNlHVQ3Rxgi1skM3991111111",
      "status": "APPROVED",
      "statusMessage": "",
      "steps": {
        "PurchaseIntention": [
          {
            "resultStatus": {
              "message": "Transacción aprobada",
              "transactionDate": "2024-07-31T22:28:50.974+00:00",
              "transactionId": "6Ggyd3w7-efqj-PZd8-40RMbLM32veV",
              "status": 0
            },
            "infoOtp": {
              "idSesionOTP": "20270866",
              "expirationDateOTP": "2024-07-31T22:28:50.974+00:00",
              "expirationTimeOTP": 3
            }
          }
        ],
        "ConfirmIntention": [
          {
            "resultStatus": {
              "message": "Transacción aprobada",
              "transactionDate": "2024-07-31T22:28:50.974+00:00",
              "transactionId": "wkwoA4TR-R1ti-yw46-0sBSeQ7vi0gB",
              "status": 0
            },
            "Subscription": {
              "Commerce": {
                "commerceId": 1004,
                "commerceName": "Juan Manuel Tamayo Monje"
              },
              "Product": {
                "productCode": "DVP_CO",
                "productNumber": "3991111111"
              },
              "Identification": {
                "identificationNumber": "1234567890",
                "identificationType": "CC"
              },
              "subscriptionId": 5734,
              "maxValue": {
                "currencyType": "COP",
                "value": 0
              },
              "TppPartner": {
                "tppPartnerName": "Test Daviplata Sandbox",
                "tppPartnerId": "00000001"
              }
            }
          }
        ]
      }
    },
    "authorization": {
      "access_token": "pub_devtest_lfGsG2o7X6OL8fOSVcaP2r20sMGpMgT9"
    },
    "attempts": {
      "currentSendCode": 1,
      "limitSendCode": 2,
      "currentValidateCode": 0,
      "limitValidateCode": 2
    }
  }
}
We will focus again on the information in data -> subscription; this time, we will receive an additional field.
- status: As we can see, the token has been APPROVED, indicating the end of the tokenization process.
- steps -> ConfirmIntention: An array that, in each of its iterations in descending order, indicates the number of times the customer has tried to confirm the OTP code.
- steps -> ConfirmIntention -> resultStatus: Information about the response to the OTP code validation request.
- steps -> ConfirmIntention -> subscription: Information related to the subscription.
If the customer has entered an incorrect OTP code, we will receive the following response:
{
  "status": 200,
  "code": "OK",
  "message": "Solicitud ejecutada correctamente.",
  "data": {
    "subscription": {
      "PK": "daviplata_devtest_KYbozzUqNlHVQ3Rxgi1skM3220164001",
      "status": "PENDING",
      "statusMessage": "",
      "steps": {
        "PurchaseIntention": [
          {
            "resultStatus": {
              "message": "Transacción aprobada",
              "transactionDate": "2024-08-01T15:49:02.558+00:00",
              "transactionId": "FAZpFUnO-3JUa-aUiy-yurjWxOeJo7z",
              "status": 0
            },
            "infoOtp": {
              "idSesionOTP": "20270866",
              "expirationDateOTP": "2024-08-01T15:49:02.558+00:00",
              "expirationTimeOTP": 3
            }
          }
        ],
        "ConfirmIntention": [
          {
            "resultStatus": {
              "message": "No se puede ejecutar la transacción",
              "transactionDate": "2024-05-08T16:23:33.104-00:00",
              "transactionId": "8eb61a58-5df1-4838-945c-0f634fdd8686",
              "status": "2"
            },
            "faultstring": "OTP_INVALIDO"
          }
        ]
      }
    },
    "authorization": {
      "access_token": "pub_devtest_lfGsG2o7X6OL8fOSVcaP2r20sMGpMgT9"
    },
    "attempts": {
      "currentSendCode": 1,
      "limitSendCode": 2,
      "currentValidateCode": 0,
      "limitValidateCode": 2
    }
  }
}
We will focus again on the information in data -> subscription; this time, we will receive an additional field.
- status: As we can see, the tokenization process remains in the PENDING state.
- steps -> ConfirmIntention -> resultStatus: Information about the response to the OTP code validation request.
- steps -> ConfirmIntention -> faultstring: Reason for the authentication failure.
Recommendations
- Remember that the token obtained from
data -> authorization -> access_tokenis for one-time use; therefore, with each successful request, a new token will be generated and returned for use. - steps -> PurchaseIntention and steps -> ConfirmIntention are two arrays that grow in descending order according to the OTP code requests made by the customer and the OTP code validations performed by the customer. (In the Sandbox environment, you will only find one iteration in each of the scenarios mentioned above.) In either case, the last position in the array shows the result of the requested action.
- attemps:
- These scenarios cannot be replicated in the environment Sandbox; therefore, the information we obtain in attempts is purely informational.
- The maximum number of OTP code resends in the production environment is 2.
- The maximum number of attempts allowed to validate the OTP code is 2.
- Exceeding the number of attempts in either of the above scenarios will result in:
{
  "status": 500,
  "meta": {
    "trace_id": "92a53630-503e-11ef-b637-b76fbbdbd451"
  },
  "code": "500",
  "message": "Ha agotado el número de intentos de envío de código OTP",
  "data": {
    "PK": "daviplata_devint_h2UEgbEE30H29iVoS1aBXUlA961zfXJL",
    "status": "DECLINED",
    "statusMessage": "Ha agotado el número de intentos de envío de código OTP",
    "steps": {
      "PurchaseIntention": [
        {
          "resultStatus": {
            "message": "Transacción aprobada",
            "transactionDate": "2024-08-01T14:45:12.270-05:00",
            "transactionId": "068e2764-dece-4b85-8921-56016c554be3",
            "status": 0
          },
          "infoOtp": {
            "idSesionOTP": "84446823",
            "value": "135301",
            "expirationDateOTP": "2024-08-01 14:48:12.104",
            "expirationTimeOTP": 3
          }
        },
        {
          "resultStatus": {
            "message": "Transacción aprobada",
            "transactionDate": "2024-08-01T14:45:13.803-05:00",
            "transactionId": "4118cad1-fe17-43c1-b2fe-30e3e0f3b0a7",
            "status": 0
          },
          "infoOtp": {
            "idSesionOTP": "33041739",
            "value": "609102",
            "expirationDateOTP": "2024-08-01 14:48:13.741",
            "expirationTimeOTP": 3
          }
        }
      ]
    },
    "createdAt": "2024-08-01T19:45:09.281Z",
    "updatedAt": "2024-08-01T19:45:13.903Z"
  },
  "type": "Technical"
}
When we receive a token with the status APPROVED, the tokenization process is complete and we can proceed to the next step: Create a payment source. If you need to request a token, you should make a request:
GET /v1/tokens/daviplata/daviplata_prod_qOVWahMgs2oOYHvggC1Mxc3991111111
And send the public key as the Bearer token. As a result of this request, you will receive the following response:
{
  "data": {
    "id": "daviplata_devtest_KYbozzUqNlHVQ3Rxgi1skM3991111111",
    "status": "APPROVED",
    "status_message": "",
    "client_info": {
      "type_document": "CC",
      "number_document": "14395323",
      "phone_number": "3991111111"
    }
  },
  "meta": {}
}
Bancolombia Accounts (Bancolombia Button)
With this process you will be able to enable the subscription process for Bancolombia accounts, allowing payments to be made directly to the successfully registered accounts.
The first step of the flow requires generating a bancolombia token, to continue with the process through the endpoint.
POST /v1/tokens/bancolombia_transfer
In this request, you must send the public key of your business as a Bearer Token to be able to authenticate it and in the body of the request the information associated with the Client.
For the account selection process, the client must first create the tokens.
Below are two different examples:
 "redirect_url": "<<URL to which the experience will be directed Once the account selection window in the bancolombia portal ends>>",
 "type_auth": "Type of subscription request, if it is TOKEN the authorization must be carried out at the time of the request response, if it is TRANSACTION this authorization would be executed in the first authorization"
- Account Selection during Transaction Request.
{
  "redirect_url": "https://www.redirect_url_example.com",
  "type_auth": "TRANSACTION"
}
- Answer.
{
  "data": {
    "id": "<<CREATED_TOKEN_ID>>",
    "status": "AVAILABLE",
    "status_message": "",
    "bank_account_type": "",
    "bank_account_last_four": "",
    "redirect_url": "https://www.redirect_url_example.com",
    "authorization_url": "",
    "created_at": "2024-06-07T16:26:21.289Z",
    "updated_at": "2024-06-07T16:26:21.289Z"
  },
  "goal": {}
}
It is important that the status is AVAILABLE, this allows the token to be used in the payment source creation step.
- Account Selection Prior to the transaction Request.
{
  "redirect_url": "https://www.redirect_url_example.com",
  "type_auth": "TOKEN"
}
- Answer.
{
  "data": {
    "id": "<<CREATED_TOKEN_ID>>",
    "status": "PENDING",
    "status_message": "",
    "bank_account_type": "",
    "bank_account_last_four": "",
    "redirect_url": "https://www.redirect_url_example.com",
    "authorization_url": "https://<<URL to select and authorize the account from Bancolombia>>",
    "created_at": "2024-06-07T14:50:25.389Z",
    "updated_at": "2024-06-07T14:50:26.104Z"
  },
  "goal": {}
}
Authorization_url
Through this field, we can go to Bancolombia to make the subscription without carrying out the transaction, taking into account that once it is finalized it will be redirected to the URL previously sent in the redirect_url parameter.
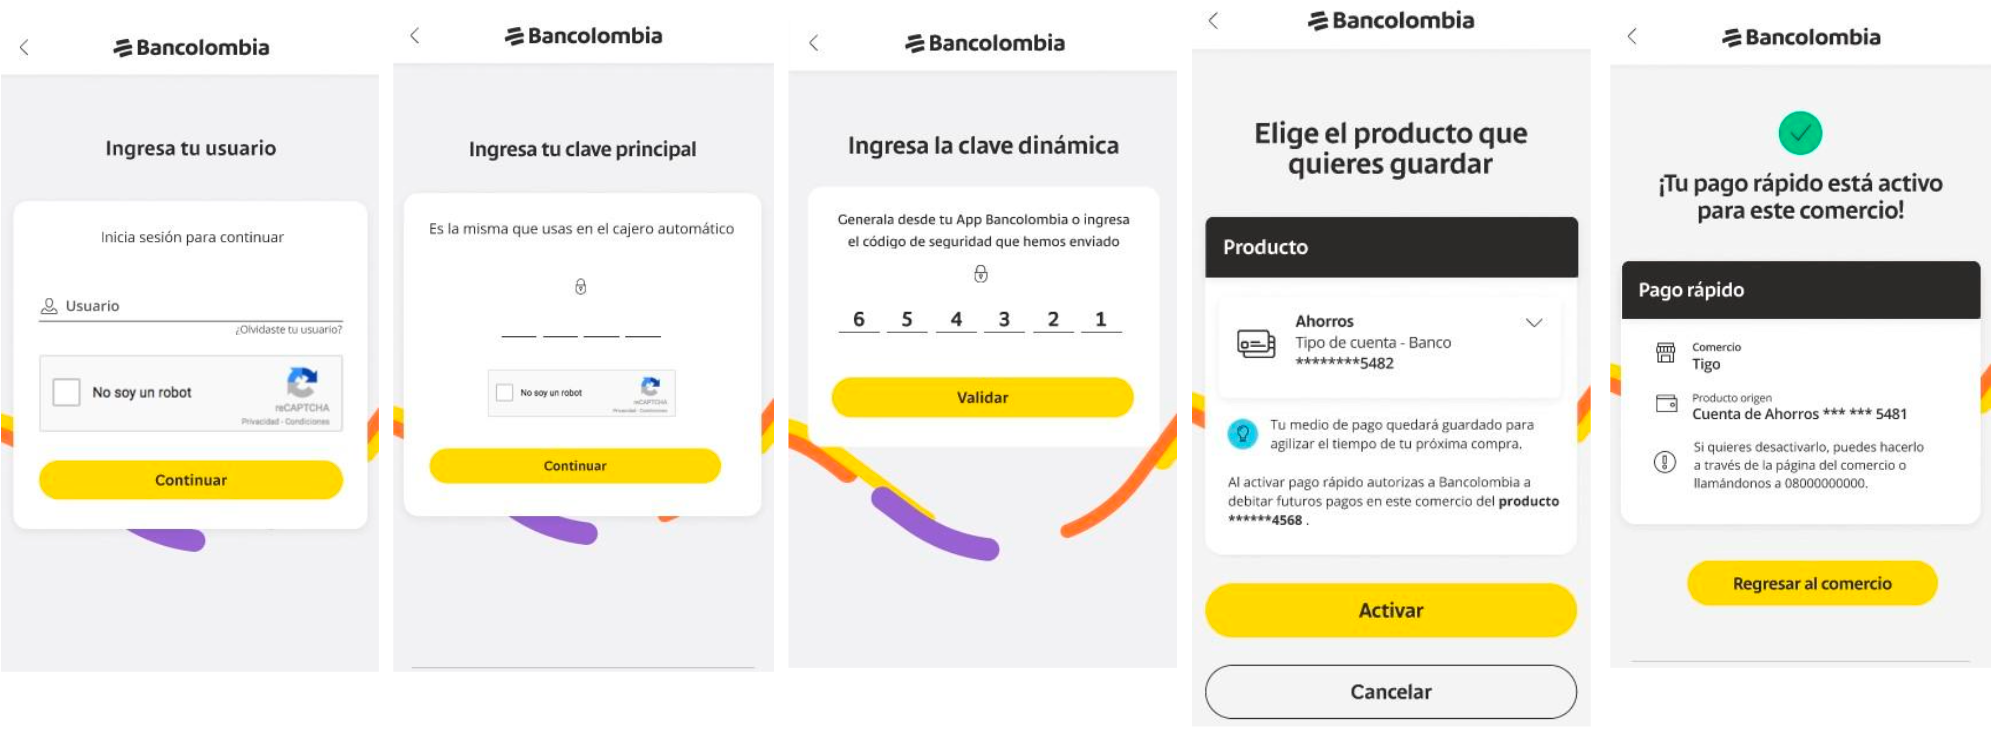
- After the paying client authorizes the account, the business must check its status through the API.
v1/tokens/bancolombia_transfer/<<CREATED TOKEN_ID>>
The result if the subscription is complete would be similar to the following:
{
  "data": {
    "id": "<<CREATED_TOKEN_ID>>",
    "status": "APPROVED",
    "status_message": "",
    "bank_account_type": "SAVINGS ACCOUNT",
    "bank_account_last_four": "***1234",
    "redirect_url": "https://www.redirect_url_example.com",
    "authorization_url": "<<URL to select and authorize the account from Bancolombia in this response it would no longer be used>>",
    "created_at": "2024-06-07T16:21:19.904Z",
    "updated_at": "2024-06-07T16:22:22.072Z"
  },
  "goal": {}
}
Now with the status APPROVED, you can continue with the step of creating the payment source.
Step 2: Create a payment source
To create a payment source, you'll use the following endpoint:
POST /v1/payment_sources
With the following required fields:
"customer_email"is the user's email address."type"indicates the kind of payment method that corresponds to the token, which can be"CARD"or"NEQUI"."token"Nequi or Card token obtained above."acceptance_token"a acceptance token for the privacy policy."accept_personal_auth"a acceptance token for authorization of personal data processing.
Cards
The following is the request body you'll need to send when creating Payment Sources for a Card, using "CARD" as its type and the card token obtained from Step 1:
{
  "type": "CARD",
  "token": "tok_prod_1_BBb749EAB32e97a2D058Dd538a608301",
  "customer_email": "john_smith@example.com",
  "acceptance_token": "eyJhbGciOiJIUzI1NiJ9.eyJjb250cmFjdF9pZCI6MSwicGVybWFsaW5rIjoiaHR0cHM6Ly93b21waS5jby93cC1jb250ZW50L3VwbG9hZHMvMjAxOS8wOS9URVJNSU5PUy1ZLUNPTkRJQ0lPTkVTLURFLVVTTy1VU1VBUklPUy1XT01QSS5wZGYiLCJmaWxlX2hhc2giOiIzZGNkMGM5OGU3NGFhYjk3OTdjZmY3ODExNzMxZjc3YiIsImppdCI6IjE1ODEwOTIzNjItMzk1NDkiLCJleHAiOjE1ODEwOTU5NjJ9.JwGfnfXsP9fbyOiQXFtQ_7T4r-tjvQrkFx0NyfIED5s",
  "accept_personal_auth": "eyJhbGciOiJIUzI1NiJ9.eyJjb250cmFjdF9pZCI6NDQxLCJwZXJtYWxpbmsiOiJodHRwczovL3dvbXBpLmNvbS9hc3NldHMvZG93bmxvYWRibGUvYXV0b3JpemFjaW9uLWFkbWluaXN0cmFjaW9uLWRhdG9zLXBlcnNvbmFsZXMucGRmIiwiZmlsZV9oYXNoIjoiOTVkYzcwN2M0M2UxYmViMDAwMDUyZDNkNWJhZThhMDAiLCJqaXQiOiIxNzI5NTY0MTM2LTU2NjMwIiwiZW1haWwiOiIifQ.0f-hFte-mpCcnxlrPgEG-fLdGBWUoQaUhU71pPuij40"
}
You should now obtain a JSON response similar to the following, indicating the payment source was created and is available to use:
{
  "data": {
    "id": 3891,
    "public_data": {
      "type": "CARD"
    },
    "type": "CARD",
    "status": "AVAILABLE"
  }
}
Nequi
The following is the request body you'll need to send when creating Payment Sources for Nequi, using "NEQUI" as its type and the Nequi token obtained from Step 1:
{
  "type": "NEQUI",
  "token": "nequi_prod_RQkUiuv3lEnDLiSao2Cz0iQLdFlyQOI5",
  "customer_email": "john_smith@example.com",
  "acceptance_token": "eyJhbGciOiJIUzI1NiJ9.eyJjb250cmFjdF9pZCI6MSwicGVybWFsaW5rIjoiaHR0cHM6Ly93b21waS5jby93cC1jb250ZW50L3VwbG9hZHMvMjAxOS8wOS9URVJNSU5PUy1ZLUNPTkRJQ0lPTkVTLURFLVVTTy1VU1VBUklPUy1XT01QSS5wZGYiLCJmaWxlX2hhc2giOiIzZGNkMGM5OGU3NGFhYjk3OTdjZmY3ODExNzMxZjc3YiIsImppdCI6IjE1ODEwOTIzNjItMzk1NDkiLCJleHAiOjE1ODEwOTU5NjJ9.JwGfnfXsP9fbyOiQXFtQ_7T4r-tjvQrkFx0NyfIED5s",
  "accept_personal_auth": "eyJhbGciOiJIUzI1NiJ9.eyJjb250cmFjdF9pZCI6NDQxLCJwZXJtYWxpbmsiOiJodHRwczovL3dvbXBpLmNvbS9hc3NldHMvZG93bmxvYWRibGUvYXV0b3JpemFjaW9uLWFkbWluaXN0cmFjaW9uLWRhdG9zLXBlcnNvbmFsZXMucGRmIiwiZmlsZV9oYXNoIjoiOTVkYzcwN2M0M2UxYmViMDAwMDUyZDNkNWJhZThhMDAiLCJqaXQiOiIxNzI5NTY0MTM2LTU2NjMwIiwiZW1haWwiOiIifQ.0f-hFte-mpCcnxlrPgEG-fLdGBWUoQaUhU71pPuij40"
}
You will then obtain a response indicating that the payment source was successfully created, with a structure like the following:
{
  "data": {
    "id": 3891,
    "public_data": {
      "type": "NEQUI",
      "phone_number": "3105671703"
    },
    "type": "NEQUI",
    "status": "AVAILABLE"
  }
}
DaviPlata Accounts
Requirements
- Private key.
- Daviplata token with APPROVED status.
- Payer's email.
-
Before creating a payment source, you need to obtain a Acceptance token.
-
To create a payment source, you need to make a request:
POST /v1/payment_sources
Use your private key as the Bearer token and send the following information in the request body:
{
  "type": "DAVIPLATA",
  "token": "daviplata_devtest_KYbozzUqNlHVQ3Rxgi1skM3991111111",
  "customer_email": "test@test.com",
  "acceptance_token": "acceptance_token",
  "accept_personal_auth": "acceptance_token_treatment_of_personal_data"
}
As a result of this request, you will receive the following response:
{
  "data": {
    "id": 8276,
    "public_data": {
      "type": "DAVIPLATA",
      "type_document": "CC",
      "number_document": "14395323",
      "phone_number": "3991111111"
    },
    "token": "daviplata_devtest_KYbozzUqNlHVQ3Rxgi1skM3991111111",
    "type": "DAVIPLATA",
    "status": "AVAILABLE",
    "customer_email": "test@test.com"
  },
  "meta": {}
}
- id: It is the identifier of the payment source and is used to:
- Create transactions.
- Cancel the payment source and unsubscribe Daviplata from the business.
- public_data:
- type_document: Type of document for the payer.
- number_document: Document number of the payer.
- phone_number: Daviplata number of the payer.
- token: Token with which the payment source was created.
- type: Payment method of the payment source.
- status: Status of the payment source; to be used, the status must be AVAILABLE.
- customer_email: Email of the payer.
If we try to create a payment source with a token whose final status is different from APPROVED, we will receive the following response:
{
  "error": {
    "type": "UNPROCESSABLE",
    "reason": "La fuente de pago ha sido declinada"
  }
}
Recommendations
- Once a payment source is created with the status AVAILABLE, you can create transactions using the payment source ID.
- When tokenization is successful (status APPROVED), a subscription of the payer's Daviplata with the business has been made. However, it cannot be used to make payments or for unsubscribing. In either of these scenarios, you need to create a payment source.
- A payer can tokenize their Daviplata with the business only once; this scenario cannot be replicated in the Sandbox environment. If you try to tokenize with an already tokenized account, you will receive the following error:
{
  "status": 500,
  "meta": {
    "trace_id": "417adc60-503e-11ef-b637-b76fbbdbd451"
  },
  "code": "2",
  "message": "SUSCRIPCION_YA_EXISTE",
  "data": {
    "PK": "daviplata_devint_yam2QkUw0jRx3PzeSYFtvhGGfXQlC96J",
    "status": "DECLINED",
    "statusMessage": "SUSCRIPCION_YA_EXISTE",
    "steps": {
      "PurchaseIntention": [
        {
          "resultStatus": {
            "message": "Transacción aprobada",
            "transactionDate": "2024-08-01T14:42:56.414-05:00",
            "transactionId": "a1a30968-0494-42ae-a3fa-a33b08f73c76",
            "status": 0
          },
          "infoOtp": {
            "idSesionOTP": "29268759",
            "value": "155345",
            "expirationDateOTP": "2024-08-01 14:45:56.341",
            "expirationTimeOTP": 3
          }
        }
      ]
    },
    "createdAt": "2024-08-01T19:42:53.407Z",
    "updatedAt": "2024-08-01T19:42:56.539Z"
  },
  "type": "Technical"
}
Note: For unsubscribing a Daviplata account from the business, it is recommended to create the payment source and make the following request:
PUT /v1/payment_sources/{{ID_FUENTE_DE_PAGO}}/void
Using your private key as the Bearer token, you will receive the following response:
{
  "data": {
    "id": 8276,
    "public_data": {
      "type": "DAVIPLATA",
      "type_document": "CC",
      "number_document": "300051",
      "phone_number": "3991111111"
    },
    "token": "daviplata_devint_O2RJ3a6e7ayYjzadMmtZ1q81jQr03mZ9",
    "type": "DAVIPLATA",
    "status": "VOIDED",
    "customer_email": "test@test.com"
  },
  "meta": {}
}
As we can see, the status has changed to VOIDED. In this state, if you attempt to create a transaction with this payment source, it will not be possible.
Bancolombia Accounts (Bancolombia Button)
The body of the request should be similar to the following:
{
  "type": "BANCOLOMBIA_TRANSFER",
  "token": "<<CREATED_TOKEN_ID>>",
  "payment_description": "<<Description of the subscription created, 'This field is the default value with which each payment is described, although each payment can also be customized during the creation of the transaction'>>",
  "customer_email": "pepito_perez@example.com",
  "acceptance_token": "eyJhbGciOiJIUzI1NiJ9.eyJjb250cmFjdF9pZCI6MSwicGVybWFsaW5rIjoiaHR0cHM6Ly93b21waS5jby93cC1jb250ZW50L3VwbG9hZHMvMjAxOS8wOS9URVJNSU5PUy1Z LUNPTkRJQ0lPTkVTLURFLVVTTy1VU1VBUklPUy1XT01QSS5wZGYiLCJmaWxlX2hhc2giOiIzZGNkMGM5OGU3NGFhYjk3OTdjZmY3ODExNzMxZjc3YiIsImppdCI6IjE1ODEwOTIzNjItMzk1NDkiLCJle HAiOjE1ODEwOTU5NjJ9.JwGfnfXsP9fbyOiQXFtQ_7T4r-tjvQrkFx0NyfIED5s",
  "accept_personal_auth": "eyJhbGciOiJIUzI1NiJ9.eyJjb250cmFjdF9pZCI6NDQxLCJwZXJtYWxpbmsiOiJodHRwczovL3dvbXBpLmNvbS9hc3NldHMvZG93bmxvYWRibGUvYXV0b3JpemFjaW9uLWF kbWluaXN0cmFjaW9uLWRhdG9zLXBlcnNvbmFsZXMucGRmIiwiZmlsZV9oYXNoIjoiOTVkYzcwN2M0M2UxYmViMDAwMDUyZDNkNWJhZThhMDAiLCJqaXQiOiIxNzI5NTY0MTM2LTU2NjMwIiwiZ W1haWwiOiIifQ.0f-hFte-mpCcnxlrPgEG-fLdGBWUoQaUhU71pPuij40"
}
We will obtain a response with a structure like the following, indicating that it was created successfully:
{
  "data": {
    "id": <<{ID_FUENTE_DE_PAGO} Id of the payment source, 'This is the field that would be used to carry out the transactions'>>,
    "public_data": {
      "type": "BANCOLOMBIA_TRANSFER",
      "payment_description": "Prueba",
      "bank_account_type": "CUENTA AHORROS",
      "bank_account_last_four": "***1234"
    },
    "token": "<<ID_DEL_TOKEN_CREADO>>",
    "type": "BANCOLOMBIA_TRANSFER",
    "status": "AVAILABLE",
    "customer_email": "john@email.com"
  },
  "meta": {}
}
Note: If you want to offer your clients the possibility of canceling a subscription from their Bancolombia account, you must complete the following request:
PUT /v1/payment_sources/{{PAYMENT_SOURCE_ID}}/void
When consuming this request, we must ensure that the status returned to us remains VOID for the payment source.
{
  "data": {
    "id": <<PAYMENT_SOURCE_ID>>,
    "public_data": {
      "type": "BANCOLOMBIA_TRANSFER",
      "payment_description": "Prueba",
      "bank_account_type": "CUENTA AHORROS",
      "bank_account_last_four": "***1234"
    },
    "token": "<<ID_DEL_TOKEN_CREADO>>",
    "type": "BANCOLOMBIA_TRANSFER",
    "status": "VOIDED",
    "customer_email": "john@email.com"
  },
  "meta": {}
}
Step 3: Create a transaction
Use your private key to create transactions using payment sources
Keep in mind that, in order to create transactions using a payment source, the transactions creation endpoint requires the use of the private key and must be done from your back-end (server) to keep that key protected.You should never do it from the user's device (browser, mobile device, etc).
An id of a payment source, when available, can be used to charge your customers without their direct intervention for each one of them. This way, you can, for example, charge for a periodical or on-demand service.
For this, you need to use the same transaction endpoint that simple payments use (POST to
/v1/transactions), but this time you will send the information of the payment method directly (object payment_method) with the number of installments, if the payment method represented by the payment source is a card. In either case, you will need to add the payment_source_id you just created, for example:
{
  "amount_in_cents": 4990000, // Amount in cents
  "currency": "COP", // Currency
  "signature": "37c8407747e595535433ef8f6a811d853cd943046624a0ec04662b17bbf33bf5", //Integrity signature
  "customer_email": "example@gmail.com", // User email
  "payment_method": {
    "installments": 2 // Number of installment if the payment source represents a card otherwise ignore the payment_method field altogether.
  },
  "reference": "sJK4489dDjkd390ds02", // Unique payment reference
  "payment_source_id": 3891 // Payment source ID
}
NOTE: If you have doubts about how to generate the integrity signature value, you can review the following documentation: ** Generate an integrity signature**.
Transactions with COF
When the payment method is a MasterCard or VISA franchise card and the payment processor is RBM, Credential On File (COF) can be used to increase the approval rate in the merchant's transactions. To do this, it is necessary to send recurrent, taking into account that paid_source_id becomes a mandatory field.
recurrent must be a boolean value:
- true: Refers to all transactions in which the holder authorizes the storage of their card data and subsequent charges for the same amount to be made periodically. (COF sales transaction with recurrence).
- false: Refers to all transactions in which the holder authorizes the storage of their card data and subsequent charges for different amounts to be made without any type of periodicity. (Stored COF sales transaction).
{
  "amount_in_cents": 4990000, // Amount in cents
  "currency": "COP", // Currency
  "customer_email": "example@gmail.com", // User's email
  "payment_method": {
    "installments": 2 // Number of installments if the payment source represents a card otherwise the payment_method field can be ignored.
  },
  "reference": "sJK4489dDjkd390ds02", // Payment unique reference
  "payment_source_id": 3891, // ID of the source payment (required)
  "recurrent": true // Recurrent
}
- If
recurrentis not send, the transaction will be carried out without COF. - If
recurrentis send in transactions with cards of a franchise other than MasterCard or VISA, the transaction will be carried out without COF. - If
recurrentis send and the commerce-enabled processor is different from RBM, the transaction will be carried out without COF.
Widget in tokenization mode
You can integrate our Widget in tokenization mode so that you can save your users' information more quickly and safely.
With just a few lines of HTML:
<form method="POST" action="/process_token">
  <script
    src="https://checkout.wompi.co/widget.js"
    data-render="button"
    data-widget-operation="tokenize"
    data-public-key="pub_test_X0zDA9xoKdePzhd8a0x9HAez7HgGO2fH"
  ></script>
</form>
With the token inside the response, you must do a POST to /v1/payment_sources from your server and using your private commerce key. Remember never to use the private key in insecure contexts like your HTML code.
