Payment Methods
Important changes on the Public API
When creating transactions and payment sources, and because we keep our users privacy in the top of our priorities, the usage of Acceptance Tokens is now mandatory when creating either of these resources through our API.
Every time you create a transaction using our API, you have the option of processing the payment using different payment methods. Currently, the available payment methods are:
- Credit or Debit Cards: Allows your customers to pay using credit or debit cards.
- Clave: Offer your customers the possibility to use their Key card to complete the payment
To use a payment method you must POST in the /transactions endpoint with:
- Specify the
payment_methodfield with a JSON object containing specific details for each method, described below.
To end the payment process for any of the available payment methods, we recommend periodically verifying (long polling) the state of a transaction, waiting for a final status (approved, denied, voided or error), using the transaction ID and our API, since none of the payment methods deliver an instant synchronous response. A transaction that has just been created always has a PENDING status.
Final statuses for a transaction
The final status of a transaction can be: APPROVED (approved) , DECLINED (declined), VOIDED (anulled, applies to transactions with card only) or ERROR (if there is an external error with a payment method during the transaction).
Credit or Debit Cards
In Wompi, your customers can process payments using a Visa or Mastercard Credit or Debit Card, as long as the card has a CVC (card verification code), usually printed on the back of the card.
The payment method type that you must use to create the transaction is CARD. When using the payment method CARD you need to take into account that:
- You must first tokenize a card (more details below).
- You must ask the end how many installments does he wants to make his payment.
Tokenize a Credit or Debit Card
By default we recommend tokenizing by encrypting the card information. If your use case does not support encryption, select the simple tokenization tab.
- Encrypting the information
- Simple tokenization
The steps to tokenize while encrypting the card information are:
- Get the public key (
GET /v1/tokens/keys/tokenization). - Generate the JWE with RSA-OAEP-256 and CEK AES-GCM-256.
- Send the
payload(the JWE as a string) toPOST /v1/tokens/cards.
To tokenize by encrypting the information, first generate a JWE (JSON Web Encryption) with the card information and send it in the payload field.
The public key required to generate the JWE —which uses the RSA-OAEP algorithm— can be obtained from the following endpoint:
GET /v1/tokens/keys/tokenization
To tokenize a card, send the encrypted card information to the following endpoint.
POST /v1/tokens/cards
Use your merchant public key in the authorization header.
As "Authorization": "Bearer [merchant's public key]"
The JWE must be sent in the payload field as a base64 string and for the JWE CEK (Content Encryption Key) you must use AES GCM 256. Assuming a function encrypt_jwe, which generates the JWE from the card information, the public key, and the algorithm to use in the CEK, you must send the following information to the endpoint:
{
  "payload": encrypt_jwe(
    {
      "number": "4242424242424242", // Card number
      "cvc": "123", // Card security code (3 or 4 digits depending on the brand)
      "exp_month": "08", // Expiration month (2-digit string)
      "exp_year": "28", // Year expressed as 2 digits
      "card_holder": "Jose Perez" // Cardholder name
    },
    ENCRYPTION_PUBLIC_KEY,
    "RSA-OAEP-256"
  )
}
The successful v1/tokens/cards response looks like this:
{
  "status": "CREATED",
  "data": {
    "id": "tok_prod_1_BBb749EAB32e97a2D058Dd538a608301", // TOKEN that must be used to create the transaction
    "created_at": "2020-01-02T18:52:35.850+00:00",
    "brand": "VISA",
    "name": "VISA-4242",
    "last_four": "4242",
    "bin": "424242",
    "exp_year": "28",
    "exp_month": "08",
    "card_holder": "Jose Perez",
    "expires_at": "2020-06-30T18:52:35.000Z"
  }
}
Examples in different languages:
For Panama use https://api.wompi.pa/v1 as BASE_URL in the examples.
- JavaScript (Node)
- Python
- Java
- Php
import { pathToFileURL } from 'url'
import { importSPKI, EncryptJWT } from 'jose'

const BASE_URL = '<BASE_URL>'
const WOMPI_PUBLIC_KEY = '...'

const cardInfo = {
  number: '4242424242424242',
  exp_month: '04',
  exp_year: '30',
  cvc: '123',
  card_holder: 'test test',
}

let cachedPublicKey

async function getPublicKey() {
  if (cachedPublicKey) return cachedPublicKey

  const response = await fetch(`${BASE_URL}/tokens/keys/tokenization`, {
    headers: {
      Authorization: `Bearer ${WOMPI_PUBLIC_KEY}`,
      'Content-Type': 'application/json',
    },
  })

  if (!response.ok) {
    const body = await response.text()
    throw new Error(`Unable to fetch public key. Status ${response.status}: ${body}`)
  }

  const body = await response.json()
  const publicKeyPem = body?.data?.publicKey
  if (!publicKeyPem) throw new Error('Public key missing in response')

  cachedPublicKey = publicKeyPem
  return cachedPublicKey
}

async function tokenizeCard(payload) {
  const response = await fetch(`${BASE_URL}/tokens/cards`, {
    method: 'POST',
    headers: {
      Authorization: `Bearer ${WOMPI_PUBLIC_KEY}`,
      'Content-Type': 'application/json',
    },
    body: JSON.stringify(payload),
  })

  const body = await response.json()
  if (!response.ok) {
    throw new Error(
      `Tokenization failed - Status ${response.status}: ${JSON.stringify(body)}`
    )
  }

  return body
}

export async function encryptCardInfo(cardInfo, pubKey) {
  const secret = await importSPKI(pubKey, 'RSA-OAEP-256')
  const encryptedData = await new EncryptJWT(cardInfo)
    .setProtectedHeader({ alg: 'RSA-OAEP-256', enc: 'A256GCM' })
    .encrypt(secret)

  return encryptedData
}

const main = async () => {
  try {
    const publicKey = await getPublicKey()
    const encrypted = await encryptCardInfo(cardInfo, publicKey)
    console.log("encypted:", encrypted)
    const tokenizationResponnse = await tokenizeCard({ payload: encrypted })
    console.log(tokenizationResponnse)
    return tokenizationResponnse
  } catch (error) {
    console.error('Tokenization failed:', error)
    process.exitCode = 1
  }
}

if (import.meta.url === pathToFileURL(process.argv[1]).href) {
  main()
}
import json

import requests
from jwcrypto import jwk, jwe

BASE_URL = "<BASE_URL>"
WOMPI_PUBLIC_KEY = "......"

CARD_INFO = {
    "number": "4242424242424242",
    "exp_month": "04",
    "exp_year": "30",
    "cvc": "123",
    "card_holder": "test test",
}

PUBLIC_KEY_CACHE: bytes | None = None


def get_public_key() -> bytes:
    global PUBLIC_KEY_CACHE
    if PUBLIC_KEY_CACHE:
        return PUBLIC_KEY_CACHE

    response = requests.get(
        f"{BASE_URL}/tokens/keys/tokenization",
        headers={"Authorization": f"Bearer {WOMPI_PUBLIC_KEY}"},
    )
    response.raise_for_status()
    payload = response.json()

    public_key = payload.get("data", {}).get("publicKey")
    if not public_key:
        raise RuntimeError("Unable to fetch public key")

    PUBLIC_KEY_CACHE = public_key.encode("utf-8")
    return PUBLIC_KEY_CACHE


def encrypt(payload: dict, key: bytes | str) -> str:
    pem_key = key.encode("utf-8") if isinstance(key, str) else key
    public_jwk = jwk.JWK.from_pem(pem_key)
    protected_header = {"alg": "RSA-OAEP-256", "enc": "A256GCM"}

    jwe_token = jwe.JWE(json.dumps(payload).encode("utf-8"), protected=protected_header)
    jwe_token.add_recipient(public_jwk)
    return jwe_token.serialize(compact=True)


def tokenize(card_payload: dict) -> dict:
    response = requests.post(
        f"{BASE_URL}/tokens/cards",
        data=json.dumps(card_payload),
        headers={"Authorization": f"Bearer {WOMPI_PUBLIC_KEY}"},
    )
    response.raise_for_status()
    return response.json()


if __name__ == "__main__":
    encrypted_card = encrypt(CARD_INFO, get_public_key())
    print("JWE:", encrypted_card)
    token = tokenize({"payload": encrypted_card})
    print("Token:", token)
package com.wompi.cardtokenization;

// nimbus-jose-jwt
// bcpkix-jdk18on
// jackson-databind

import com.fasterxml.jackson.databind.JsonNode;
import com.fasterxml.jackson.databind.ObjectMapper;
import com.nimbusds.jose.EncryptionMethod;
import com.nimbusds.jose.JWEAlgorithm;
import com.nimbusds.jose.JWEHeader;
import com.nimbusds.jose.Payload;
import com.nimbusds.jose.crypto.RSAEncrypter;
import com.nimbusds.jose.jwk.JWK;
import com.nimbusds.jose.jwk.RSAKey;

import java.net.URI;
import java.net.http.HttpClient;
import java.net.http.HttpRequest;
import java.net.http.HttpResponse;
import java.nio.charset.StandardCharsets;
import java.time.Duration;
import java.util.LinkedHashMap;
import java.util.Map;
import java.util.concurrent.ConcurrentHashMap;

public class WompiCardTokenization {

    private static final String BASE_URL = "<BASE_URL>";
    private static final String WOMPI_PUBLIC_KEY = "...";

    private static final ObjectMapper MAPPER = new ObjectMapper();
    private static final HttpClient HTTP = HttpClient.newBuilder()
        .connectTimeout(Duration.ofSeconds(10))
        .build();
    private static String PUBLIC_KEY_CACHE;

    public static void main(String[] args) throws Exception {
        Map<String, String> cardInfo = new LinkedHashMap<>() {{
            put("number", "4242424242424242");
            put("exp_month", "04");
            put("exp_year", "30");
            put("cvc", "123");
            put("card_holder", "test test");
        }};

        String publicKeyPem = getPublicKey(BASE_URL);
        String encryptedCard = encrypt(cardInfo, publicKeyPem);
        System.out.println("JWE: " + encryptedCard);

        JsonNode tokenResponse = tokenize(encryptedCard, BASE_URL, WOMPI_PUBLIC_KEY);
        System.out.println("Token: " + tokenResponse.toPrettyString());
    }

    private static String getPublicKey(String baseUrl) throws Exception {
        if (PUBLIC_KEY_CACHE != null) {
            return PUBLIC_KEY_CACHE;
        }

        HttpRequest request = HttpRequest.newBuilder()
            .uri(URI.create(baseUrl + "/tokens/keys/tokenization"))
            .GET()
            .header("Accept", "application/json")
            .header("Authorization", "Bearer " + WOMPI_PUBLIC_KEY)
            .timeout(Duration.ofSeconds(15))
            .build();

        HttpResponse<String> response = HTTP.send(request, HttpResponse.BodyHandlers.ofString(StandardCharsets.UTF_8));
        JsonNode json = MAPPER.readTree(response.body());

        JsonNode publicKeyNode = json.path("data").path("publicKey");
        if (publicKeyNode.isMissingNode() || publicKeyNode.isNull()) {
            throw new IllegalStateException("Unable to retrieve public key: " + response.body());
        }

        String pemRaw = publicKeyNode.asText();
        String pem = normalizePem(pemRaw);

        PUBLIC_KEY_CACHE = pem;
        return pem;
    }

    private static String encrypt(Map<String, String> payload, String pemKey) throws Exception {
        try {
            JWK jwk = JWK.parseFromPEMEncodedObjects(pemKey);
            RSAKey rsaKey = jwk.toRSAKey();
            JWEHeader header = new JWEHeader.Builder(JWEAlgorithm.RSA_OAEP_256, EncryptionMethod.A256GCM)
                .contentType("application/json")
                .build();

            Payload jwePayload = new Payload(MAPPER.writeValueAsString(payload));
            var jweObject = new com.nimbusds.jose.JWEObject(header, jwePayload);
            jweObject.encrypt(new RSAEncrypter(rsaKey));
            return jweObject.serialize();
        } catch (Exception e) {
            String preview = pemKey == null ? "null" : pemKey.substring(0, Math.min(120, pemKey.length()));
            throw new IllegalStateException("Failed to parse public key. Starts with: " + preview, e);
        }
    }

    private static String normalizePem(String raw) {
        if (raw == null || raw.isBlank()) {
            return raw;
        }

        String cleaned = raw
            .replace("\\n", "\n")
            .replace("\r", "")
            .trim();

        String base64 = cleaned
            .replace("-----BEGIN PUBLIC KEY-----", "")
            .replace("-----END PUBLIC KEY-----", "")
            .replaceAll("\\s+", "");

        return "-----BEGIN PUBLIC KEY-----\n" + base64 + "\n-----END PUBLIC KEY-----";
    }

    private static JsonNode tokenize(String encryptedPayload, String baseUrl, String wompiPublicKey) throws Exception {
        Map<String, String> body = Map.of("payload", encryptedPayload);
        String requestBody = MAPPER.writeValueAsString(body);

        HttpRequest request = HttpRequest.newBuilder()
            .uri(URI.create(baseUrl + "/tokens/cards"))
            .header("Accept", "application/json")
            .header("Content-Type", "application/json")
            .header("Authorization", "Bearer " + wompiPublicKey)
            .timeout(Duration.ofSeconds(30))
            .POST(HttpRequest.BodyPublishers.ofString(requestBody, StandardCharsets.UTF_8))
            .build();

        HttpResponse<String> response = HTTP.send(request, HttpResponse.BodyHandlers.ofString(StandardCharsets.UTF_8));
        return MAPPER.readTree(response.body());
    }
}
<?php

declare(strict_types=1);

require __DIR__ . '/vendor/autoload.php';
//  "require": {
//    "web-token/jwt-encryption": "^3.4",
//    "web-token/jwt-key-mgmt": "^3.4",
//    "ext-json": "*",
//    "ext-openssl": "*"
//  }

use Jose\Component\Core\AlgorithmManager;
use Jose\Component\Core\JWK;
use Jose\Component\Encryption\Algorithm\ContentEncryption\A256GCM;
use Jose\Component\Encryption\Algorithm\KeyEncryption\RSAOAEP256;
use Jose\Component\Encryption\Compression\CompressionMethodManager;
use Jose\Component\Encryption\JWEBuilder;
use Jose\Component\Encryption\Serializer\CompactSerializer;
use Jose\Component\KeyManagement\JWKFactory;

const BASE_URL = '<BASE_URL>';
const WOMPI_PUBLIC_KEY = '...';

$cardInfo = [
    'number' => '4242424242424242',
    'exp_month' => '04',
    'exp_year' => '30',
    'cvc' => '123',
    'card_holder' => 'test test',
];

$publicKeyCache = null;

function getPublicKey(): string
{
    global $publicKeyCache;

    if ($publicKeyCache !== null) {
        return $publicKeyCache;
    }

    $ch = curl_init(BASE_URL . '/tokens/keys/tokenization');
    curl_setopt_array($ch, [
        CURLOPT_HTTPGET => true,
        CURLOPT_RETURNTRANSFER => true,
        CURLOPT_HTTPHEADER => [
            'Authorization: Bearer ' . WOMPI_PUBLIC_KEY,
        ],
    ]);
    $response = curl_exec($ch);
    $status = curl_getinfo($ch, CURLINFO_HTTP_CODE);
    if ($response === false || $status < 200 || $status >= 300) {
        throw new RuntimeException('Unable to fetch public key, status: ' . $status);
    }

    $decoded = json_decode($response, true);
    $pem = $decoded['data']['publicKey'] ?? null;
    if (!$pem) {
        throw new RuntimeException('Public key missing in response');
    }

    $pem = normalizePem($pem);

    $publicKeyCache = $pem;
    return $publicKeyCache;
}

function tokenize(string $encryptedPayload): array
{
    $body = json_encode(['payload' => $encryptedPayload], JSON_THROW_ON_ERROR);

    $ch = curl_init(BASE_URL . '/tokens/cards');
    curl_setopt_array($ch, [
        CURLOPT_POST => true,
        CURLOPT_RETURNTRANSFER => true,
        CURLOPT_HTTPHEADER => [
            'Authorization: Bearer ' . WOMPI_PUBLIC_KEY,
            'Content-Type: application/json',
        ],
        CURLOPT_POSTFIELDS => $body,
    ]);

    $response = curl_exec($ch);
    $status = curl_getinfo($ch, CURLINFO_HTTP_CODE);

    if ($response === false) {
        throw new RuntimeException('Tokenization request failed to execute');
    }

    $decoded = json_decode($response, true);
    if ($status < 200 || $status >= 300) {
        throw new RuntimeException('Tokenization failed with status ' . $status . ': ' . $response);
    }

    return $decoded;
}

function normalizePem(string $raw): string
{
    $cleaned = str_replace(["\r", '\\n'], ['', "\n"], trim($raw));
    $base64 = preg_replace(
        '/\s+/',
        '',
        str_replace(['-----BEGIN PUBLIC KEY-----', '-----END PUBLIC KEY-----'], '', $cleaned)
    );

    return "-----BEGIN PUBLIC KEY-----\n" . $base64 . "\n-----END PUBLIC KEY-----";
}

function encrypt(array $payload, string $pemKey): string
{
    $keyEncryption = new AlgorithmManager([new RSAOAEP256()]);
    $contentEncryption = new AlgorithmManager([new A256GCM()]);
    $compressionManager = new CompressionMethodManager([]); // no compression

    $jwk = JWKFactory::createFromKey($pemKey, null, ['use' => 'enc']);

    $jweBuilder = new JWEBuilder($keyEncryption, $contentEncryption, $compressionManager);
    $jwe = $jweBuilder
        ->create()
        ->withPayload(json_encode($payload, JSON_THROW_ON_ERROR))
        ->withSharedProtectedHeader([
            'alg' => 'RSA-OAEP-256',
            'enc' => 'A256GCM',
        ])
        ->addRecipient($jwk)
        ->build();

    $serializer = new CompactSerializer();
    return $serializer->serialize($jwe, 0);
}


function main(array $cardInfo): array
{
    $publicKey = getPublicKey();
    $encrypted = encrypt($cardInfo, $publicKey);
    echo "JWE: {$encrypted}\n";
    $token = tokenize($encrypted);
    echo "Token: " . json_encode($token, JSON_PRETTY_PRINT) . "\n";
    return $token;
}

main($cardInfo);
Use this option only if you cannot encrypt the information. It is equivalent to the encrypted flow, but here you send the card fields in plain text in the body instead of an encrypted payload.
To tokenize a card, use the following endpoint:
POST /v1/tokens/cards
Use your merchant public key in the authentication header.
Send the card information to this endpoint:
{
  "number": "4242424242424242", // Card number
  "cvc": "123", // Card verification code (3 or 4 digits depending on the brand)
  "exp_month": "08", // Expiration month (2-digit string)
  "exp_year": "28", // Year expressed as 2 digits
  "card_holder": "Jose Perez" // Cardholder name
}
The endpoint will respond:
{
  "status": "CREATED",
  "data": {
    "id": "tok_prod_1_BBb749EAB32e97a2D058Dd538a608301", // TOKEN that must be used to create the transaction
    "created_at": "2020-01-02T18:52:35.850+00:00",
    "brand": "VISA",
    "name": "VISA-4242",
    "last_four": "4242",
    "bin": "424242",
    "exp_year": "28",
    "exp_month": "08",
    "card_holder": "Jose Perez",
    "expires_at": "2020-06-30T18:52:35.000Z"
  }
}
From this response, the value of the "id" field is the token you must use within the payment method (in this case "tok_prod_1_BBb749EAB32e97a2D058Dd538a608301") to later create a transaction.
If you need to create multiple transactions for the same card, use the Payment Sources feature.
Create the Transaction
After obtaining the token details and having asked the user the number of ("installments"). The payment method fields for a new transaction with a card should be similar to the following:
{
  "payment_method": {
    "type": "CARD",
    "installments": 1, // Number of installments
    "token": "tok_prod_e6S2sAz383mdCQ38dj32z" // Card token
  }
  // Other transaction fields...
}
Lastly, remember to periodically check the state of the transacion in Wompi from your system, using the transaction ID and our API endpoint GET /v1/transactions/:id.
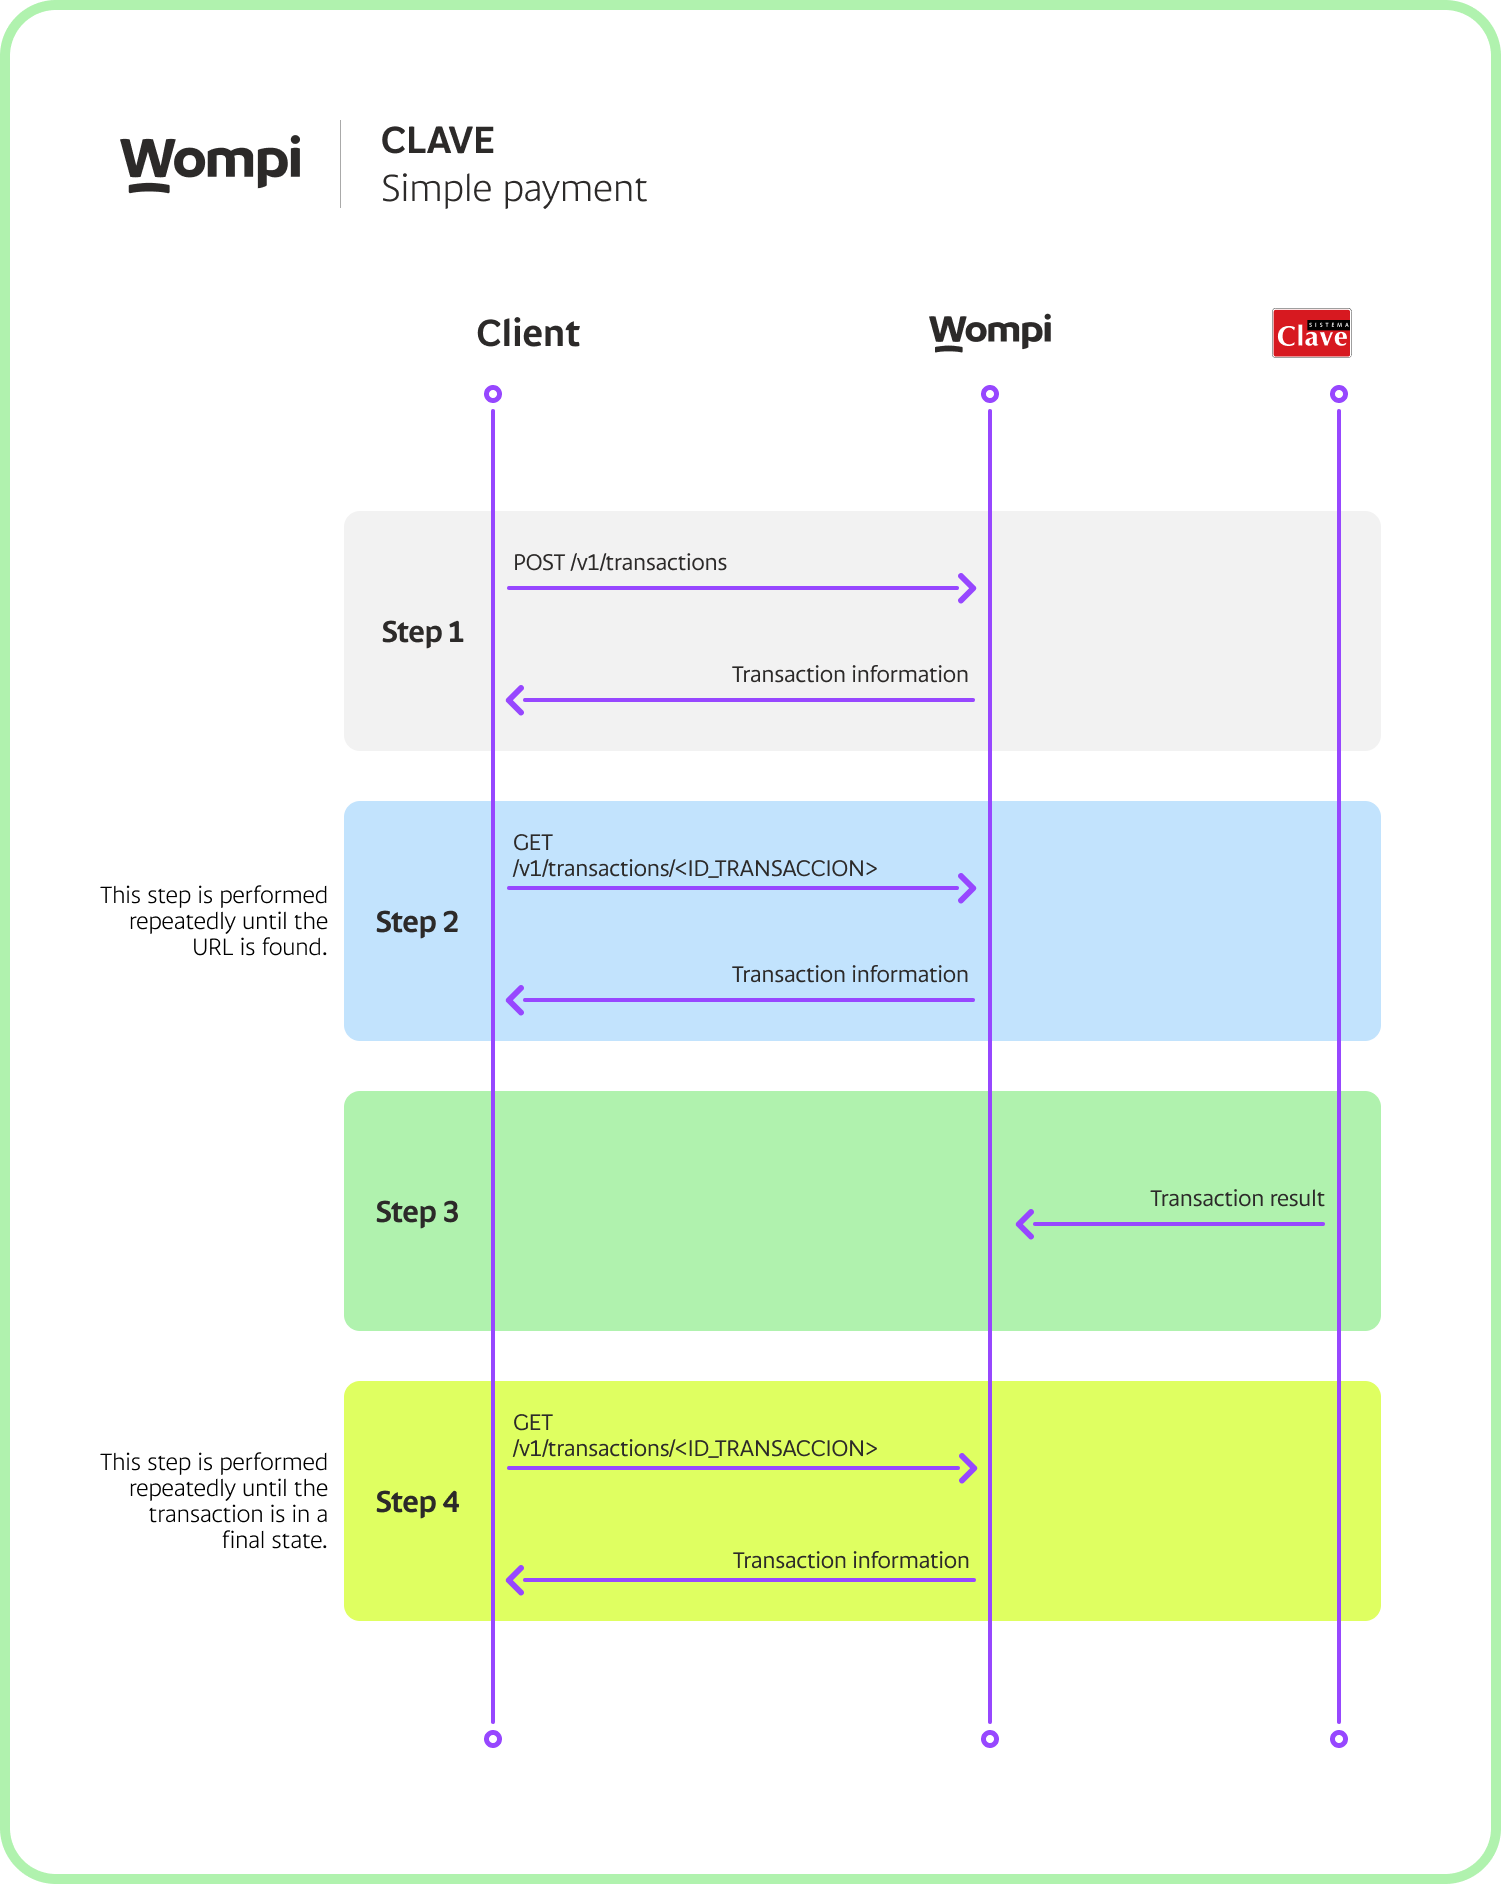
Clave
We will guide you through the process of using the Clave payment method in our API. Clave is a card system belonging to the company Telered in Panama, offering your customers a secure way to process payments on your platform.
Create transaction
To get started with the Clave payment method, you need to create a new transaction using the endpoint POST /v1/transactions. Make sure to include the following specific fields for the Clave payment method:
{
  "payment_method": {
    "type": "CLAVE"
  },
  // Other transaction fields...
  "amount_in_cents": 2000,
  "currency": "USD",
  "customer_email": "{{EMAIL}}",
  "reference": "{{REFERENCE}}",
  "acceptance_token" : "{{ACCEPTANCE_TOKEN}}"
}
Check transaction
After creating the transaction, it's essential to periodically check for changes in the transaction using the Wompi API and the transaction ID. You can do this by using the endpoint GET /v1/transactions/<TRANSACTION_ID>.
Once you receive the response, you should validate the data->payment_method->extra->clave_auth->url field. This URL should be loaded into an <iframe> element within your payment page. Here, your customers will interact with the Clave system to continue the transaction process. Upon successfully completing the process, the data->status field will change to APPROVED, DECLINED, or ERROR, depending on the outcome.
Below is an example of the response structure:
{
    "data": {
        "id": "1156-1689191638-98479",
        "created_at": "2023-07-12T19:53:58.190Z",
        "amount_in_cents": 1000,
        "reference": "refence_test1",
        "currency": "USD",
        "payment_method_type": "CLAVE",
        "payment_method": {
            "type": "CLAVE",
            "extra": {
                "clave_auth": {
                    "url": "URL_TEST",
                    "session_id": "12345",
                    "client_session_id": "12345"
                }
            }
        },
        "redirect_url": null,
        "status": "PENDING",
        "status_message": null,
        "merchant": {
            "name": "Comercio De Prueba",
            "legal_name": "Comercio De Prueba",
            "contact_name": "Pepito Perez",
            "phone_number": "+507123456789",
            "logo_url": null,
            "legal_id_type": "RUC",
            "email": "test@wompi.com",
            "legal_id": "123456789-1"
        },
        "taxes": []
    },
    "meta": {}
}