3DSecure Transactions (Sandbox)
IMPORTANT: This version is deprecated we recommend migrating to the new version of transactions with 3D secure.
Introduction
In this guide, you will learn how to perform a transaction using the 3D Secure protocol. 3D Secure is an authentication system that adds an extra layer of security to online transactions. Through this protocol, card issuers and acquirers can authenticate the cardholder before processing the transaction.
Helping to protect your business and your money is one of our priorities. For this reason, we want to provide you with some security recommendations here.
Workflow
The process of a 3D Secure transaction with Wompi generally follows these steps:
- Transaction Initiation: Your customer selects products or services and proceeds to the payment process on your platform.
- Redirection to the Authentication Page: After entering card details, your customer is automatically redirected to the card issuer’s authentication page.
- Cardholder Authentication: The card issuer will prompt the cardholder to enter a password or a unique verification code. This could be a password, OTP (One-Time Password), or fingerprint, depending on the implemented authentication method.
- Transaction Authorization: Once the cardholder has been successfully authenticated, the card issuer generates a successful authentication message and sends it to the acquirer.
- Transaction Processing: The acquirer receives the successful authentication message and proceeds to authorize the transaction. It checks if there are enough funds in the cardholder’s account and if the transaction complies with the card limits and fraud rules.
- Transaction Confirmation: Once the transaction has been successfully processed and authorized, a confirmation will be displayed to your customer indicating that the transaction has been completed.
Note:
- The 3DS protocol is available for transactions with Mastercard and Visa franchises.
- Depending on the model (Gateway or Aggregator) of your business, the availability of the 3DS protocol by franchise may vary. We recommend contacting our support channels to resolve your questions.
General information on 3D Secure for your business here and for your customer here.

Implementing 3D Secure on Your Platform
Requirements
Before you begin your deployment, make sure you have the following requirements:
- Authentication keys: In this section, we will only use the public key, which we will send as a
Bearer tokenin theheadersof the requests. - Test data.
- Execution environment URLs (Sandbox).

Step 1. Get a pre-signed acceptance token.
Step 2. Tokenize your payment method (Card).
Step 3. Create the transaction:
To activate the 3D Secure protocol, you must send the parameters is_three_ds as true and three_ds_auth_type with one of the following values:
- challenge: Indicates that you'll need to render an
IFRAMEand select the option with the transaction's final status (APPROVED, DECLINED o ERROR). - no_challenge: Indicates that the 3D Secure authentication will be executed but we won't need to render anything extra to the customer, the transaction will be APPROVED.
- error: Indicates that the authentication will result in ERROR, consequently the transaction status will also be error.
With this in mind, to create a transaction, we must make a POST /transactions request, with the following JSON body:
{
  "acceptance_token": "acceptance_token", // Generated in step 1
  "amount_in_cents": 1000000,
  "currency": "COP",
  "customer_email": "pepito_perez@example.com",
  "reference": "AHJDFDSFK184", // Unique value to identify the transaction
  "payment_method": {
    "type": "CARD",
    "token": "token" // Generated in step 2
  },
  //Needed fields for 3DSecure
  "is_three_ds": true,
  "three_ds_auth_type": "challenge" //challenge | no_challenge | error
}
Important: To be able to use third-party authorization servers, prior authorization must be requested.
We will get back the following JSON:
{
  "data": {
    "id": "11854-1728506262-27959",
    "created_at": "2024-10-09T20:37:43.075Z",
    "finalized_at": null,
    "amount_in_cents": 1000000,
    "reference": "AHJDFDSFK184",
    "customer_email": "pepito_perez@example.com",
    "currency": "COP",
    "payment_method_type": "CARD",
    "payment_method": {
      "type": "CARD",
      "extra": {
        "bin": "400000",
        "name": "MASTERCARD-0002",
        "brand": "MASTERCARD",
        "exp_year": "29",
        "exp_month": "06",
        "last_four": "0002",
        "card_holder": "Pedro Pérez",
        "is_three_ds": true
      },
      "installments": 1
    },
    "status": "PENDING",
    "status_message": null,
    "billing_data": null,
    "shipping_address": null,
    "redirect_url": null,
    "payment_source_id": null,
    "payment_link_id": null,
    "customer_data": null,
    "bill_id": null,
    "taxes": []
  }
}
Step 4. Make periodic queries of the transaction to verify the status and ensure its correct execution.
Note: These requests must be performed repeatedly because within the integration it is necessary to render the IFRAME for each process (BROWSER_INFO, FINGERPRINT, CHALLENGE), as detailed in the following step.
Step 5. Render IFRAME to continue the authentication process:
We will observe that in the transaction, the payment_method key contains relevant additional information. Specifically, we will focus on the three_ds_method_data key, which includes an HTML code snippet. This is an IFRAME block that should be integrated and displayed on the page to securely carry out the card authentication process. Additionally, we will also find the current_step key, which indicates the current state of authentication and may refer to the specific type of authentication required to verify the cardholder's identity. Here is how these elements appear in the transaction response:
{
  "data": {
    "id": "11854-1728506262-27959",
    "created_at": "2024-10-09T20:37:43.075Z",
    "amount_in_cents": 1000000,
    "reference": "AHJDFDSFK184",
    "currency": "COP",
    "payment_method_type": "CARD",
    "payment_method": {
      "type": "CARD",
      "extra": {
        "name": "MASTERCARD-0002",
        "brand": "MASTERCARD",
        "card_type": "DEBIT",
        "last_four": "0002",
        "three_ds_auth": {
          "current_step": "BROWSER_INFO", // It refers to the process that is currently running: (BROWSER_INFO - FINGERPRINT - CHALLENGE)
          "current_step_status": "PENDING",
          "three_ds_method_data": "<iframe>...</iframe><form>...</form>" // HTML to be rendered for card authentication
        }
      },
      "installments": 1
    },
    "redirect_url": null,
    "status": "PENDING",
    "status_message": null,
    "merchant": {
      "name": "Pruebas SandBox",
      "legal_name": "Pruebas SandBox",
      "contact_name": "Pepito Perez",
      "phone_number": "+50732345634",
      "logo_url": null,
      "legal_id_type": "CC",
      "email": "pepito@prueba.com",
      "legal_id": "1036000000"
    },
    "taxes": []
  }
}
Step 6. Don't forget to perform periodic queries of the transaction until it reaches a final status.
This is how an approved transaction looks like.
{
  "data": {
    "id": "11854-1728506262-27959",
    "created_at": "2024-10-09T20:37:43.075Z",
    "amount_in_cents": 1000000,
    "reference": "AHJDFDSFK184",
    "currency": "COP",
    "payment_method_type": "CARD",
    "payment_method": {
      "type": "CARD",
      "extra": {
        "name": "MASTERCARD-0002",
        "brand": "MASTERCARD",
        "card_type": "DEBIT",
        "last_four": "0002",
        "is_three_ds": true,
        "three_ds_auth": {
          "current_step": "AUTHENTICATION",
          "current_step_status": "COMPLETED"
        },
        "external_identifier": "aaydSncOcB",
        "processor_response_code": "00"
      },
      "installments": 1
    },
    "redirect_url": null,
    "status": "APPROVED", // Final transaction status
    "status_message": null,
    "merchant": {
      "name": "Pruebas SandBox",
      "legal_name": "Pruebas SandBox",
      "contact_name": "Pepito Perez",
      "phone_number": "+50732345634",
      "logo_url": null,
      "legal_id_type": "CC",
      "email": "prueba@test.com",
      "legal_id": "1036000000"
    },
    "taxes": []
  }
}
3D Secure through your checkout (Sandbox)
Through your sandbox (or test) checkout, you can experience simulated 3D Secure authentication scenarios. To do this, you need to follow these steps:
Step 1. Log into your dashboard as a business.
Step 2. Go to the left sidebar and select the "Development" option.
Step 3. Select the "Developers" option.
Step 4. Go to the top right corner and locate the "Test Mode" section, then click the "Activate test mode" button.
Note: Once you select this option, a red message should appear at the top indicating that you are in Sandbox mode. Remember to return to this section to switch back to production mode once you decide to end the tests.
Step 5. Go to the Receive payments section and select Generic payment link.
Step 6. Click the "Copy to clipboard" button (or click on the link to open it on a new tab) and paste it into a new window.
Step 7. Once the payment link is open, confirm that the message Test Mode is displayed at the top. If it is, continue with the following steps. If not, repeat the process to activate test mode on your business account.

Step 8. Complete the required fields and select the payment method "Credit or debit card".
Step 9. Enter the card number using one of the test cards provided at the start of this section. Remember that each card will give a different response as indicated.
Step 10. Fill in the expiration date and CVC with generic data (e.g.: 03/27 and 123).
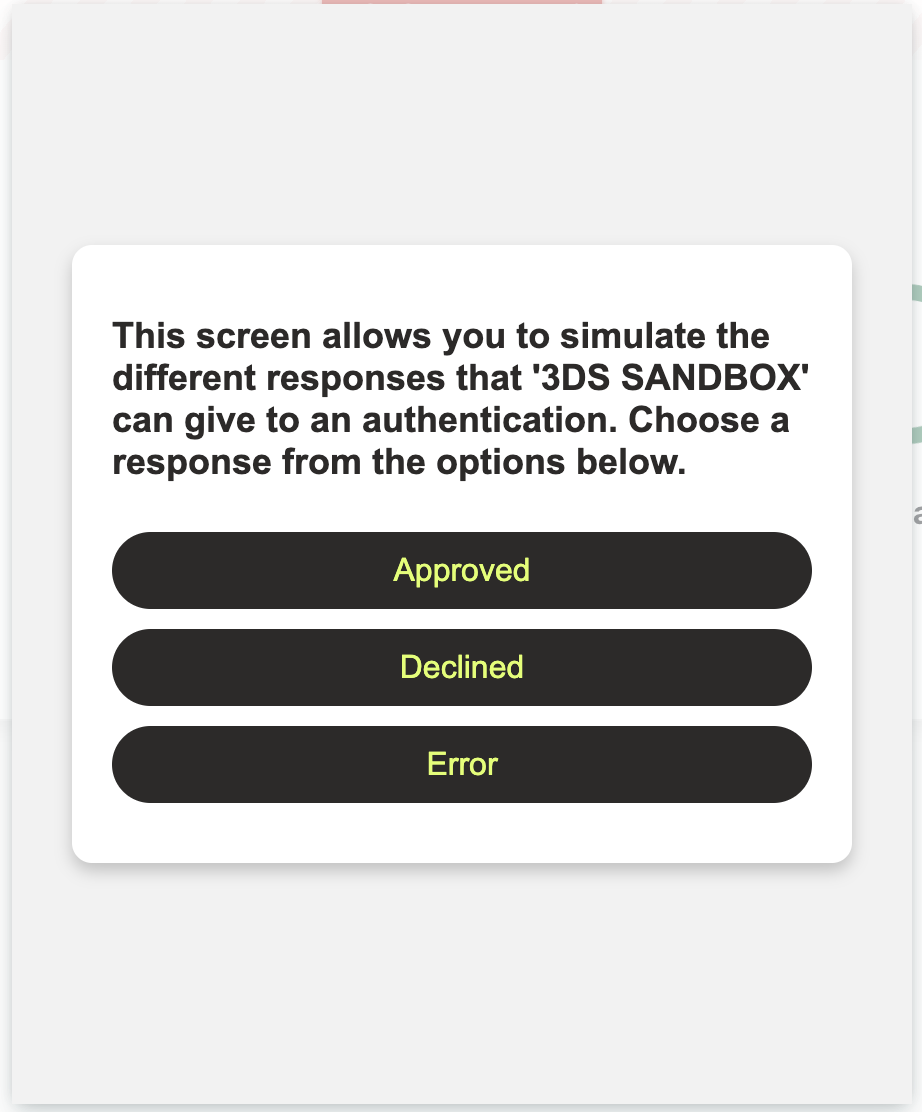
Step 11. If the card requires 3D Secure authentication, you will be asked to select one of the following options:
Note: If you select Approved, the transaction will be approved; if you select Declined, the transaction will be declined and; if you select Error, the transaction will enter an error state.
Step 12. Once you've selected an option, a message will be displayed with the transaction result according to the option you chose.

Note: Keep in mind for REAL transactions the "challenge" request in the payment process is decided by the card's issuer.
